
Brushes 301: Lesson 2
Spiral Staircases

1) Select the caulk * texture from
textures/common menu and draw out a square brush with the following
dimensions: length = 320, width = 320, height = 160 units (obviously this
can be altered accordingly).
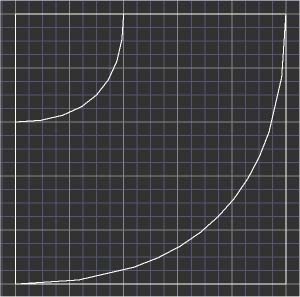
2) Now create 2 bevels ** within your original brush. These will represent
the size of your steps. It should look like the illustration below.
3) With the main brush selected, turn clip mode on (press X) and start clipping *** the brush into segments as shown below. (Make sure you're clipping at every 32 units). Keep going until you're all the way round.
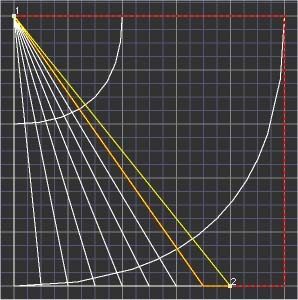
4) Turn your grid down to 1 (by pressing 1) and clip off the edges using the bevels as guide lines. You won't be able to follow the bevels exactly but that doesn't matter, just make sure each step meets flush round the bends. You may need to even turn the grid down to 0.5 to perfect the edges (grid up and down using "[" and "]" keys).
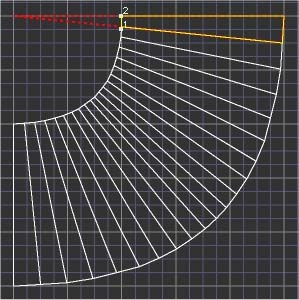
5) Delete the bevels.
6) Resize the height of your brushes to 8 units each to make the steps.
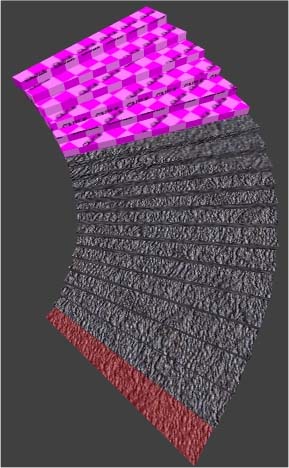
7) Now we will texture the faces of the brushes that will be visible in
game. Select a face on the bottom brush by holding down Ctrl + shift and
clicking on the desired face in the 3d view port, now click on a texture
from the texture window to apply it. If it is not aligned properly press S
for the surface inspector, then alter it accordingly. Making sure the last
face you textured is selected, hold down Ctrl and Shift, then MIDDLE click
**** on all the other faces you want to texture. This method tells Radiant
to apply the selected texture, AND alignment properties.
8 ) Now to detail ***** the stair case. This
is as simple as selecting all the brushes, then pressing Ctrl + M. If you
want to make sure it worked, press Ctrl and D to cycle Structural mode.
9) Fianly select all the steps, make a copy (press space bar) then rotate
(using the Z-axis rotate button ******) and lift the new selection so they
continue on from the first set. Repeat process until satisfied!
---END---
* The reason we use the caulk texture on
unseen faces is because the Quake 3 engine doesn't render them, thus
increasing performance.
** To create a bevel first draw out a brush and then (making sure it's
selected) go to the curve menu and select bevel.
*** To clip a brush select it, turn clip mode on (press X) then click at the
2 points you wish the break to appear at, a line should appear. At this
point, pressing enter will cause the red section to be deleted. To switch
which section is deleted hold down Ctrl then press Enter. To split the brush
without deleting either section hold shift then press enter.
**** Middle click on my mouse is achieved by pressing my mouse wheel in. You
need to make sure "3 button" mouse is enabled in the preferences.
***** There are two types of brush; structural and detail. Structural
brushes block visibility (within the Q3 engine) and detail brushes do not.
I'm not going to explain all about them here as there is a lot to say, but
at least one practical up-shot of detailing this stair case is that the
compile time will be decreased!
****** You will find the Z-axis rotate button on the tool bar just to the
right of the save button.
NOTES: If you plan to enclose either or both sides of the stairs (for
example putting them in a round tower) then you would be wise to ignore
stage 4 of this tutorial for more efficiency and to save you time.
-Myth