
Brushes 201: Lesson 7
Switches (trigger_multiple, func_usable)
Now, auto-triggering doors are fun and all, but what if you wanted it to be triggered by a switch? Unfortunately, this is one of the most complicated "basic skills," but I will try to make it as understandable as possible.
First of all, make the switch itself. To do this, I simply cut a hole in my doorframe and stuck a button in it! In this case, I used doomgiver/elevatorcall.

Next, you need a way to trigger the door. Many people have the impression this has something to do with the switch itself. This is entirely untrue. What you are actually going to do is make a trigger brush in front of your switch that activates when the player is facing a certain direction while standing it and hits their use key.
Thus, create a good-sized box in front of the switch, cover it in system/trigger, and convert it into a trigger_multiple. You will also notice a trigger_once. The difference between these is that once a trigger_once is used, it can never be used again. For a door, we want to be able to use it multiple times.
Next, target the trigger at the left door (CTRL+K). It will assign the key target to the trigger and the key targetname to the door (target targets a targetname). Repeat this process for the right door.
Next, you want the trigger brush only to trigger when facing the switch. Thus, open up the entity properties for the trigger and set it's angle to aim directly at the wall. Also check the FACING button.
Because you want it specifically to be when the player hits their use key, check the USE_BUTTON flag.
Finally, add the key wait and a value of 2 to the trigger. The reason for this isn't too obvious, but I will explain. If you do not add a wait key, the trigger will autofire for as long as the player holds the use button down. This means that the door will open and close over and over again extremely rapidly. By setting a value for the wait key, you prevent this from happening. You can experiment with this number to determine what it should be for your own door.
Since we don't want the switch itself to be silent, add the key noise with the value of an appropriate sound. A good choice here would be sound/movers/switches/button_01.mp3.
Thus, you should have something like this:
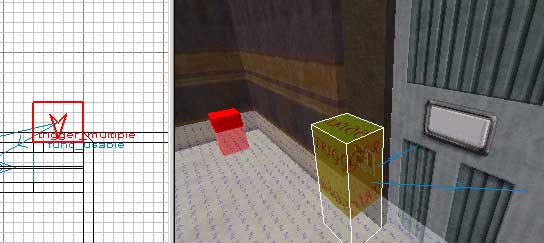
With FACING, PLAYERONLY, and USE_BUTTON checked, along with the keys noise and wait and values for each. Compile, and your door should open with your switch.
Now we have the door functioning buy a switch. In short, we did this by:
-
Creating a physical switch
-
Creating a trigger_multiple
-
Targeting the trigger_multiple at the doors
-
Setting the trigger's properties appropriately
But what about that switch on the wall? Shouldn't it switch to "on" when the door is active? It should! But this is also where this gets a bit more complicated.
This is where the func_usable comes in. The func_usable itself isn't that difficult of a concept. You have two brushes overlapping each other, each a func_usable. One is set to "off" and one is set to "on." When the entity is "off," it can't be seen. When the entity is "on," it can be seen. Thus, when the door is active, we want the "on" switch turned on and the "off" switch turned off. When the door is not active, we want the "on" switch turned off and the "off" switch turned on!
If you didn't understand that, take a deep breath and keep reading it over and over again until you do. (:
Now make two brushes that will be the "on" and "off" states for the elevator and convert them both into func_usables. The trick to using a func_usable is to understand what exactly each texture/shader looks like that you want for it. In our case, we're using doomgiver/elevatorup and doomgiver/elevatorcall.
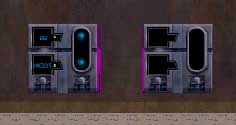
elevatorup (on the left) in actuality is the "off" shader, while elevatorcall (on the right) is the "on" shader - although you wouldn't know it from looking here. I would advise that you keep both func_usables out of their hole in the wall while you work on them, or else you will likely get very confused.
For the "on" func_usable, set the STARTOFF flag (since you want the button to be off until it is triggered.) Next, because you want the two button to both be triggered at the same time, select them both and give them both an identical targetname property. For my example, I used a simple button for the value.
Next, you want the doors to trigger the buttons to change. Only add these keys to one door, however, or else you can get some weird results (the trigger doesn't change, the trigger changes twice, etc). Add the key target and closetarget, giving both the value that you used before (button). The key target triggers every time the door starts moving from closed to open, while the key closetarget triggers every time the door closes. Thus, the button will change when the door starts to open and again when it starts to close.
That's it! Compile and you're done. Make sure you copy everything over (with the same targetnames) to the other side of the door if you don't want a 1-way door.
In short, we did the following to animate the switch correctly:
Create two func_usables in place of your switch
Set one of the func_usables to start "off"
Set the same targetname for both func_usables
Set the target and closetarget triggers on one of the doors to target both func_usables
WHEW, that was complicated, eh? At the end of all this, I had the following settings for each object... your values may vary -
trigger_multiple:
angle - 270
classname - trigger_multiple
noise - sound/movers/switches/button_01.mp3
spawnflags - 7 (PLAYERONLY, FACING, USE_BUTTON)
target - t7
wait - 2
func_door (left door):
angle - 360
classname - func_door
lip - 2
soundset - large_door
speed - 85
targetname - t7
team - maindoors
func_door (right door) - All settings the same as the left door, except:
angle - 180
closetarget - button
target - button
func_usable (textured with elevatorcall):
classname - func_usable
spawnflags - 1 (STARTOFF)
targetname - button
func_usable (textured with elevatorup) - All settings the same as the other func_usable except with no spawnflags set
You should have a mass of targetting in the 2D View:

That's all there is to it! (All there is, he says!) I know it seems complicated now, but after you make a few, it will become much more natural to make them. Oddly enough, scripting is the much simpler way to do switched doors, but we don't want to learn scripting, right? Or do we? (: