


Welcome to Part 2 of this tutorial series, my name is Linken and I’ll be your host for today!
This is the tutorial for those wanting to use Radiant. I will make an Entity Modding tutorial later on.
If you haven’t viewed Part 1 yet, or would like a refresher, I encourage you to view it first before continuing on.
Today we’ll be doing a very basic cutscene involving a single NPC. I will write this tutorial in two ways, one way we’ll be using Radiant, and the other way will be done with entity modding. Please feel free to follow along with either or both tutorials.
By the end of this tutorial you should know the basics to do your first script, and you should also begin to understand which method of mission making you like best for your own projects.
Please keep in mind as we go through this I’ll be doing this tutorial in my own personal preference for completing each step. I highly encourage you as you go through today’s tutorial to think about your own favorite practices so you begin to form a technique that best suits you.
PREPARATION WORK
Only a few steps you’ll need to complete before beginning this tutorial, regardless of which tutorial you want to follow.
Please download this file and extract the contents to your Jedi Academy base folder, this contains today’s map file and already compiled BSP. Those wanting to learn entity modding can discard the map file and keep the BSP file.: https://drive.google.com/file/d/1uZfCp9Gs6OM-c6mpDtL2J2-Q0Zety8lJ/view?usp=sharing
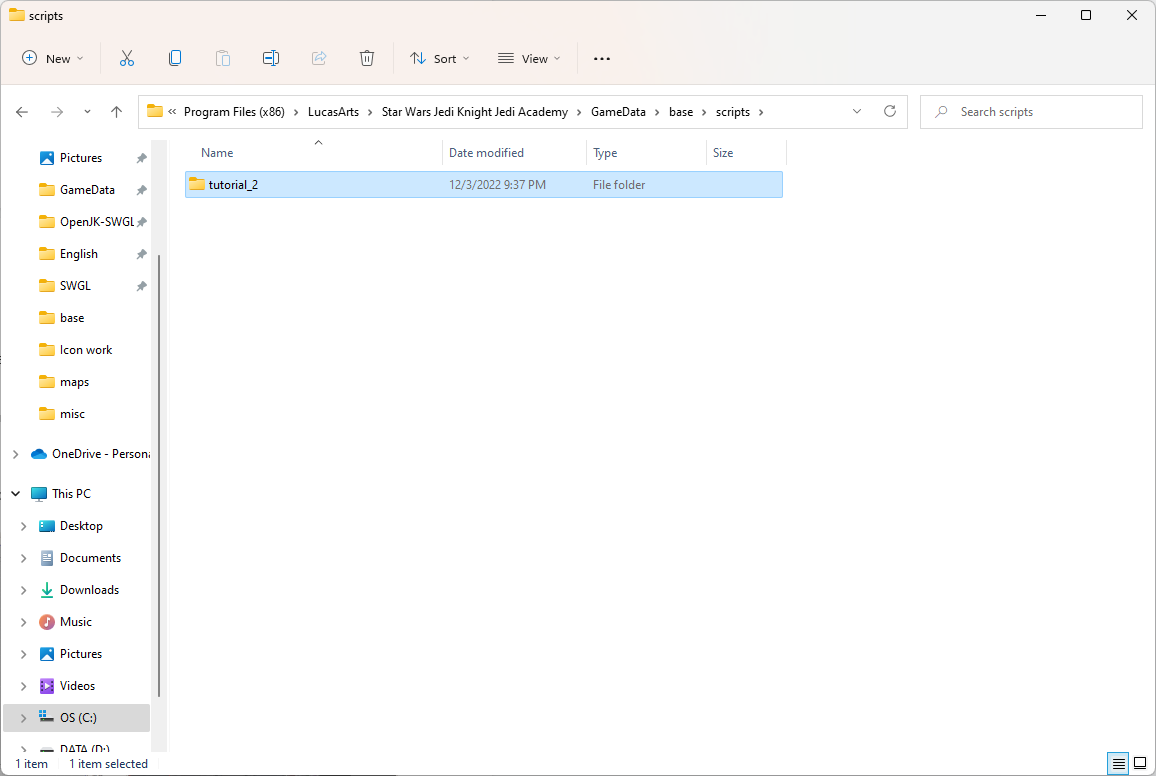
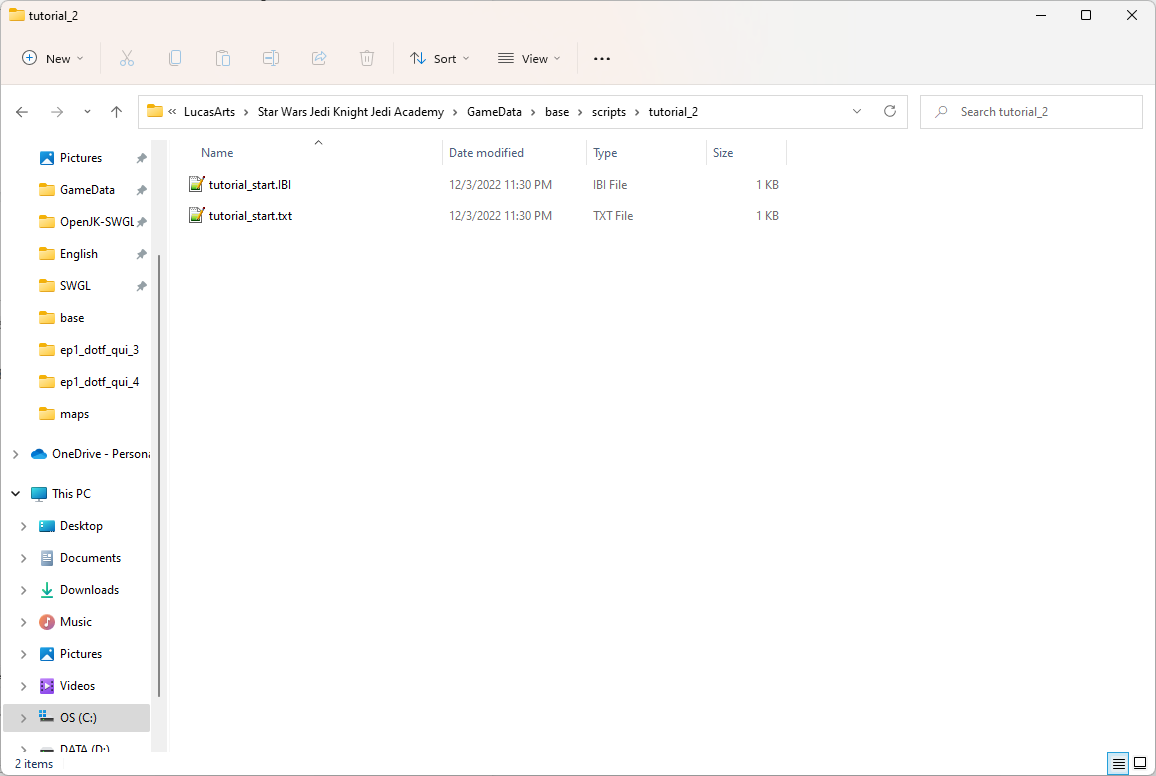
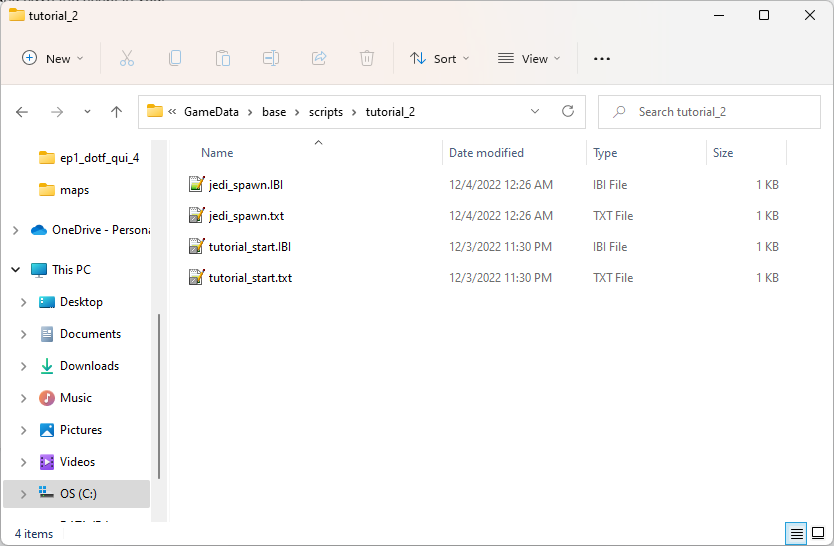
Additionally, in your base folder, create a new folder called “scripts”, and inside your “scripts” folder, create another folder called “tutorial_2”
Optionally, feel free to download this file and place it inside your base folder, this will display several missing system textures: https://drive.google.com/file/d/1jMBe8No9KO0E7y0LGqjm7L8FNRahMCRt/view?usp=sharing
GETTING STARTED
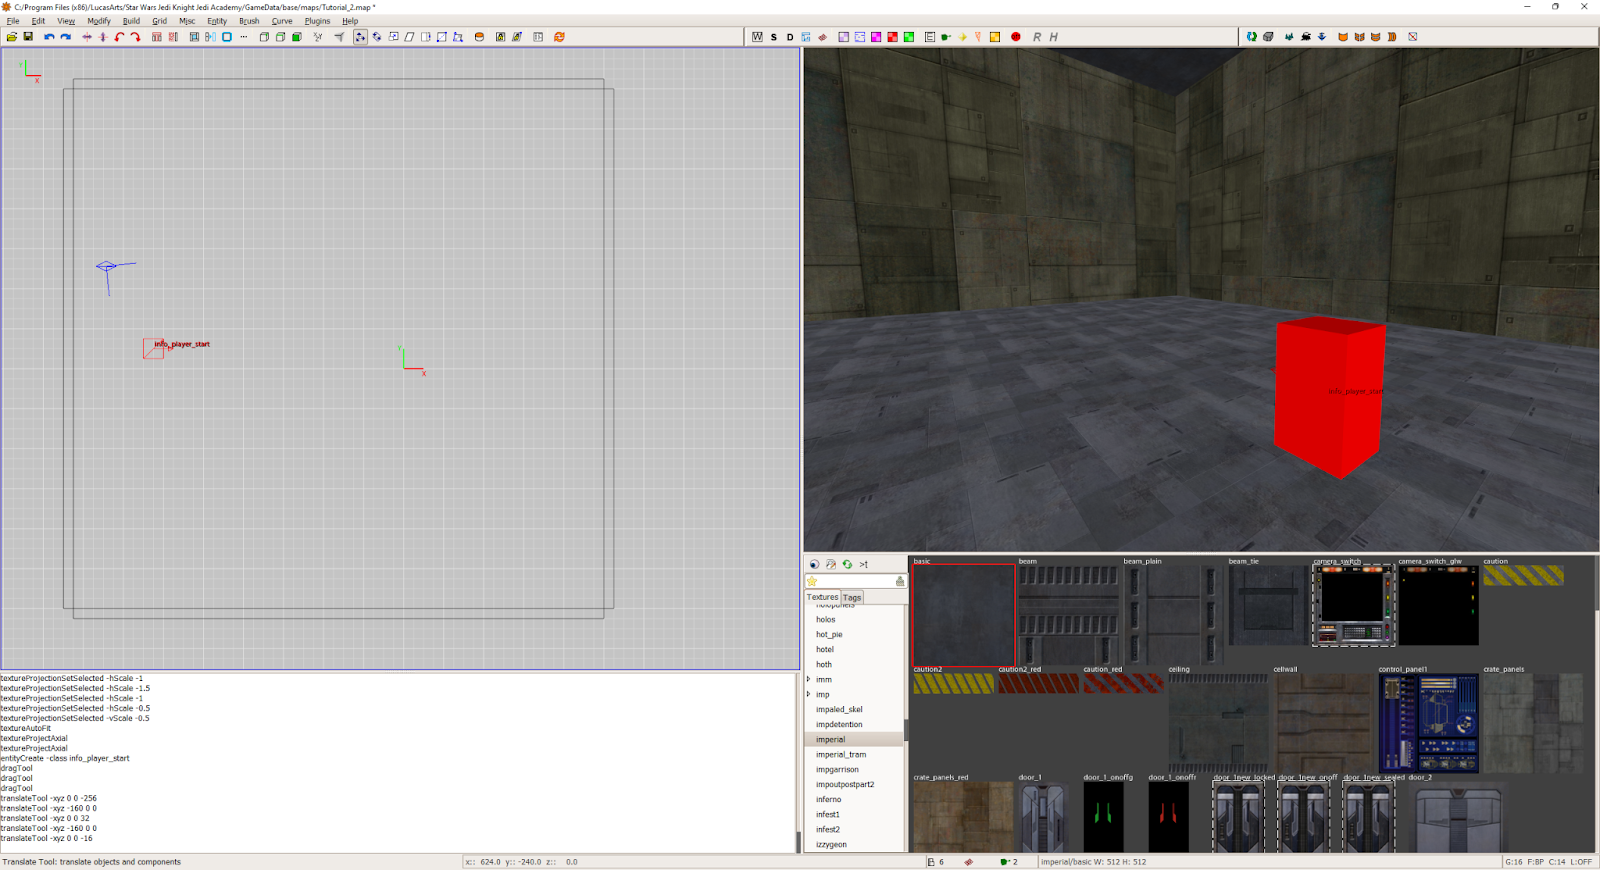
Today our map will be nothing more than a simple room. Four walls, ceiling and a floor. Good enough for today’s lesson.
In Radiant, open up the provided map file and bask in my super-basic map making! Or….y’know…..just draw your own room and add an info_player_start entity. I promise you my feelings won’t be hurt  .
.
Whichever way you want to do it, your radiant camera should be inside this room.
Our cutscene today, we’ll have a Jedi NPC walk forward a few steps, turn on his lightsaber, and perform a flourish, and say a sound. Then a reborn NPC will awaken from his meditation, stand up, turn on his lightsaber, say his own sound, and pull out a second lightsaber (GASP! WHAT A TWIST!)
So overall today we’ll be diving headfirst into NPCs, performing animations, movement, commands, cameras, and map entities used for missions.I know this sounds like a lot, but trust me, it’ll lay out a great foundation for you to get started on your own projects!
TARGET_SCRIPTRUNNER
CREATING THE SCRIPTRUNNER
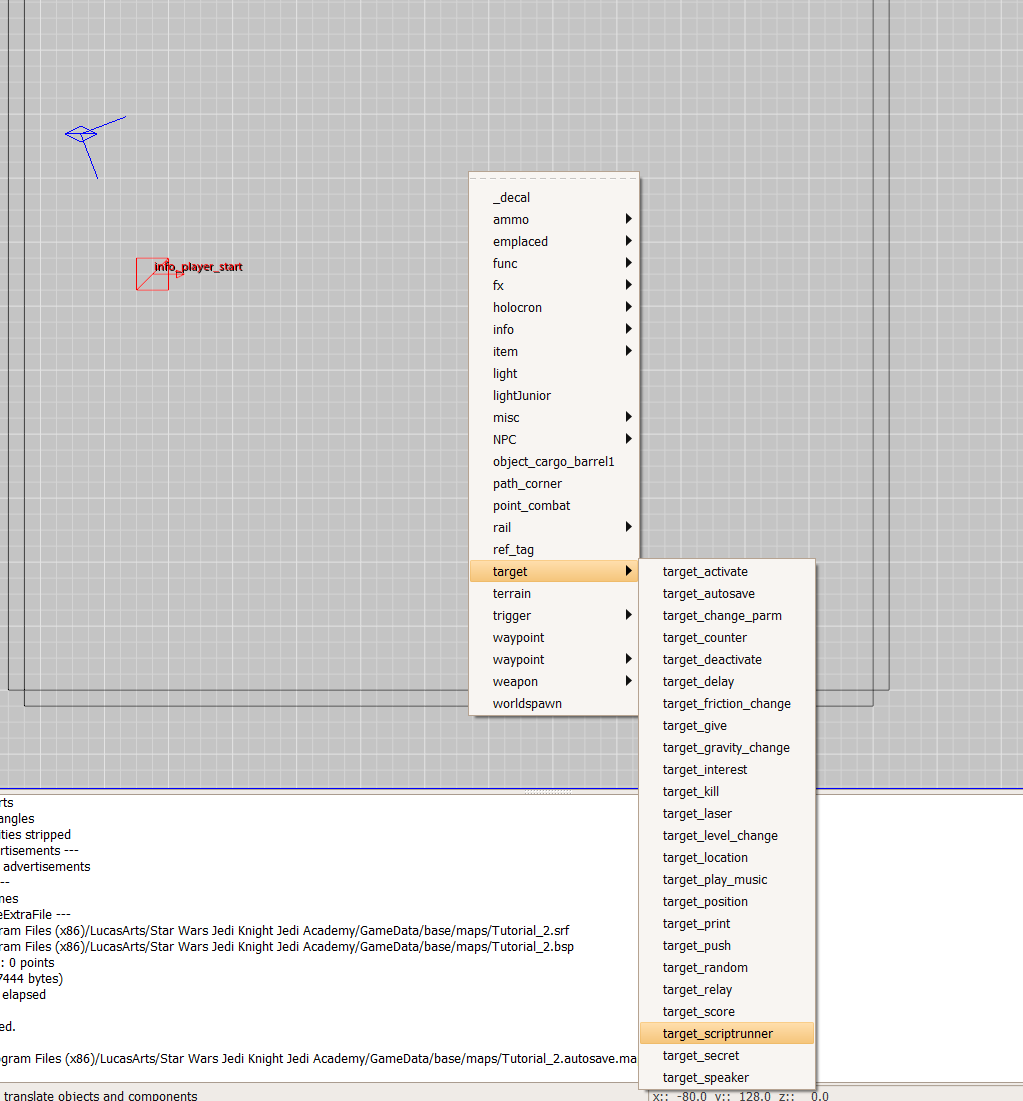
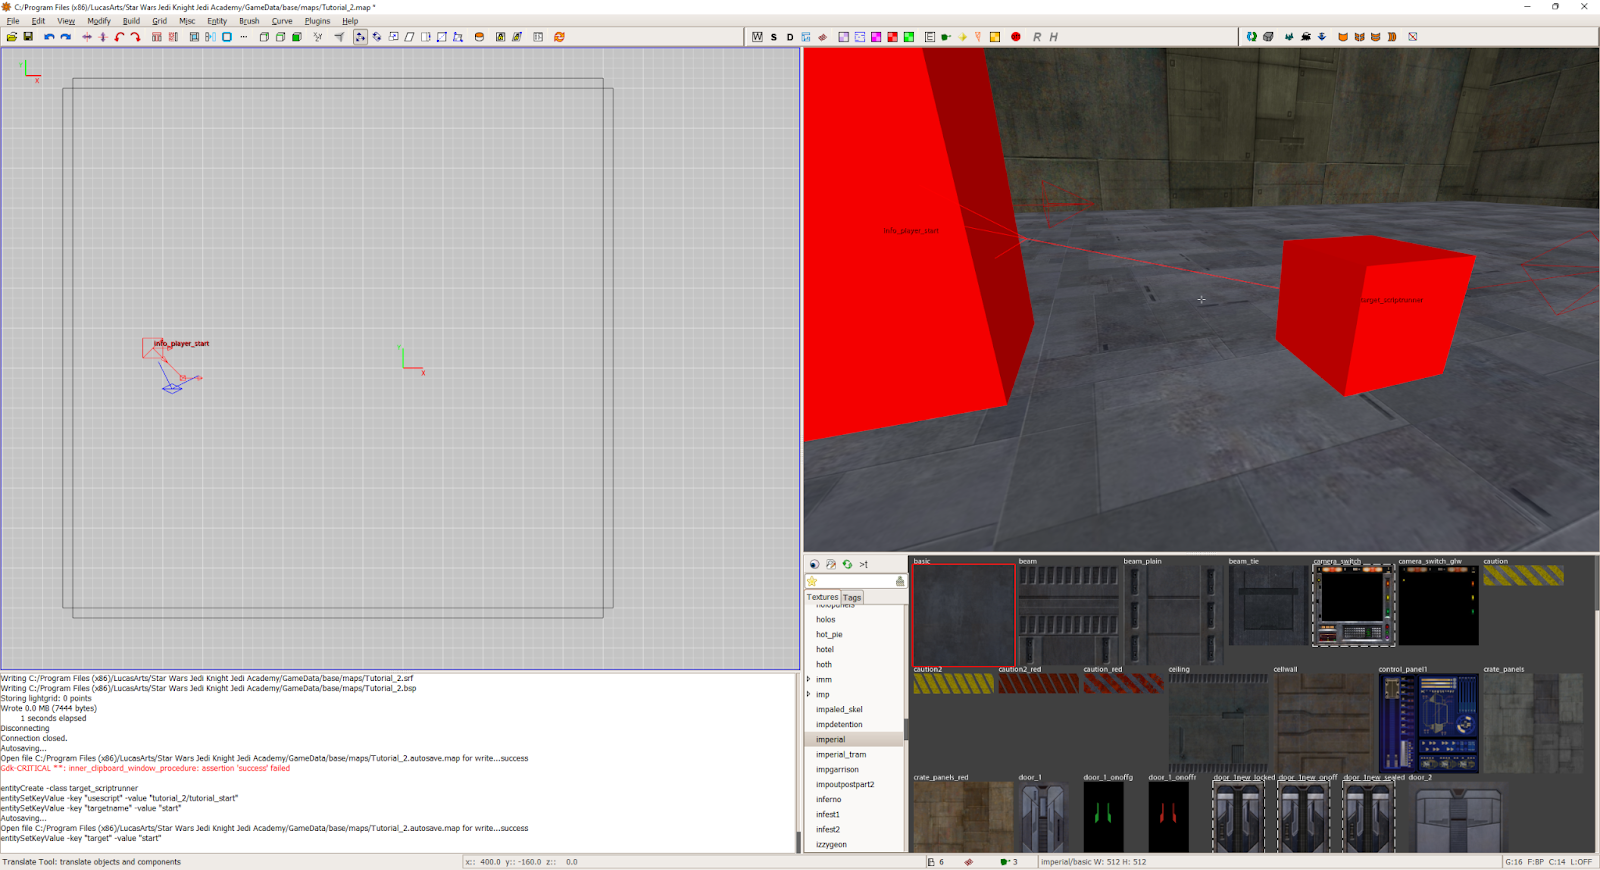
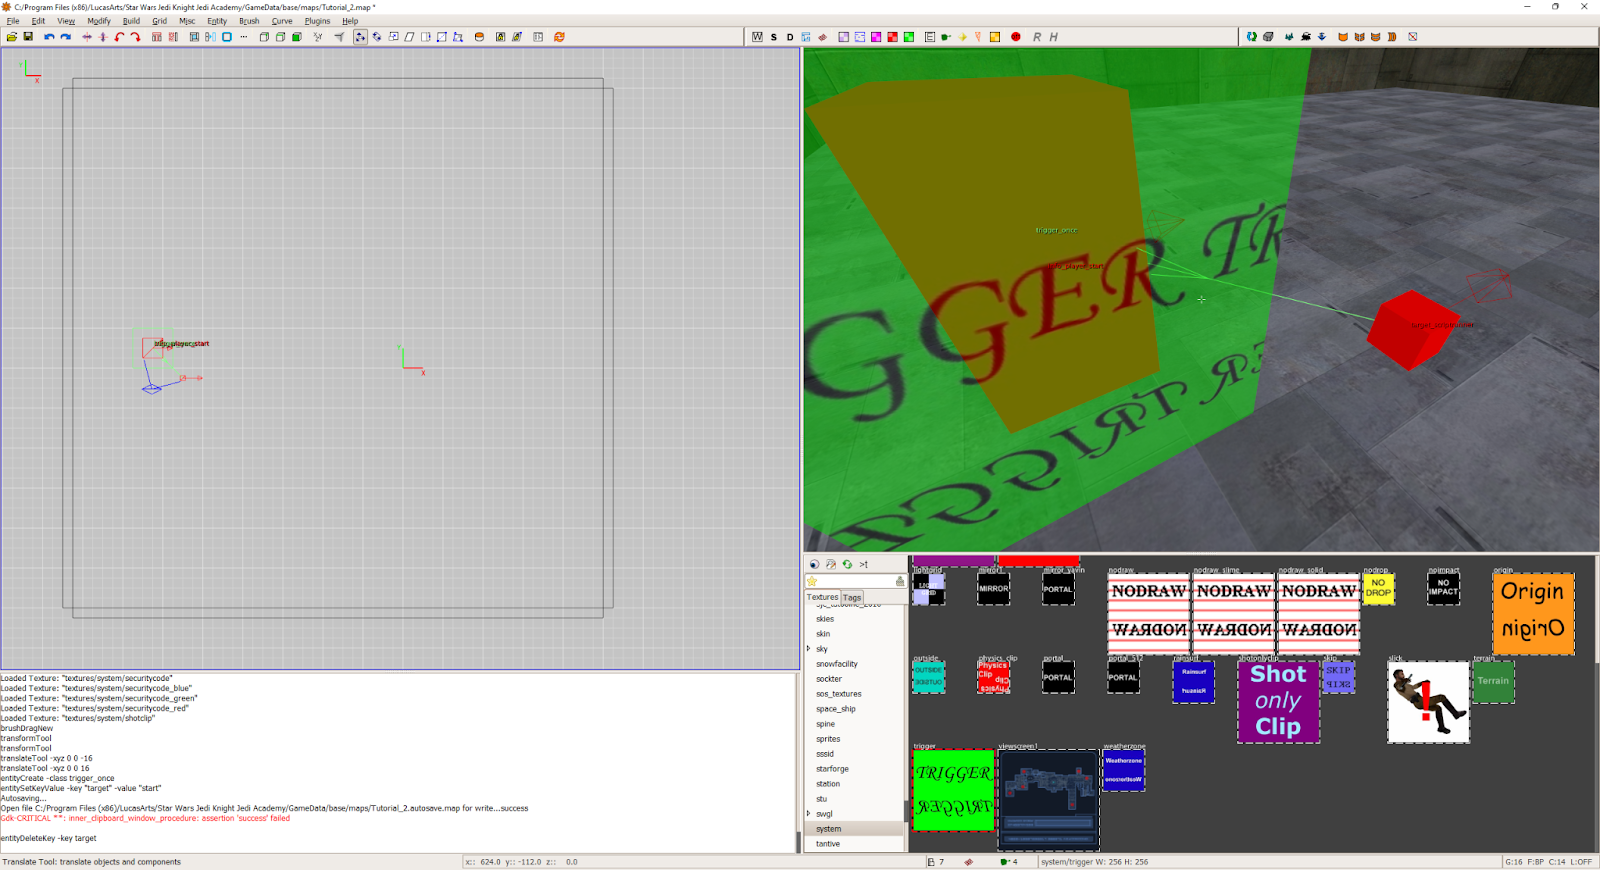
Regardless of how many scripts you write, your map will be FILLED with target_scriptrunner entities. These are the entities used to execute icarus scripts. The good news is that their location doesn’t matter at all. Right-click on the map editing section of Radiant and look for “Target”, hover over the option then click on “Target_Scriptrunner”
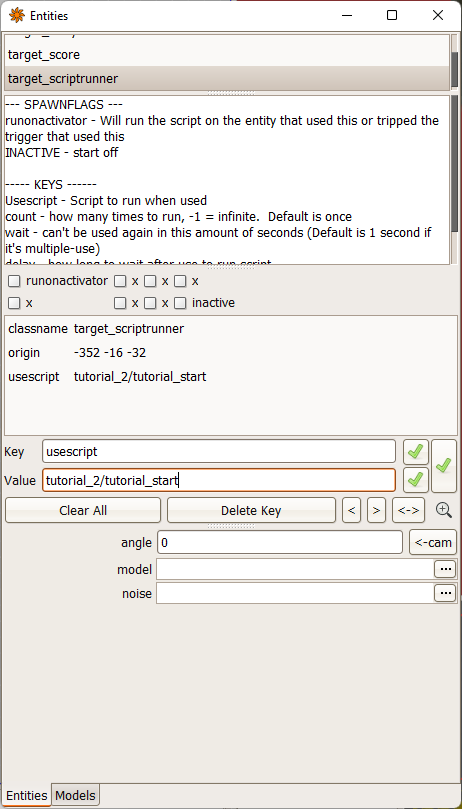
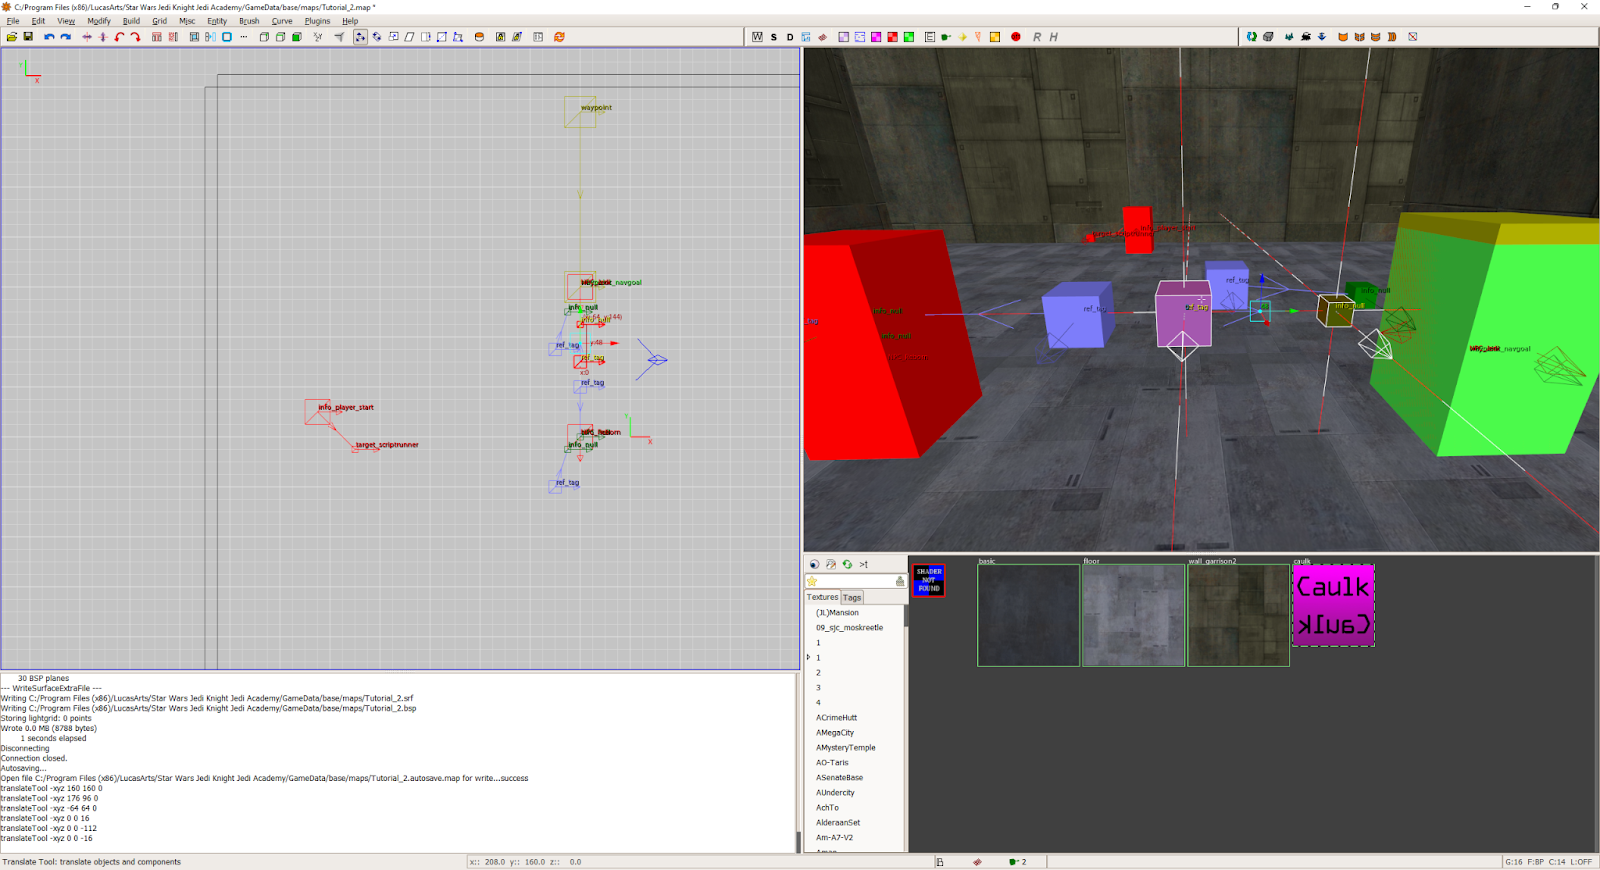
When your scriptrunner entity is created, it should be highlighted by default, if not, select the entity and press your N key to bring up the Entities window. You should see something like this:

You’ll see a few checkboxes labeled “runonactivator” and “inactive”, you can ignore these for the tutorial. You can see in the upper section of the window what these checkboxes mean. People using this version of Radiant can see similar information on most other map entities, very helpful stuff!
The first thing we want to do is tell this scriptrunner to tell what script to…..well….run.
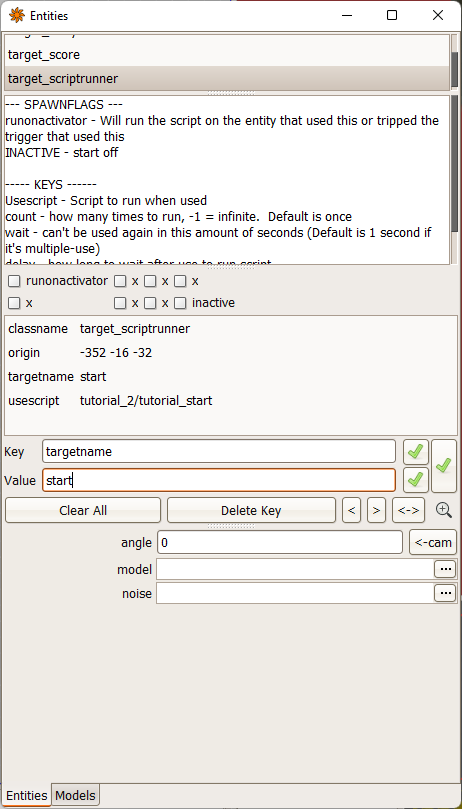
In the “Key” field, type “usescript”, and in the “Value” field, type “tutorial_2/tutorial_start”. After that, press enter. The window should look like this:
One more thing we need is a targetname, this tells the game the name of the entity. Targetname has a few other uses for other map entities, but we’ll get to that in the future. To give the entity a targetname, in the “Key” field type “targetname”, and in the “Value” field we’ll call it “start”. Once you press Enter, your window should look a little something like this.
Alright, so now we have a scriptrunner, but right now, the game won’t trigger it! So let’s do just that!
There are two methods to trigger this script runner entity. I’ll go over both, you just use what you prefer.
METHOD #1: INFO_PLAYER_START (PREFERED)
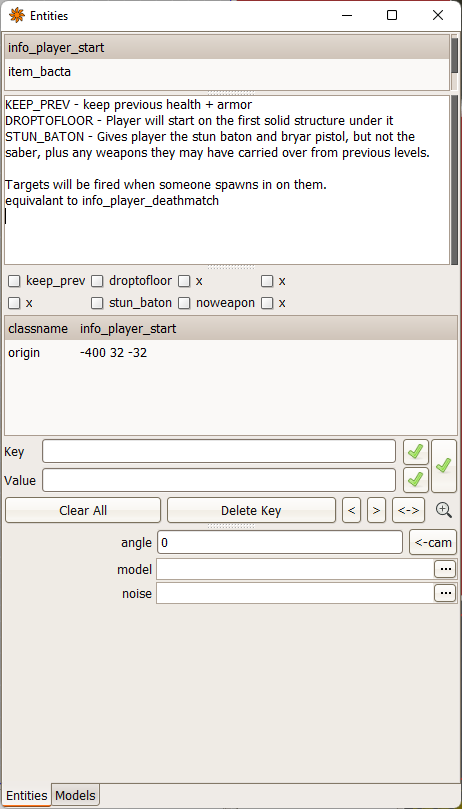
Select the info_player_start entity (make sure the scriptrunner entity is not selected (ESC key) and press your N key to bring up the entity window.
In the “Key” field, type “target”, and in the “Value” field, type “start”. Once you press enter, the player_start entity will now target the scriptrunner when you spawn in the game. To verify the connection has been made, you should see a line and arrow between the two entities.

Alternatively, if you select the info_player_start entity first and then select the target_scriptrunner entity (yes, the order matters), press CTRL + K on your Keyboard and the player_start entity will target the scriptrunner automatically
METHOD #2: TRIGGER_ONCE
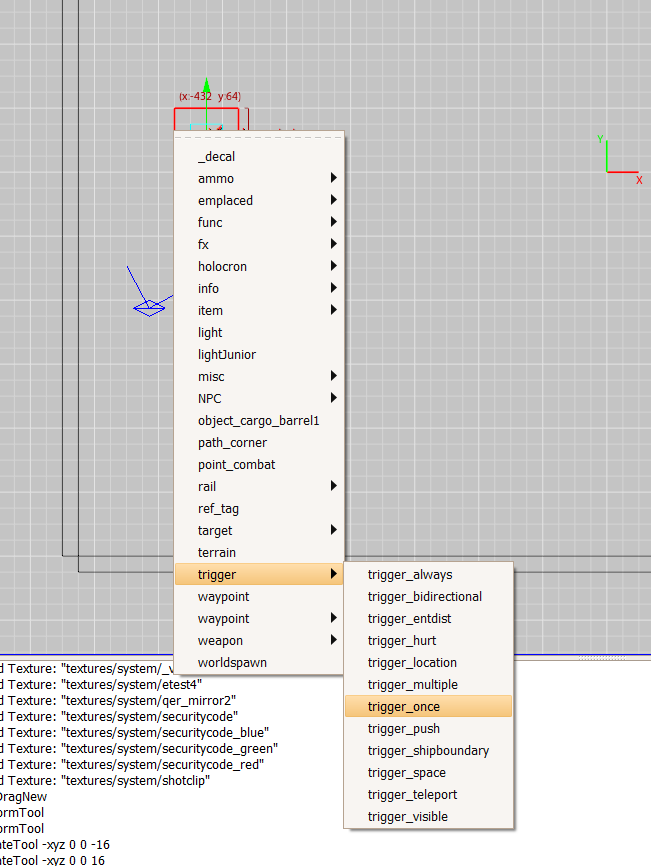
Draw a brush surrounding the info_player_start entity and texture it with the “Trigger” texture (found under System). Should quickly mention that the trigger texture may appear as a red/blue and black checkerbox with “Shader not Found” written inside instead of the green “Trigger” texture. This will not affect your ability to create triggers or do anything else in radiant, however if it annoys you, feel free to download the mapextras pk3 file I’ve included in the “Preparation Work” section of this tutorial.

With the brush selected, right-click in the map editor and look for “trigger”, hover over it and then click on “trigger_once”.
Once completed, press your N key with the trigger selected to bring up the entity menu. In the “Key” field, type “target”, and in the “Value” field, type “start”. Press Enter and you should see something like this:

Then to verify the connection is made, in the map viewing area of Radiant, you should see a green line and arrow connecting the two entities.
Alternatively, if you select the trigger brush and the scriptrunner (in that order) and press CTRL + K, the two entities will connect automatically.
A BASIC CAMERA
Before we make the cutscene, we want to give our script something to do so we know that everything is working properly. We’ll start by creating a basic camera that turns on once you spawn in the game, holds for 2 seconds, and then exits.
Now I’m going to be completely honest with you. I absolutely HATE creating cameras like this and I moved past this a long time ago. However, I feel that it’s necessary to share every method I know of to help you on your journey. That being said, after this brief tutorial on creating cameras in Radiant, I will no longer be using this method throughout the rest of this series. Don’t worry, I’ll explain other methods.
CREATING THE CAMERA
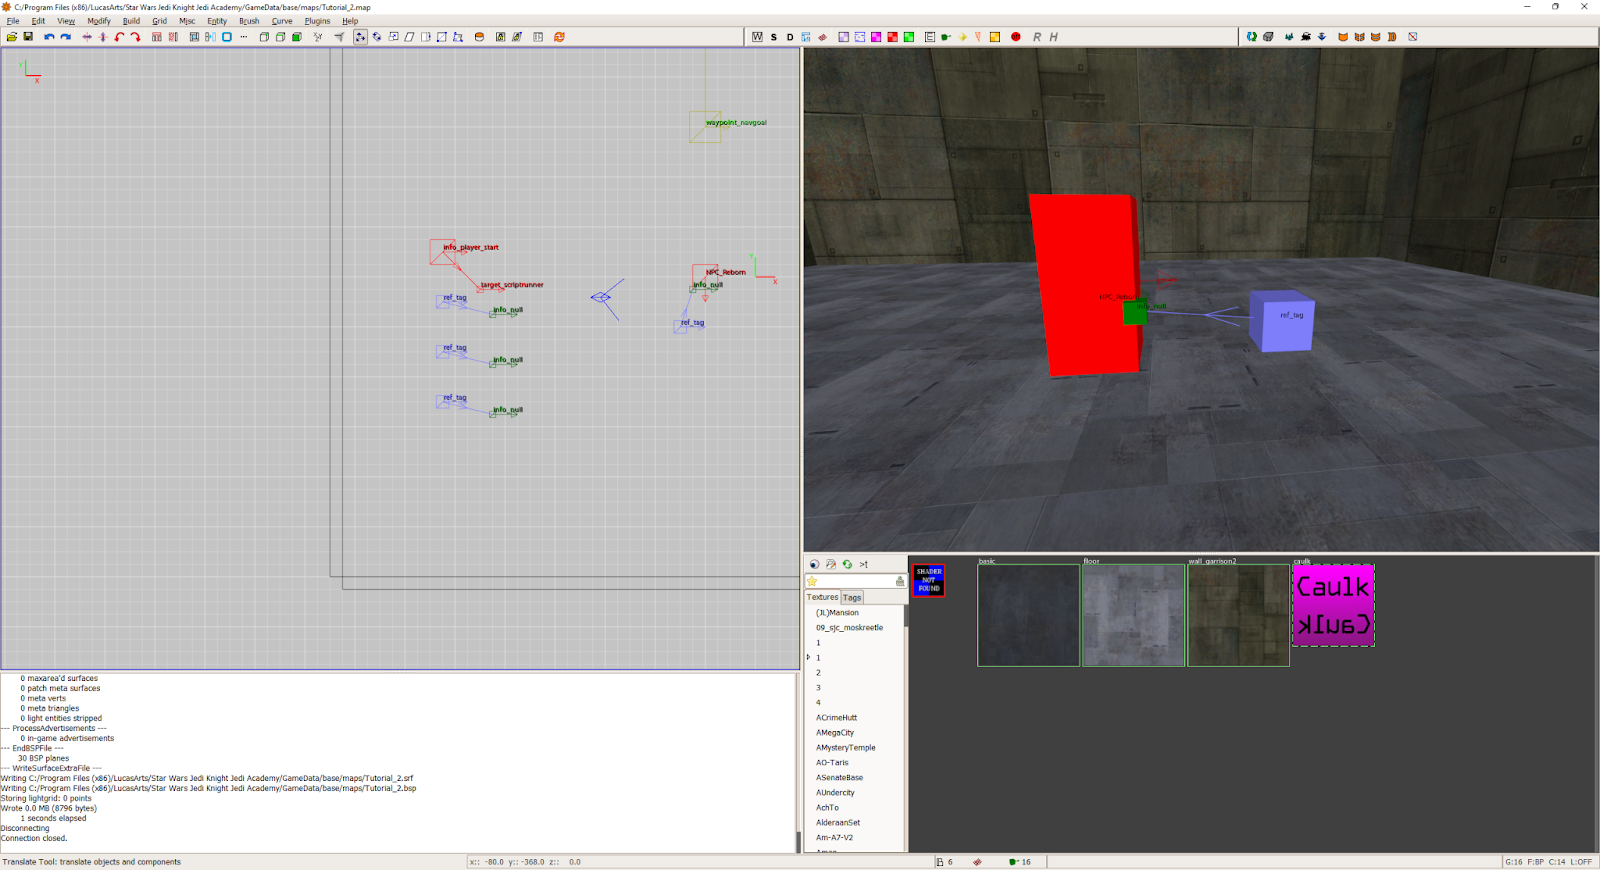
A typical radiant camera consists of two entities, a “Ref_Tag” and an “Info_Null”. The Ref_Tag is where the camera is located on the map, and the Info_Null is where the camera is pointing.
To create a ref_tag, right-click in the map editor and select ref_tag.

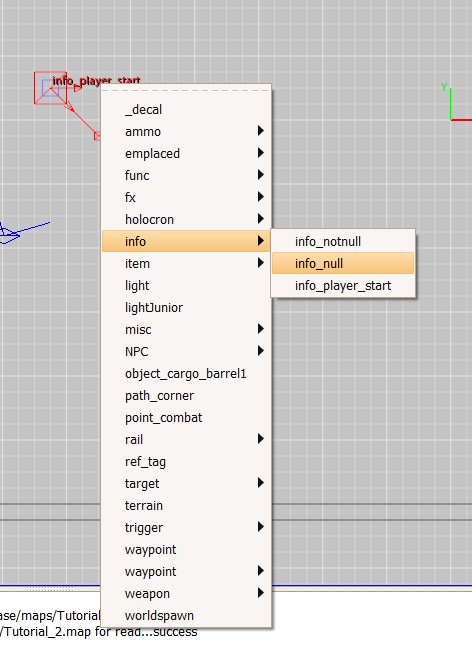
Move the ref_tag to wherever you’d like (I’m placing mine directly above my spawnpoint). After you’re pleased with the location, right-click again on the map, hover over “Info_”, then click on “Info_Null”
Move the info_null to wherever you’d like (I’m putting mine directly in front of the ref_tag but moving it a few squares down).
Once you’re pleased with your camera’s position, let’s get these two connected!
Select the ref_tag and info_null (in that order) and press CTRL + K to link the two together. If you did this correctly, a blue arrow and line should be seen between the two entities, verifying the ref_tag is targeting the info_null.
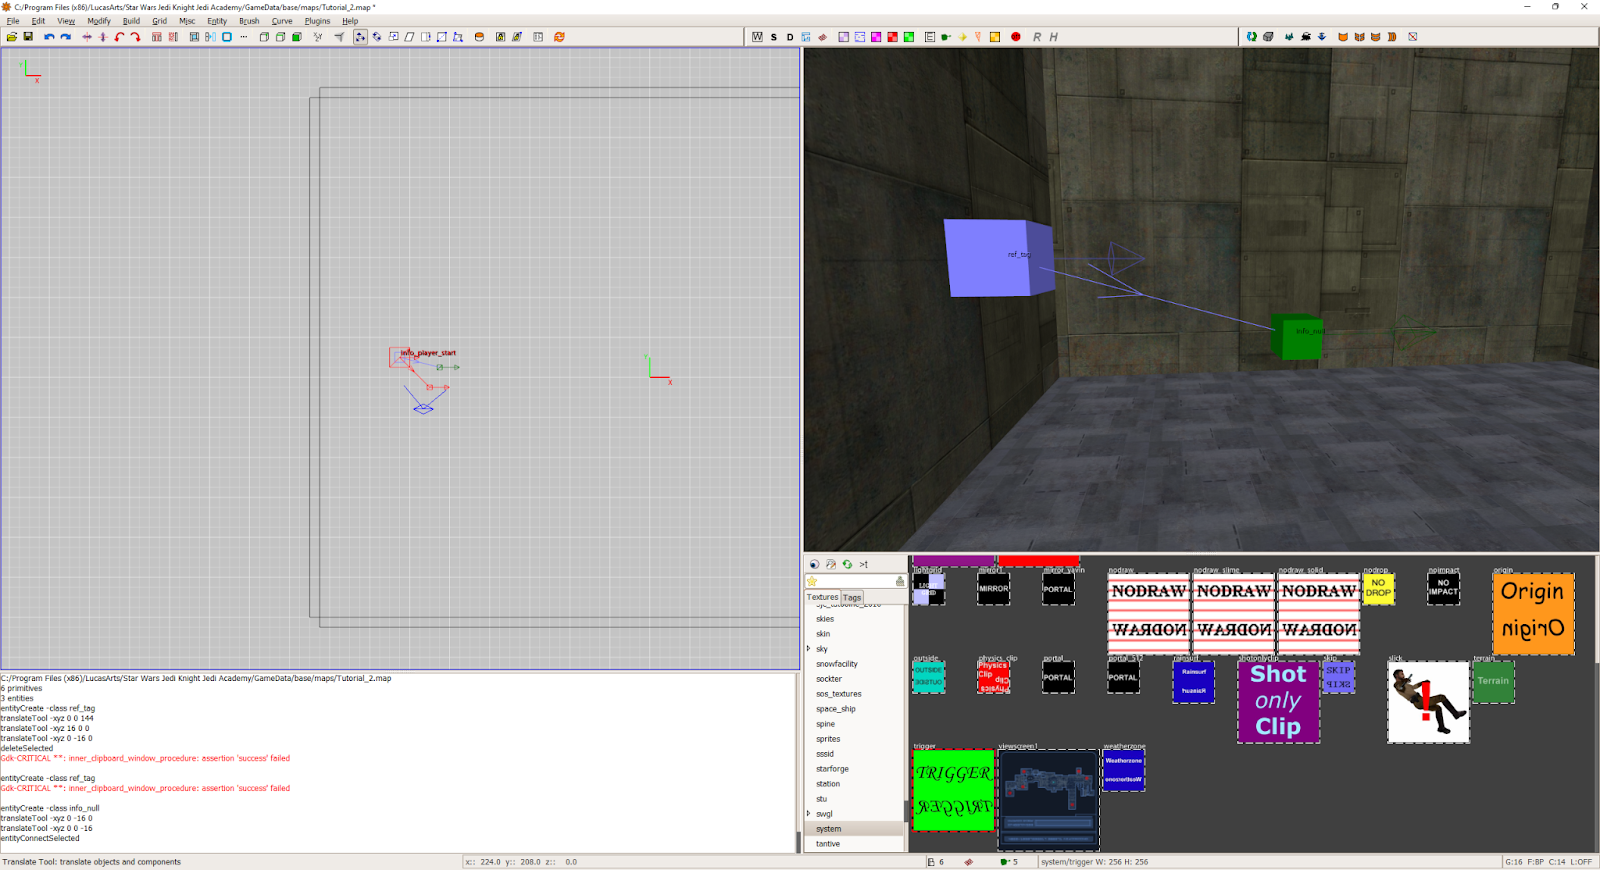
Select the ref_tag entity and press N to bring up the Entity Menu. For the script to be able to use the camera, we need to give the tag a targetname, so let’s do that! In the “Key” field, type “targetname”, and in the “Value” field, type “camera1”. Press Enter to apply your changes. Once you’re done, it should look like this:

Now that you have your camera set up, let’s go ahead and compile our map so we can use it in game!
On the upper toolbar of Radiant, click on the Build menu and then select the option that’ll only give you the BSP (should be the first option that says Q3Map2).

Once your map is done compiling, you should see a confirmation in the console at the bottom of the program. Since this is a very tiny map, compiling should be done by the time very quickly. Much larger/complex maps will take a bit longer.

Now that the map is compiled, let’s head over to BehavED and create our script!
YOUR FIRST SCRIPT
Open up BehavED and look for the Camera Command on the left-side of the window (should have a pink camcorder icon). Double-click the command or drag & drop the command to the main window below the “rem” command already applied (all new scripts will show a comment by default, you can use it or remove it, doesn’t matter). Once you complete this, you should see something that looks like this.

By default, when applying a new camera command, the camera will start off with the “Enable” Command by default. Every cutscene will start with a Camera Enable command, so leave this command as it currently is.
Double-click on the camera command 3 more times (or alternatively, select the first camera command and press your Spacebar 3 more times) to create 3 more camera commands for a total of 4 commands.
Before we start telling what camera to use, let’s go over each camera command (that I know) and what they do.
CAMERA COMMANDS
-
ENABLE: Puts the game in “Cutscene Mode”.
-
DISABLE: Takes the game out of cutscene mode and returns to normal gameplay.
-
MOVE: Moves the camera to a particular location (typically a new camera)
-
PAN: Rotates the camera to the specific angle
-
ROLL/TRACK: I never use these and don’t know what they do as of typing this.
-
FOLLOW: Follows an entity automatically and keeps the camera focused on them.
-
FADE: Applies a Fade effect to the game (such as a bright white flash of light or a fade to black), this is a command that can be used during normal gameplay.
-
SHAKE: Shakes the camera at a certain intensity, this is also a command that can be used during normal gameplay.
-
PATH: Applies a ROFF file for the camera effect. Also never used by typical modders. Is used in Jedi Outcast during the opening cutscene of the first Nar Shaddaa level.
Now let’s do our camera!
Double-click on the 2nd camera command and on the Dropdown menu, click on the “Move” Option. Once the move option is selected, you’ll see a button un-grey itself out called “Re-Evaluate”. It is VERY important that you always click on “Re-evaluate” when the opportunity presents itself, otherwise your script will not work at all.
Once you click on Re-evaluate, the window should change to look like this.

To apply the camera to the script, there are a few steps. Follow along as best you can as this can get a tad complicated for beginners.
Next to the middle dialog box (the one with all the 0s inside) you’ll see a button called “Helper”. Click on that and your window should change to something like this:

On the 2nd dropdown menu, which says “Origin”, click on the button next to it that says “Tag”. The 0s should changed into something like this:
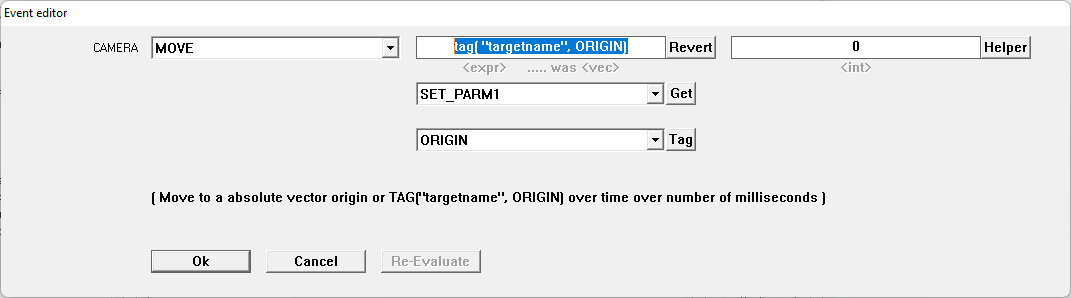
Where the text says “targetname”, replace “targetname” with the name of your camera, which we named “camera1” earlier. MAKE SURE TO KEEP THE QUOTATION MARKS. Once you’re done, it should look a little like this:

Click on OK. Now the game will move the camera to that position. Now let’s get the camera pointing in the right direction.
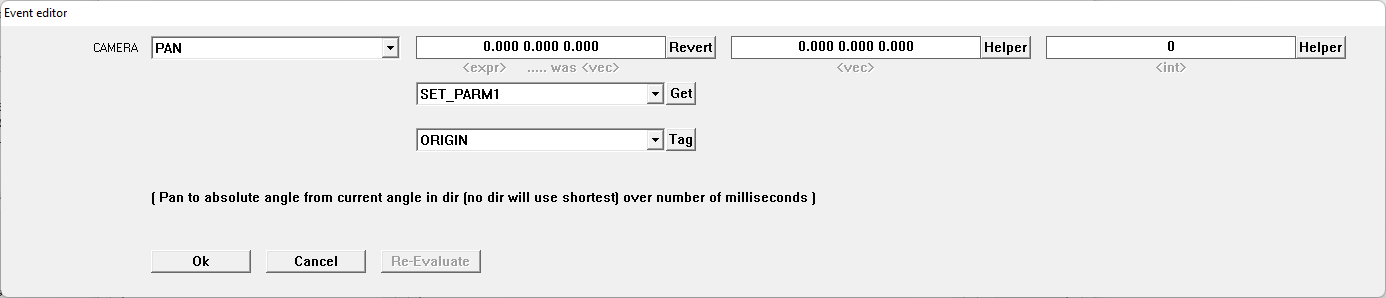
Double-click on the 3rd camera command to bring up the dropdown menu. Expand the menu and select the “PAN” command. Click on Re-evaluate once selected. Your window should look like this:

You’ll see three sets of dialog boxes, we’re only going to focus on the 1st one for this tutorial. We’ll never use the 2nd one (I still don’t know what it does as of writing this). The 3rd one we’ll use at a later time.
Similar to the MOVE Command, we’ll also be applying a tag to the PAN Command. Follow along as best you can.
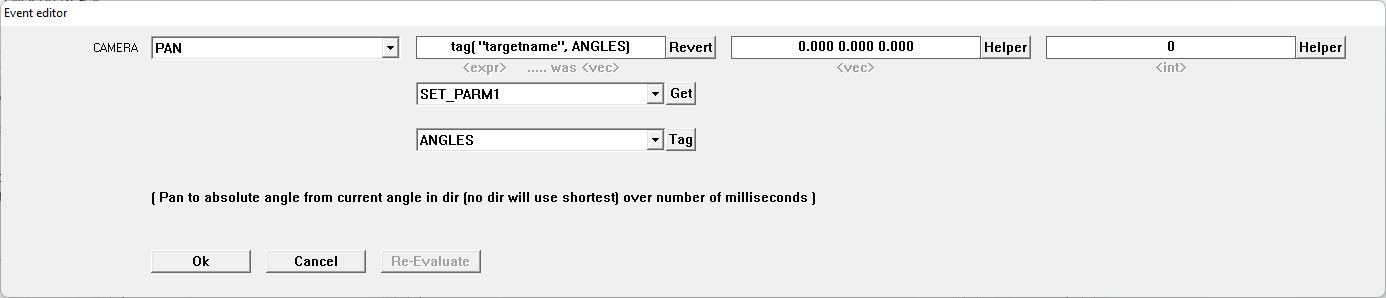
Click on the “Helper” button next to the 1st dialog box so your window looks like this:
Click on the Dropdown menu which says “ORIGIN” and select the “ANGLES” option. After that, click on the “Tag” button. Your menu should look like this:
Change the targetname to the name of your camera, which we named “camera1” earlier. Again, make sure to keep the quotation marks, else your script won’t work. It should look like this once you’re done.
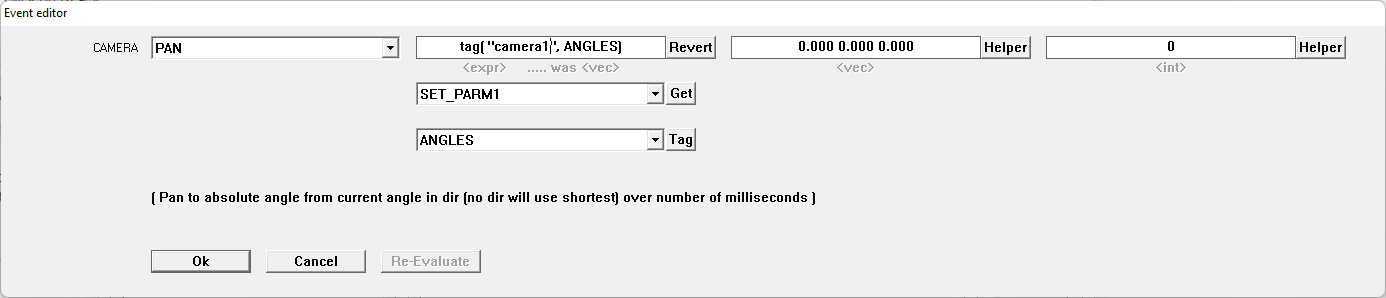
Click on OK to apply your changes.
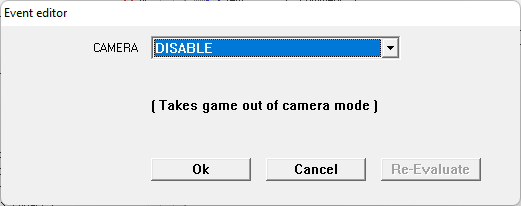
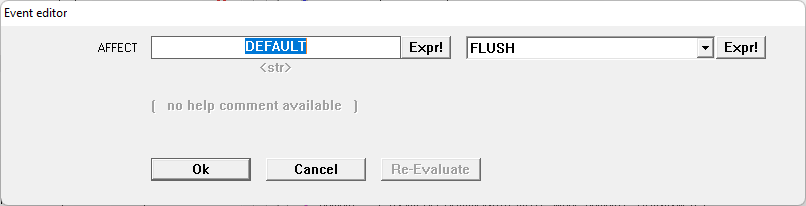
Now to take the game out of “Cutscene Mode”, double-click on the final Camera command we made earlier and in the dropdown menu, click on the DISABLE command. Again, click on the Re-evaluate command, your window should look like this:
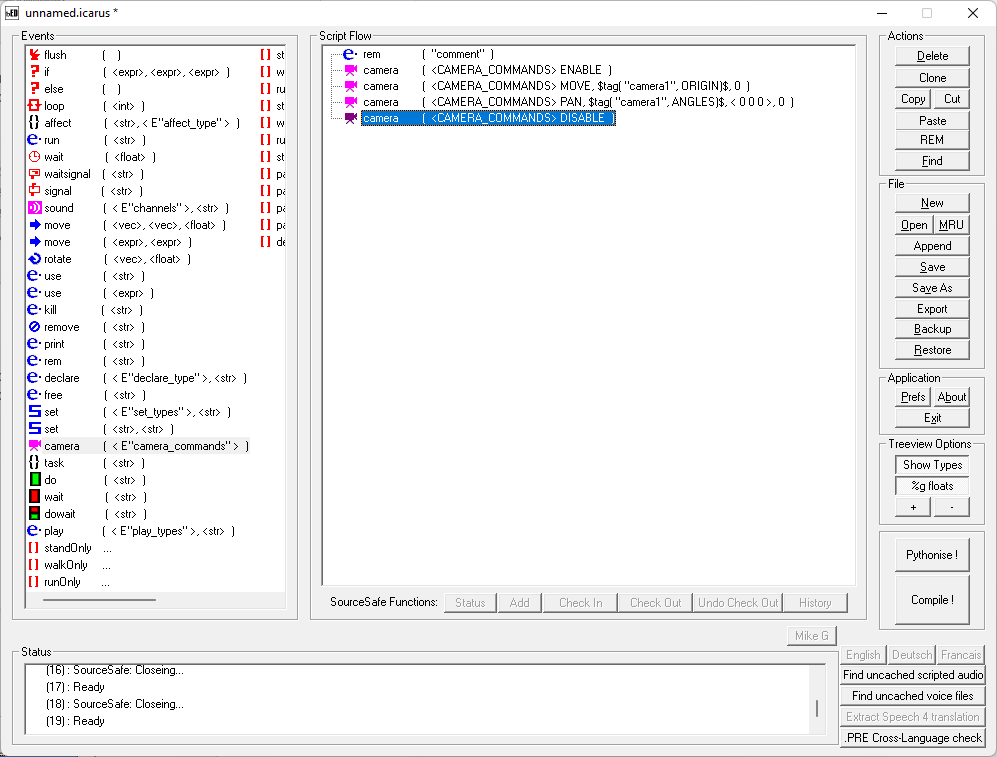
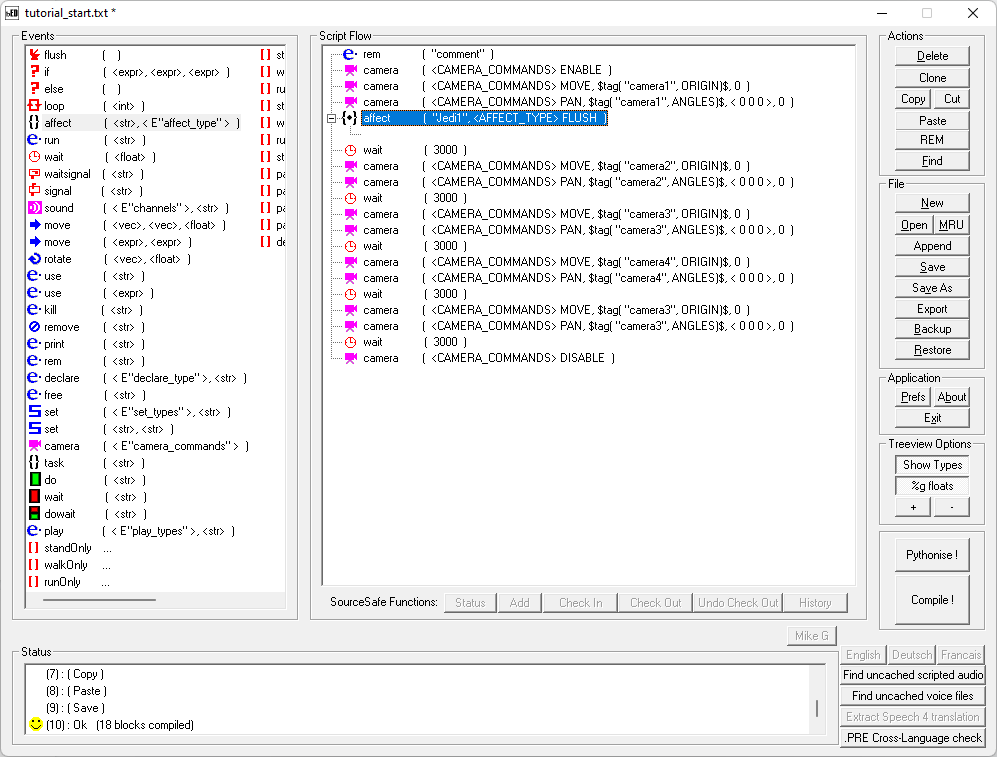
Click on OK and let’s review our script! If your script looks like this, you’re on the right track!
Now, if we were to load in our map right now, we wouldn’t see our game in camera mode. The reason for this is because we haven’t told the script to wait. When creating a script, a bunch of commands grouped together will be immediately executed with little to no pause in the order that they were written. So technically our game would go to our camera and then exit, but the action would be so fast we would never see it. This is where our trusty “Wait” command comes in!
Create a new “Wait” command (make sure to select the one with a stopwatch/clock icon and not the red light one) by double-clicking or dragging and dropping the command into your script.
Drag your new wait command in between your Camera Pan command and Camera Disable command. Keep in mind when you drag an existing command through your script, the command will be placed under whatever command is being highlighted. When you’re done, the script should look like this.
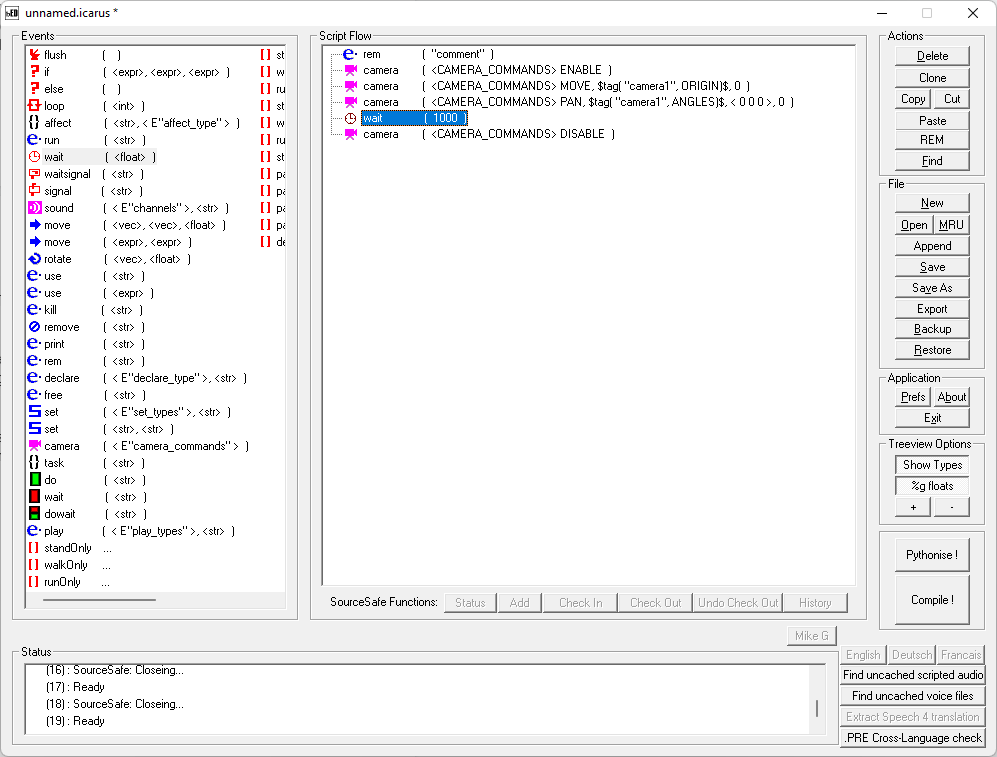
Double-click on the existing wait command to bring up its options, you’ll see a dialog box inside with the number 1000 inside. Keep in mind when doing wait commands, they are always done in milliseconds. Also keep in mind that 1000 milliseconds = 1 second. Change the value to 3000 (3 seconds), and click OK. Your script should now look like this:

COMPILING YOUR FIRST SCRIPT
Our script is done, so let’s compile it! Click on the big Compile button near the lower-right corner of the window. If you haven’t saved your script by this point, the program will ask you to pick a location to save your script. Save your script inside the tutorial_2 folder I asked you to create at the beginning of this tutorial, and name your script “tutorial_start” as we referred to it while creating our target_scriptrunner in radiant from earlier.
Your script should now be saved and compiled in your tutorial_2 folder!
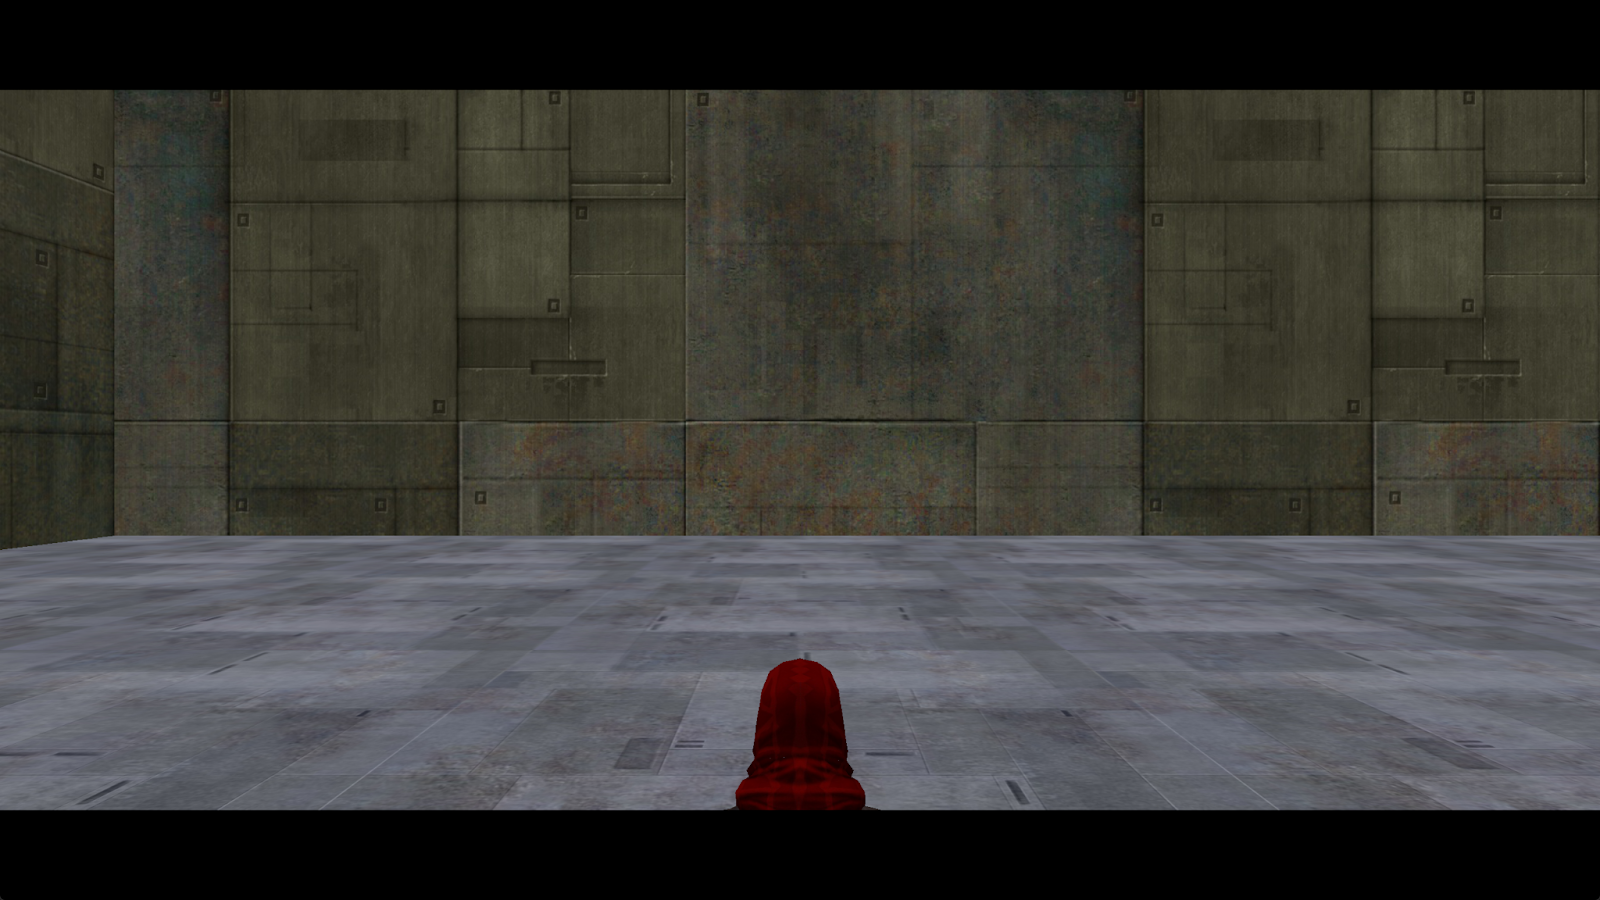
Now the moment of truth! Start up Jedi Academy and in the console type “devmap tutorial_2”, wait for the map to load, and see your camera in action! For 3 seconds, then you’ll be in normal gameplay.
Here’s my camera in action:

If you followed everything correctly, you should see similar results! Well done! If not, double-check your work and keep trying until you get it right!
NPCS
Unless you’re planning on having beautiful music involved in your cutscene and having a bunch of cameras tour every nook and cranny of your mission, you’re probably gonna need NPCs.
So let’s go ahead and add some NPCs!
Here’s gonna be our goal for these npcs starting out.
-
There will be 2 npcs, one Jedi, and one reborn.
-
The Jedi will have its Red Team skin applied and will carry a Green lightsaber (as opposed to its default yellow one)
-
The Jedi will be doing all of the major movement for this scene.
-
The Reborn is a Boss NPC
-
The Reborn will spawn in a meditating position, facing away from the Jedi, with its eyes closed.
-
The Reborn will carry a Red lightsaber and another secret Orange lightsaber.
Let’s start with the Jedi!
THE JEDI
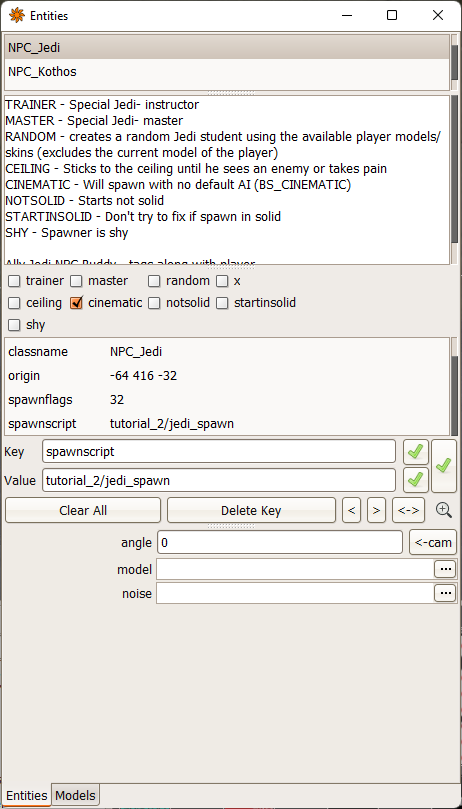
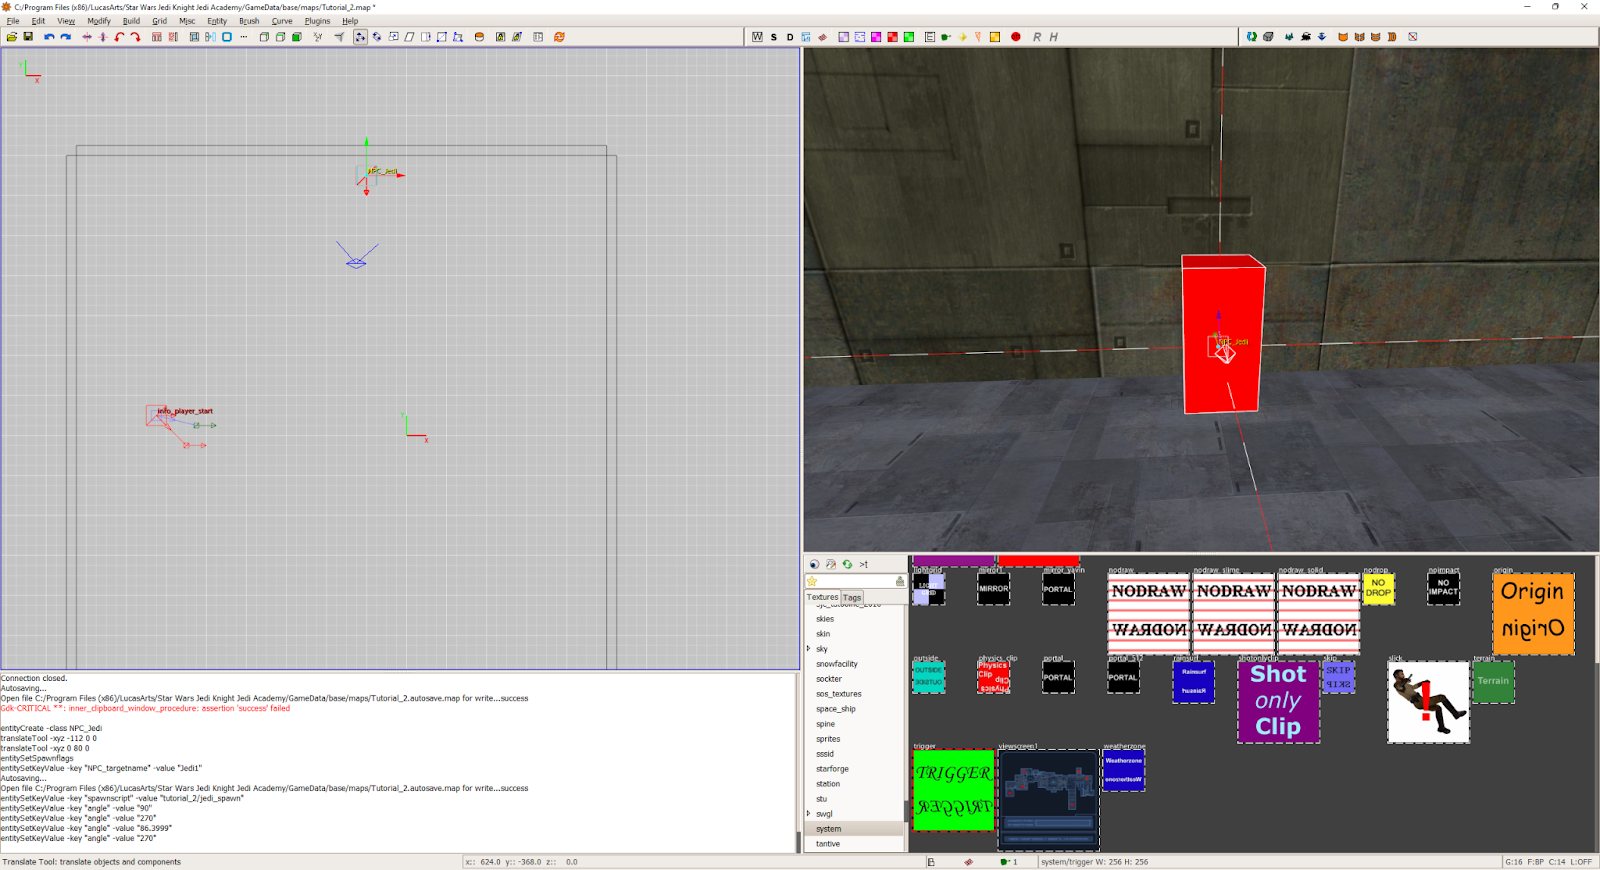
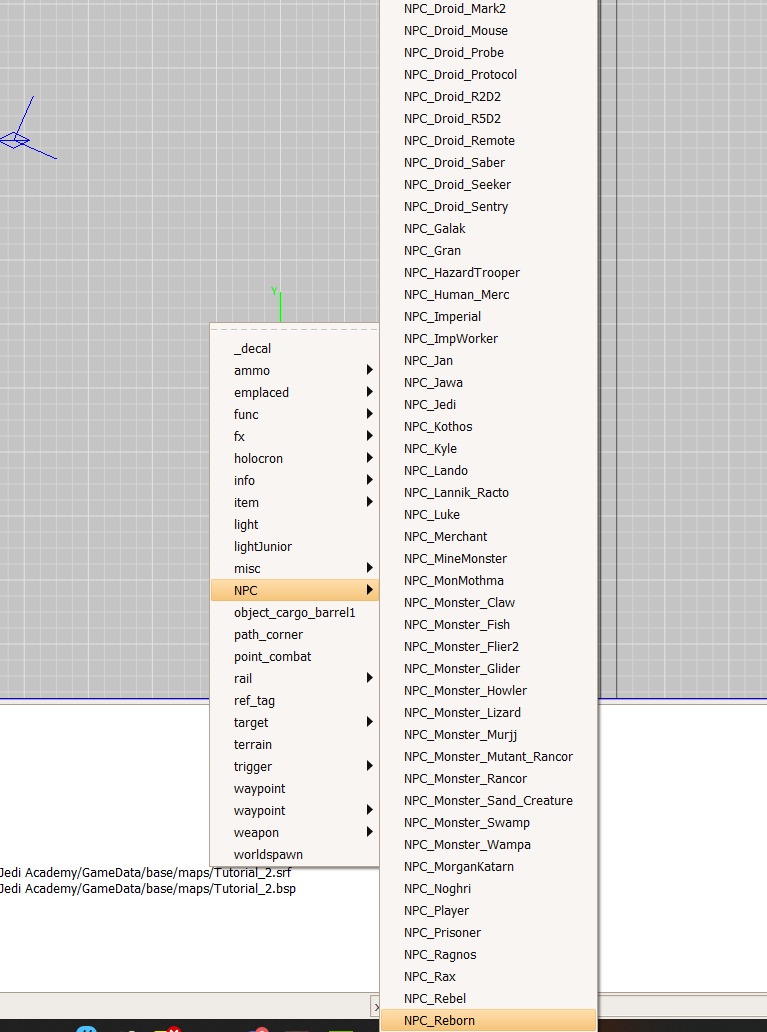
Somewhere in the map, right click on the map editor and create an NPC_Jedi map entity

The Jedi NPC will appear as a large red box with an arrow sticking out, the arrow illustrates what direction the Jedi will be facing when he appears ingame.

Press your N key to bring up the entity menu for the spawner entity, and follow along with the next few steps closely.
Starting off, you’ll see a cluster of checkboxes labelled “trainer, master, and random”. Many special NPC spawners like this feature similar commands, while the generalized NPC_spawner entity won’t feature any of these. Feel free to click on any of them at your leisure, I’ll just be keeping mine as its default appearance.

Locate the checkbox labelled “cinematic” and check it. Your window should look like this (notice spawnflags 32 was added automatically). Putting the NPC in cinematic mode will halt its typical behavior indefinitely, and will not actively seek out enemies. Some ingame actions can trigger the NPC to do some actions, but since we’re doing something very basic we don’t need to worry about this.
Later down the line I will show you some techniques you can use to prevent any unwanted actions.

Next we’re going to give this NPC something called an “NPC_targetname”, an NPC_targetname is what the script is looking for to affect a specific NPC. In the “Key” field, type “NPC_targetname”, and in the “Value” field, type “Jedi1”, press Enter. Your window should now display the NPC_targetname.

Now I said earlier that we want our Jedi NPC to have its Red team skin and a green lightsaber. You may be thinking “I can’t see any options! WTF!” That’s perfectly alright, this is where our next part of scripting comes in. We’re going to declare a Spawnscript!
A spawnscript is a type of script that is executed for a specific NPC when it's spawned into the game, very simple. There are other types of scripts, but I will save those for another time.
In the “Key” field, type “spawnscript”, and in the “Value” field, we’ll call for a new script and we’ll call it “tutorial_2/jedi_spawn”. Press Enter and your window should look like this (you may need to scroll down a little to see it):
Finally, we’re going to change the direction our Jedi is facing when he’s spawned, since right now he’s facing the wrong way!
In the “Key” field, type “angle”, and in the “value” field, type a number that forces the NPC to look toward the center of the room. For me it’s 270. You can also use the dialog box labelled “angle” if you’re using the same version of Radiant I’m using. Other versions of radiant have a number of angle buttons in a clock-type pattern. Regardless, make sure your NPC is facing the right direction. Once you apply an angle, the NPC spawner arrow should also change to reflect its new location.

To create the Jedi’s spawnscript, open up BehavED and start a new script.
On the left-side of the program, double-click on the “Set E”Set_Types” command twice to create 2 set commands. Your script should look like this:
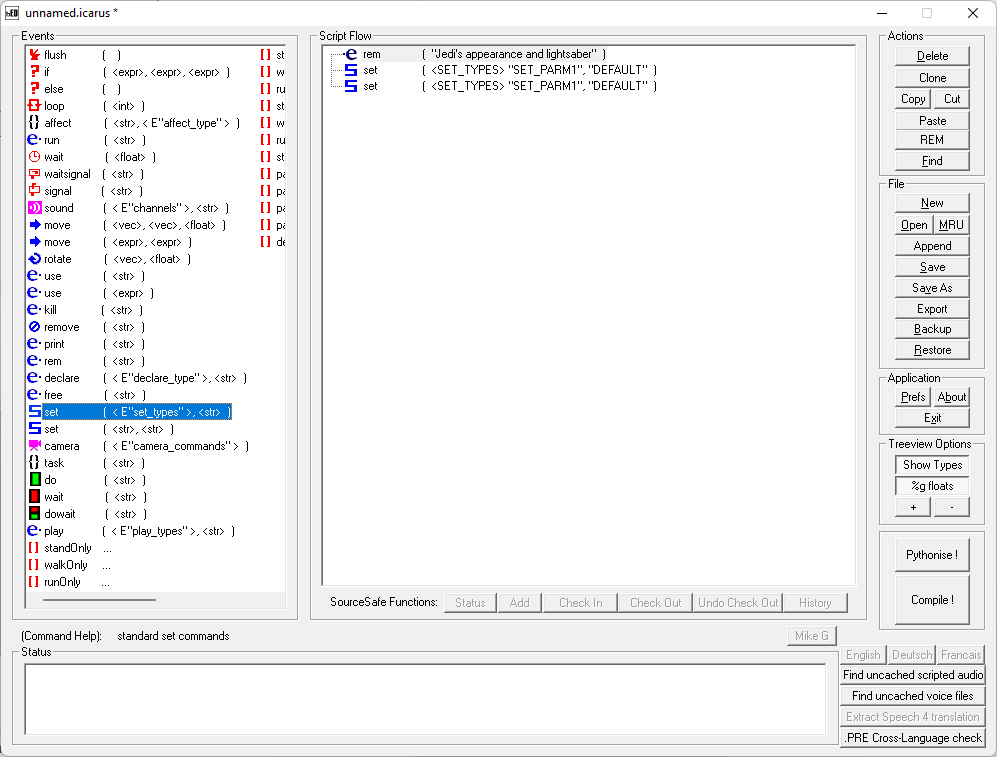
We’ll first start off with setting the Jedi’s appearance.
Double-click on the first “Set” command to bring up its options menu. Then expand the Dropdown menu. Unfortunately this part requires a very careful eye for beginners as this menu is not the best organized and there’s no easier way to search for commands. There are some sections to help with navigation, so just keep these in mind. I will try to be as specific as possible during these next few steps to help you out.
Scroll down the dropdown menu using either your arrow keys or (my preferred) your mouse wheel and look for the SET_SKIN command, which is located at the bottom of the “// Scripts and other file paths section” (near the top, just below all of the SET_PARM commands). You can also hold down your left mouse button and move it down for even faster scrolling!
PRO-TIP: There can be instances that the dropdown menu will close immediately when expanding it or any other dropdown menu in BehavED. If this occurs, either restart BehavED or hold down your mouse button and use your mouse wheel or arrow keys to navigate each option.

(You will not see the SET_MODEL - SET_GENDER options in your copy, these are unused commands meant for Galactic Legacy but aren’t used, so don’t panic!)
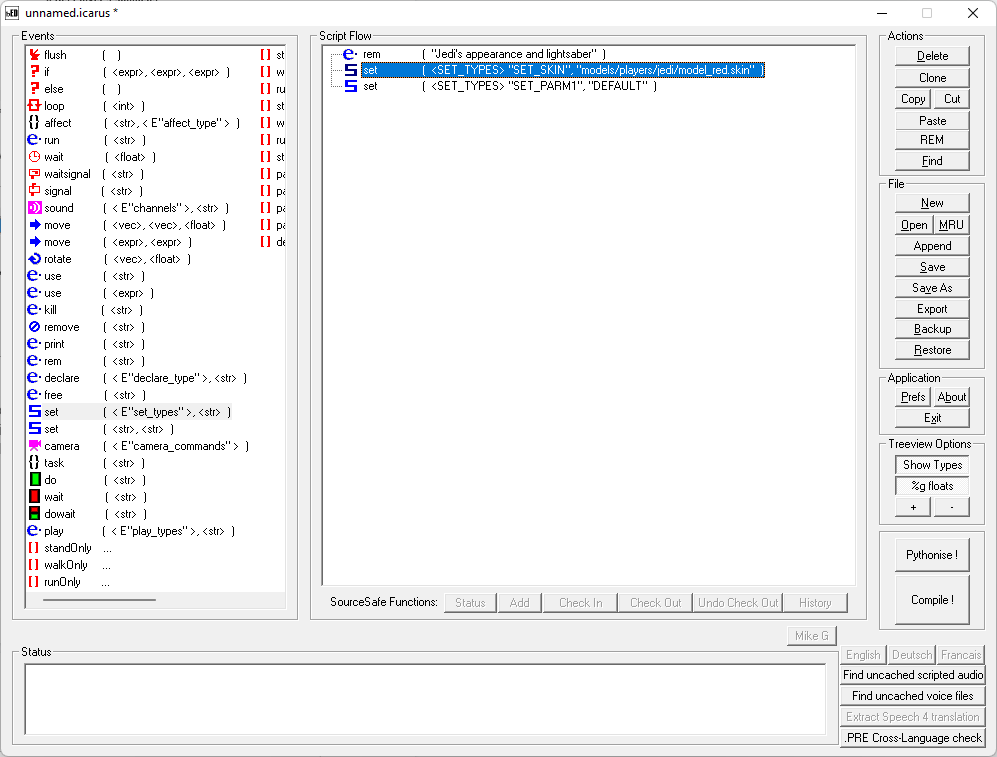
Once SET_SKIN is selected, click on the Re-evaluate button and your window should look like this:
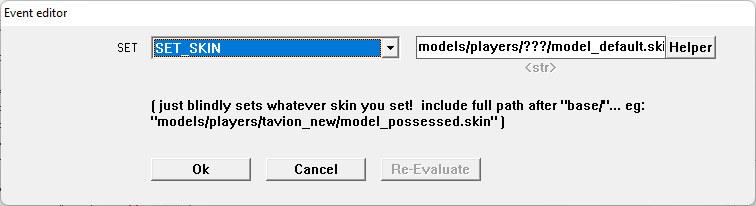
If you’re familiar with modeling or skinning, this file path should be familiar to you. Change the value in there to “models/players/jedi/model_red.skin”. To delete the previous value faster, double-click on the text inside to select everything then press your Delete or Backspace key (unfortunately Ctrl + A doesn’t work). Your window should look like this:
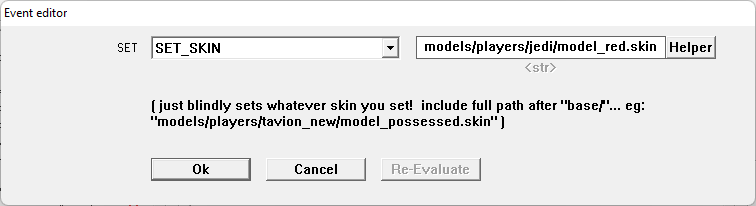
Click on OK and verify your script looks like this:
Next we’ll set the NPCs lightsaber color.
Double-click the 2nd “Set” command, and navigate the dropdown menu to look for the command SET_SABER1_COLOR1. This command will be located near the bottom of the entire dropdown menu in the “// Special Tables” section.
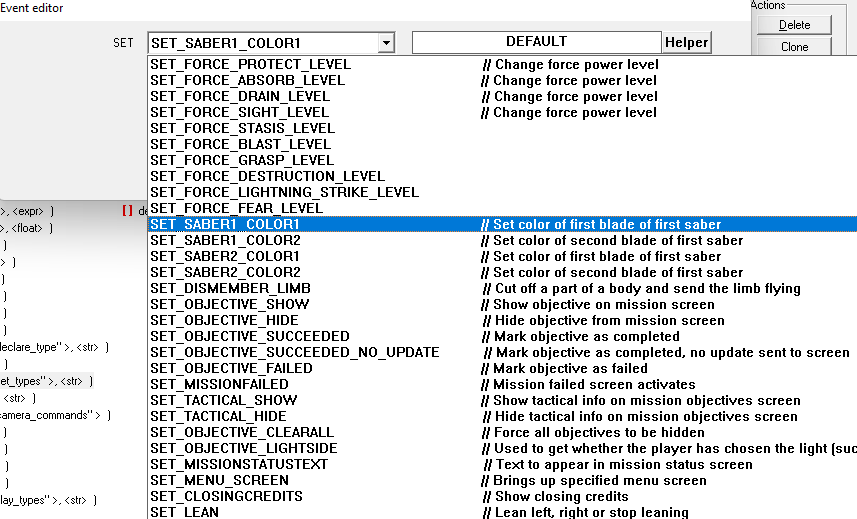
(SET_FORCE_STASIS_LEVEL through SET_FORCE_FEAR_LEVEL are Galactic Legacy-only script commands so you will not see them.)
Once you have the command selected, click on Re-Evaluate and you’ll see a dropdown menu. This new dropdown will display all saber colors currently featured in Jedi Academy. Expand the dropdown and click on the “Green” color (or really any color, I’m not judging). Once your color is selected, your window should look like this.

Click OK and verify your script looks like this:

Once everything looks good to you, click on the Compile button and save the script in your tutorial_2 folder and call it jedi_spawn.
Verify your script is in the right folder
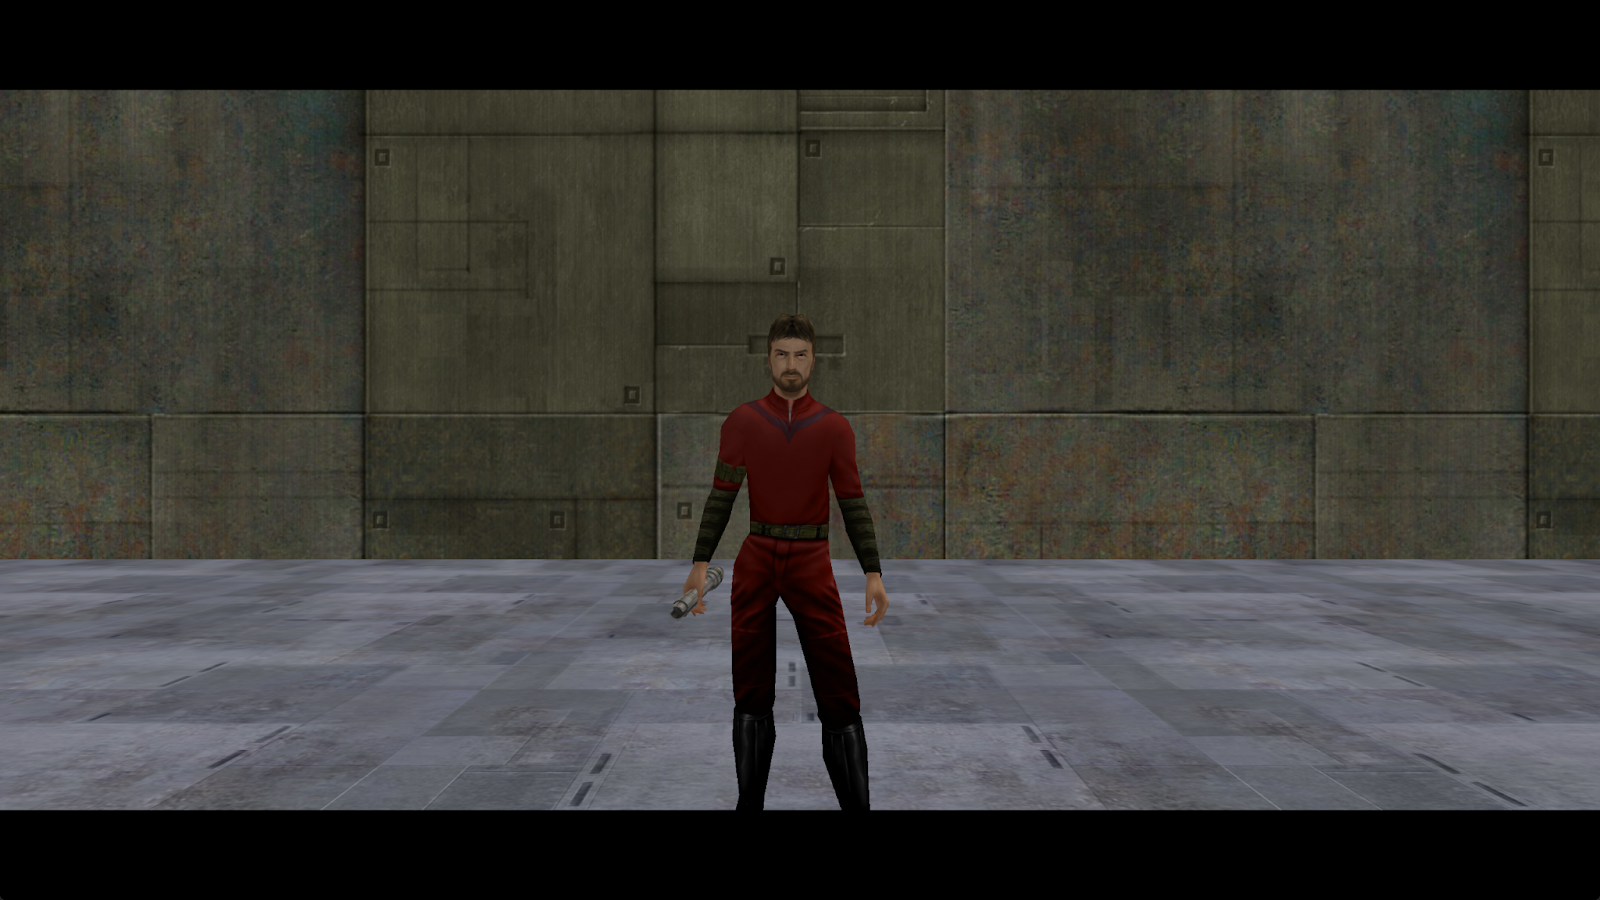
Now let’s test it! Compile your map and open Jedi Academy. If you did everything right, you should see a Jedi in red clothes holding a green lightsaber. If you want to verify the saber color, use console commands to set your team to enemy (playerteam enemy) and bump into the Jedi. He should ignite his green saber.

Now let’s do the Reborn!
THE REBORN
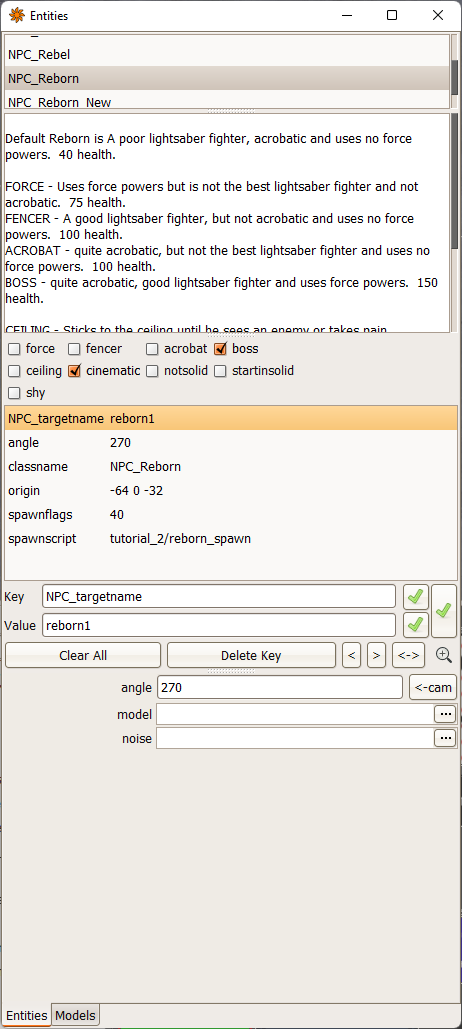
Back to Radiant, right-click on the map editor and select the NPC_Reborn map entity.
Similar to the Jedi NPC, press N to open the Entity menu. In the checkbox section, tick the boxes labelled “cinematic” and “boss”. Unlike the Jedi, whose NPC we did not change, we are changing the NPC for the Reborn spawner to spawn the boss npc. Again, this is only a function of the special NPC spawners and is not featured in the generalized NPC_spawner entity.

Keep in mind that while the spawnflags value is 40 instead of 32, the game will still recognize that this is a cutscene NPC. How? It’s a code thing.
Now that that mystery is solved, let’s go ahead and set the angle he needs to be facing and his spawnscript.
In the “Keys” field, type “NPC_targetname”, and in the “Value” field, type “reborn1”
Set his angle to face away from the Jedi (so for me it’s 270)
Finally, in the “Keys” field, type “spawnscript”, and in the “Value” field, type “tutorial_2/reborn_spawn”.
The final product should look like this.
Now that our Reborn is set up, let’s go ahead and compile our map once again.
Open up BehavED and start a new script. This one will be a little different from the Jedi as we’ll be adding a few extra commands. Once again, just follow along as best you can.
In BehavED, create four SET <E”set_types”> commands using your preferred method. Your script should look like this:
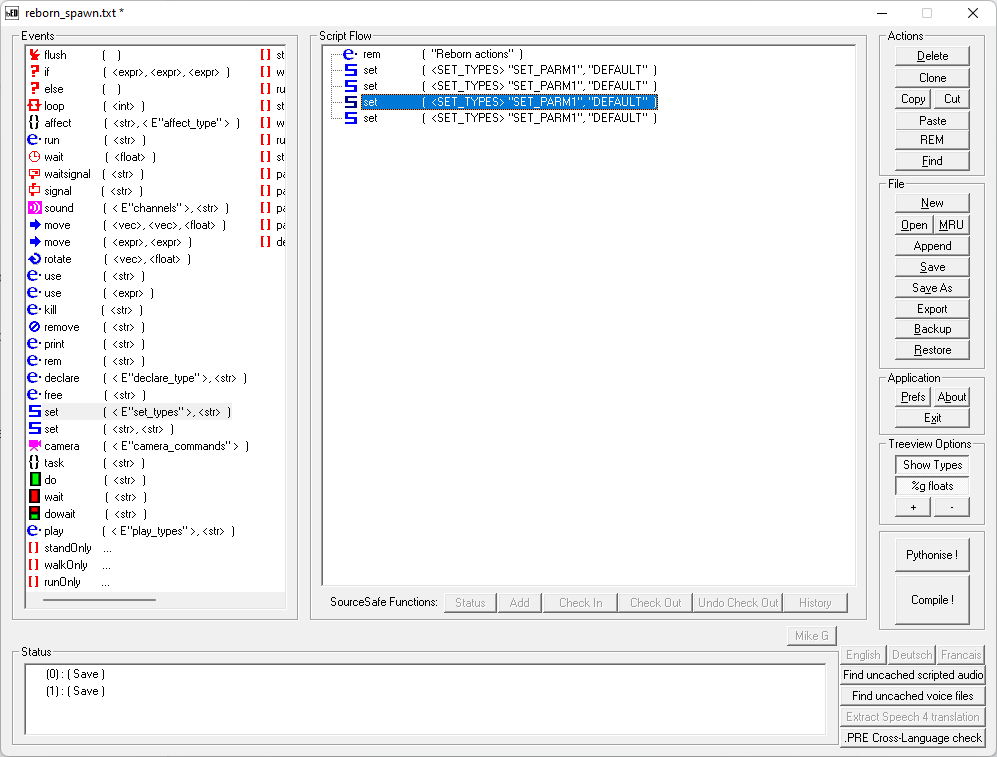
On the first SET command you created, double-click the command to open up the event editor. On the dropdown menu, you’ll be looking for a command called SET_WEAPON. You can find this command in the // Special Tables section of the dropdown menu, which is near the bottom.

Once you click on SET_WEAPON, click on the Re-evaluate button so a new dropdown menu is displayed which will show off a list of every weapon featured in Jedi Academy.

Expand the dropdown menu and click on WP_NONE, which will remove the NPC’s current weapon. Why are we doing this? Because I don’t want this reborn to be holding his weapon while meditating.
Click OK and verify your script looks like this:
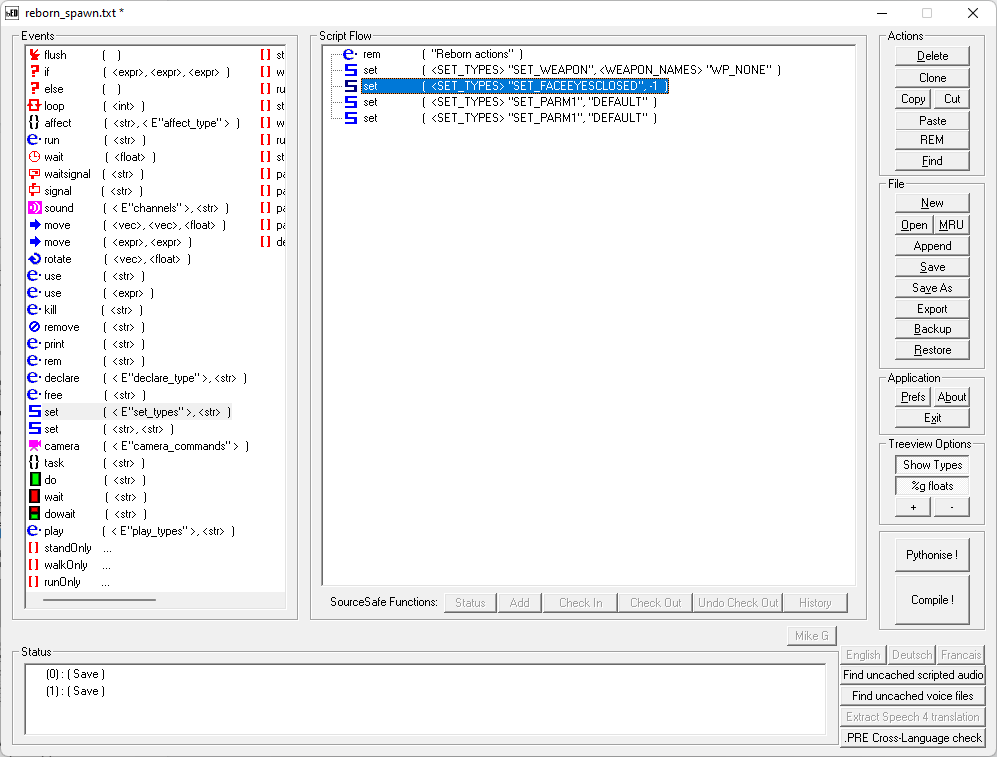
Next we’re going to shut the Reborn’s eyes. On the 2nd SET command, double-click it and on the dropdown menu you’ll be looking for the command SET_FACEEYESCLOSED, which you can find in the // Floats section located close to the middle of the dropdown menu.

Once again, click on Re-evaluate, and the number 0.00000 will appear. This number will tell the game how long to keep the npc’s eyes shut. As we want the Reborn to keep his eyes closed for an unknown length of time, we’ll just put the value at -1, like so.
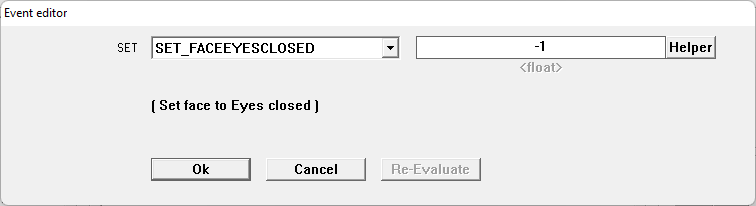
Click on OK and verify that your script looks like this:
The last two SET commands we’ll be using to control the Reborn’s meditation animation. I personally find it best to declare any animations last just to make sure everything else looks good before we continue.
On the 3rd SET command, double-click the command and on the dropdown menu look for the command SET_ANIM_BOTH, which you can find in the // Special Tables section close to the bottom of the dropdown menu.

Once the command is selected, click on Re-Evaluate, and a new dropdown menu will appear. This dropdown I will be perfectly frank with you, is simply the worst. It’s coarse, rough, irritating, and gets everywhere.
Expand the new dropdown menu and look for the animation BOTH_SIT2, which you can find in the “// BOTH_SITTING/CROUCHING section around the middle of the menu. Once you locate the animation, click on OK and verify your script looks like this.

Now if we don’t do anything else, the Reborn will perform the animation then return to his default standing animation. We don’t want him standing up yet and want him sitting for as long as we need him to. This is where our fourth SET command comes in!
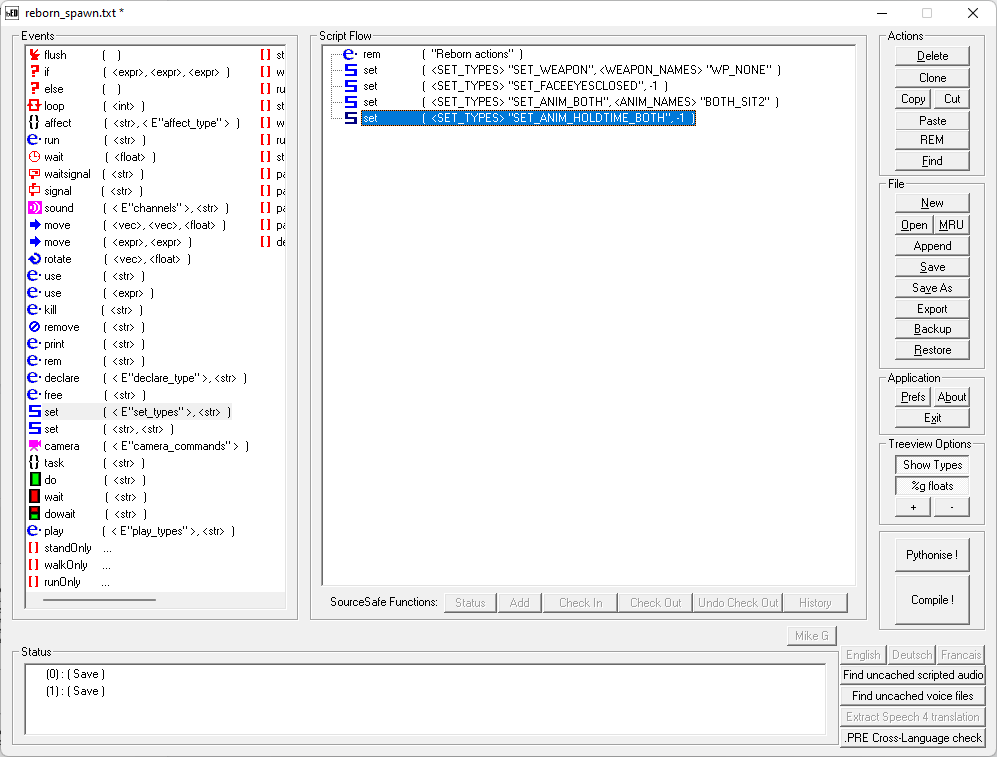
Double-click on the final SET command and in the dropdown menu, look for the command SET_ANIM_HOLDTIME_BOTH, which you can find in the “// ints” section close to the middle of the dropdown menu.

Once you find it, once again click on the Re-evaluate button and you’ll see the number “0” in the value box. As we want this Reborn to meditate for as long as we need him to, set this value to -1. Click on OK and verify your script looks like this:
Now that this script is completed, let’s go ahead and compile it! Save your script to the tutorial_2 folder located inside your scripts folder and name the script “reborn_spawn”, like how we called it in our map from earlier.
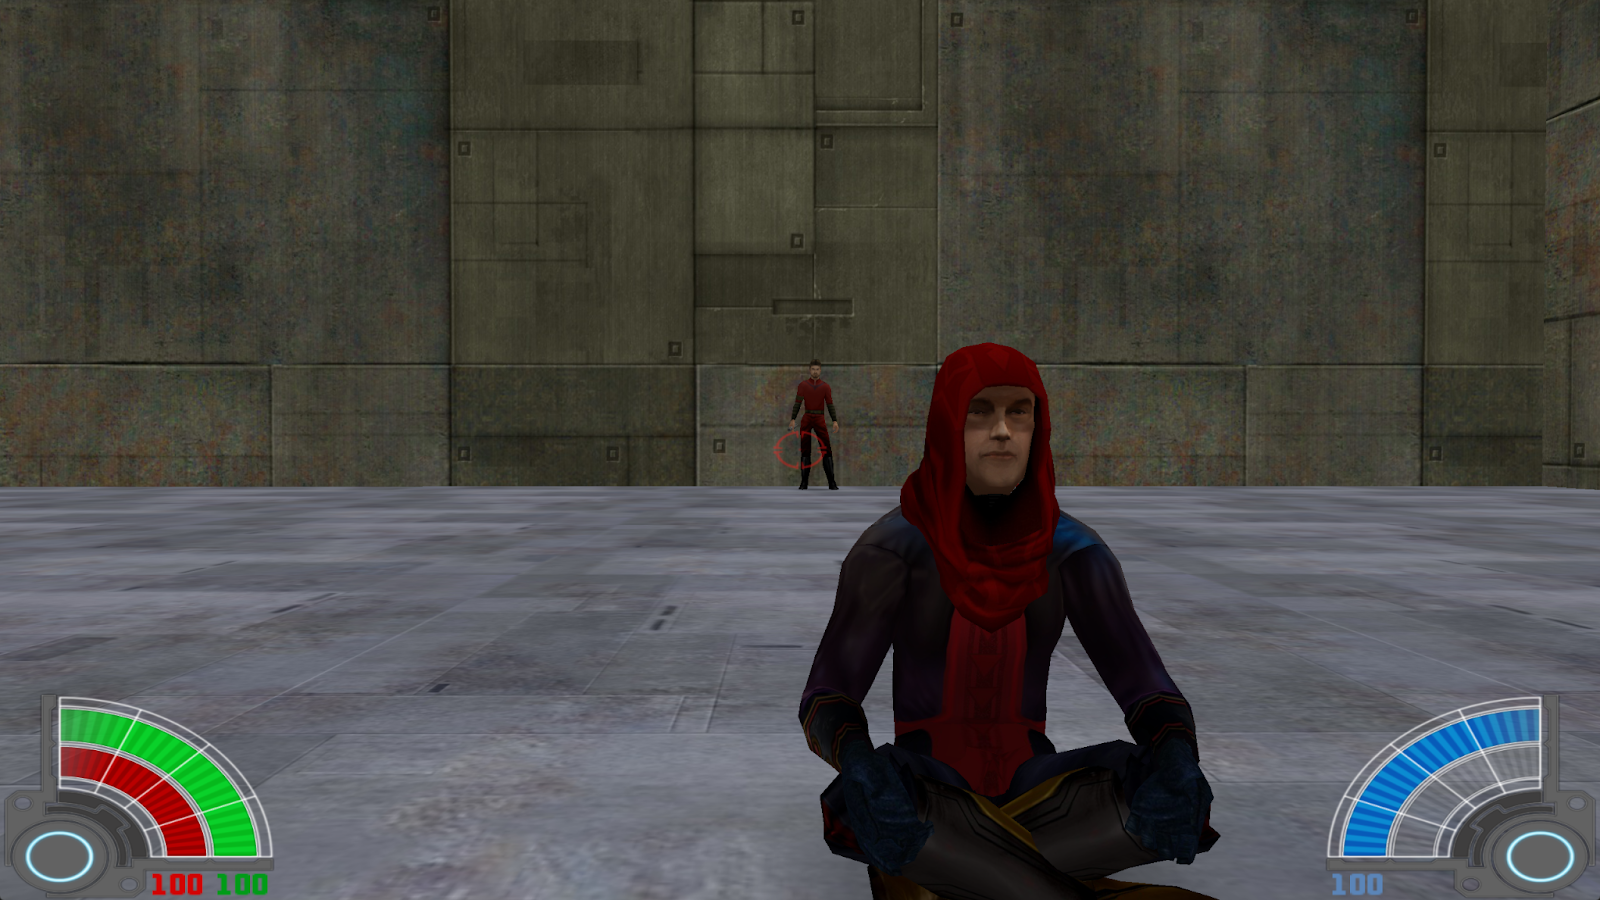
Now let’s test! With everything completed, we’ll go ahead and test that both our Jedi and Reborn are where they need to be and doing what they need to be doing. Start up Jedi Academy and load your map, and verify that your Reborn is meditating!
Alright, now our NPCs are in place! Let’s make ourselves a cutscene!
THE CUTSCENE: JEDI MOVEMENT
So the first step we’re going to complete is getting our Jedi to move. We want him to walk a few feet forward and stop at a certain place. So let’s do that!
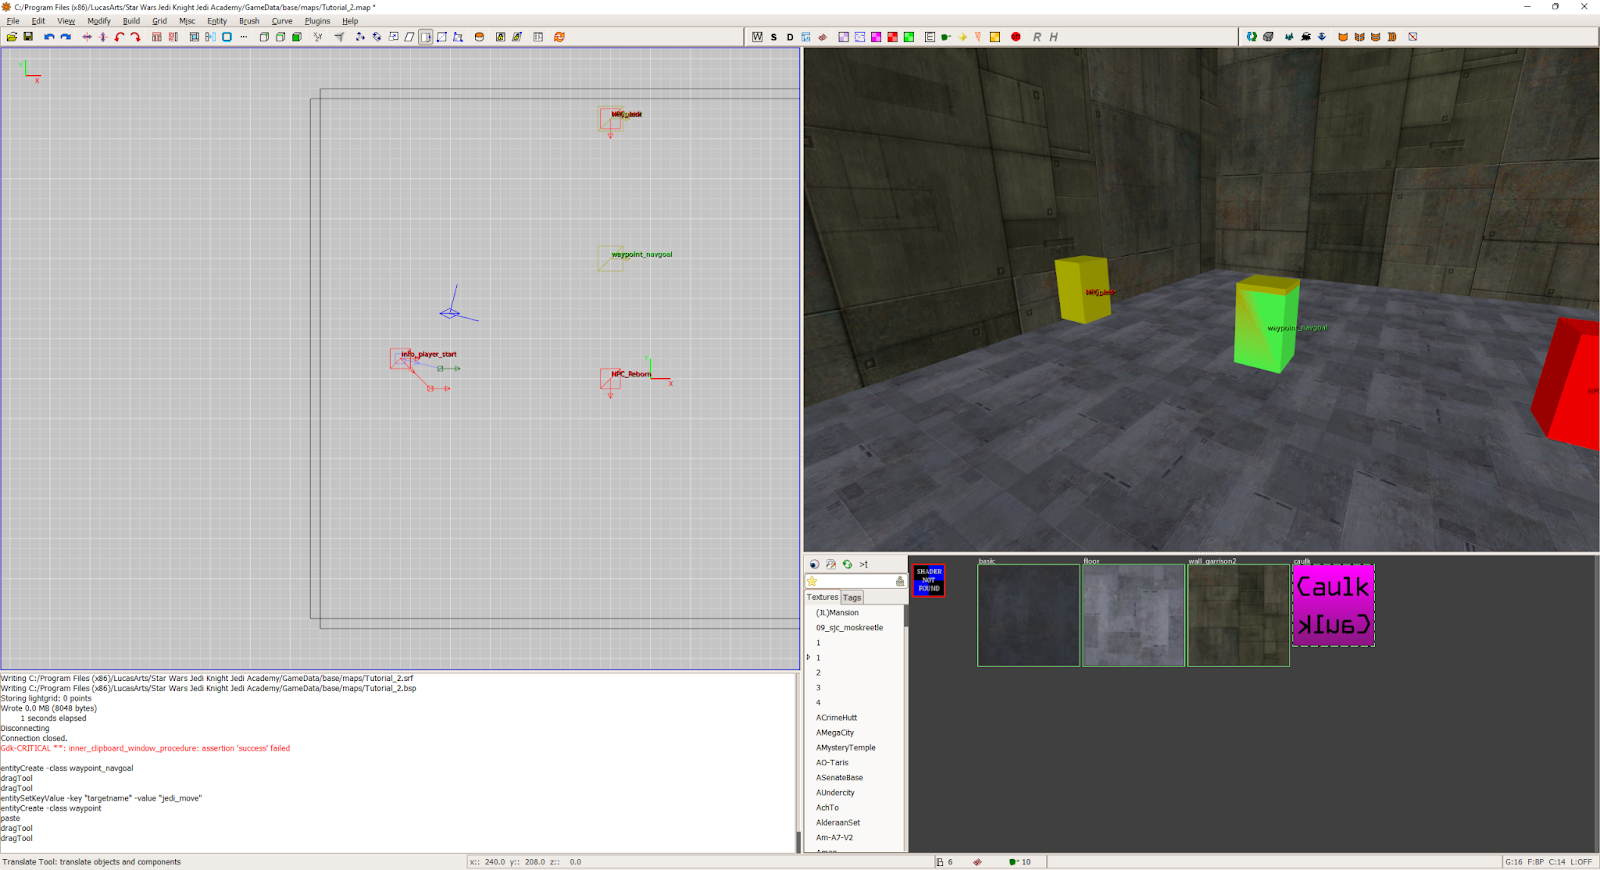
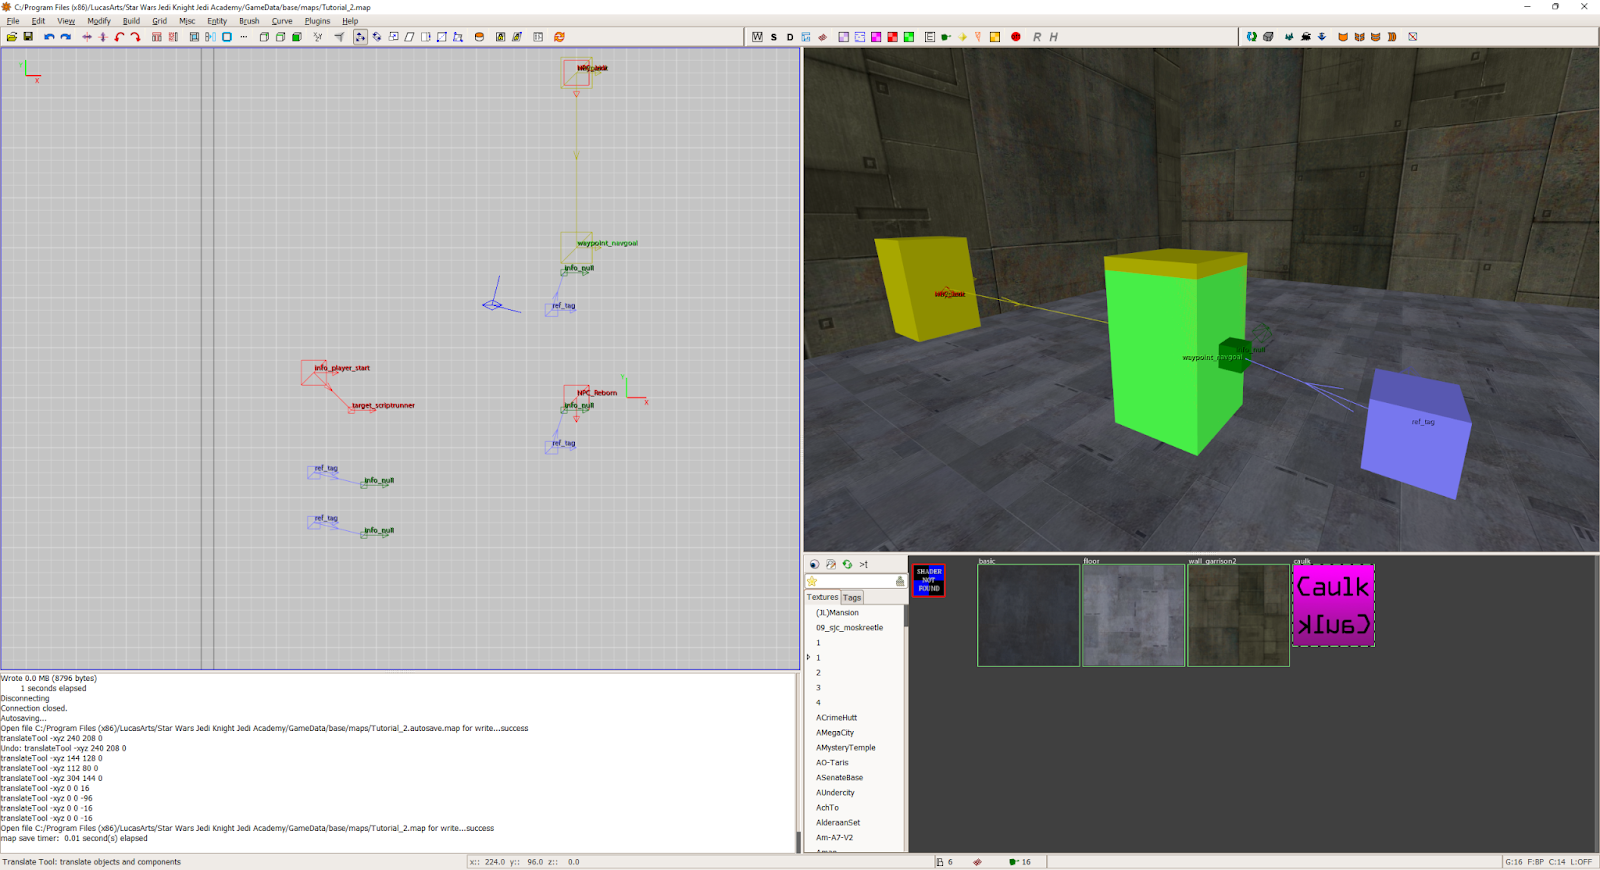
Back in Radiant right-click on the map editor and select waypoint_navgoal.

A green rectangular prism will appear on the map, a waypoint_navgoal is essentially a location for the NPC to move to when commanded to do so in the script. Now there are a few things to keep in mind when using navgoals.
You want your navgoals to be a decent distance away from an NPC, if the location is too far, one of two things may happen:
-
The NPC will not move to the navgoal at all
-
The NPC (if a Jedi/Sith) will force jump to the navgoal.
Neither are things that we want happening, so we’re going to take a few steps to prevent this.
First though, the location. Move the navgoal to your desired location (I’m going to place it fairly close to the Reborn).
Once you’re pleased with the location, press your N key to bring up the entity menu. In the “Key” field, type “targetname”, and in the “Value” field, type “jedi_move”. Press Enter and verify that your navgoal looks like this:

Exit out of the entity menu and right-click once again on the map editor and select “waypoint”.

A waypoint helps npcs to create a path from Point A to Point B. This entity is essential for any map you’re intending to use for Single Player as it helps allied npcs to follow you accurately. If you ever experienced problems while playing on a map trying to lead your npc friends and they get stuck constantly, a lack of waypoints is the reason why.
Place the waypoint on top of the Jedi’s NPC spawner so the two overlap each other. Once you’re done, create a second waypoint using a method of your choice (Copy and Paste works well) and place it on top of the waypoint_navgoal. Now our Jedi should have no issues going to the navgoal!
Select both waypoints you placed and press Ctrl + K to link the two together. This time, the order will not matter. If done correctly, a yellow line and arrow should be seen between the two, connecting them together.
Now let’s do some cameras!
THE CUTSCENE: CAMERA PLACEMENT
At this point in the tutorial, I strongly encourage you to take some creative liberties with your work. We all have our own opinions for the best camera placements for a cutscene. If you disagree with my choices, I completely understand and you can still follow along with this the same way.
For our cutscene I’m going to utilize a total of 4 cameras with the following purposes:
-
Camera #1 will be a close-up shot of the Reborn while he’s meditating, the Jedi will walk up from behind.
-
Camera #2 will be a close-up shot of the Jedi after he reaches the navgoal
-
Camera #3 will be a straight shot of the Reborn as he stands up and turns around
-
Camera #4 will be a straight shot of the Jedi as he prepares for battle
-
We’ll return to Camera #3 when the Reborn prepares himself for battle
Now this section will take some trial and error, take your time with this and most importantly, have fun!
SETTING UP YOUR TEST
To help you test your cutscene as quickly and efficiently as possible, let’s edit our first script a bit!
In BehavED, open up your “Tutorial_Start” script and select the MOVE, PAN, and wait commands. Copy each command 4 times and edit each camera command to read “camera2”, “camera3”, “camera4”, and “camera3” in that order. Once your edits are made, your script should look like this:

This will ensure that once we position our cameras, we can test them quickly. Since we know what cameras we’re using, and in what order, we can perform this step in advance!
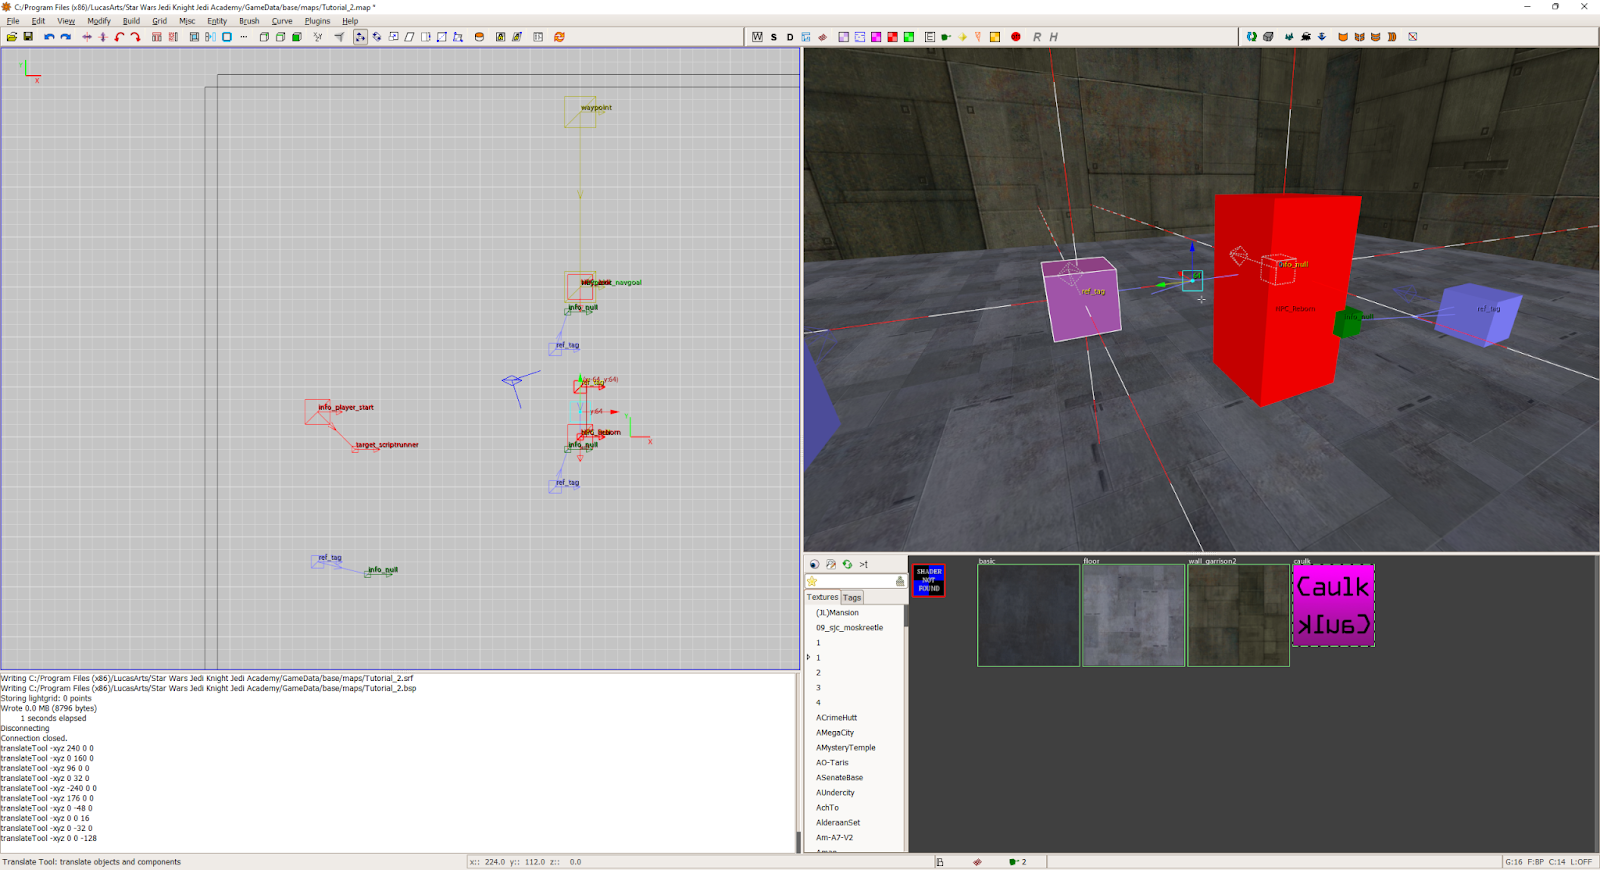
Back in Radiant, copy and paste the first camera we wrote earlier 3 more times for a total of 4 cameras. Place them where you want for now so you can select them when you need them. As you copy and paste each camera, change each ref_tag’s targetname to read camera2, camera3, and camera4. Some versions of radiant will do this step for you (how convenient!).
CAMERA #1
For our close-up shot of the Reborn we’ll use the first camera we created earlier in this tutorial.

Take the first camera and position it fairly close to the reborn and lower it to about halfway down the NPC spawner (to account for the Reborn meditating at the start). If you use the same camera we made at the start of this tutorial, you can compile your map and start up your map immediately to check your work. I’m doing a slight angle shot just to add a bit of dimension.

Verify that your ref_tag has a targetname of camera1 and is linked with its appropriate Info_null (there should be a blue-ish line and arrow connecting the two).

Continue checking and testing your camera placement until you’re satisfied with your camera placement. Ultimately I chose to use this placement:

CAMERA #2
For the second camera, I want it to also be an angled shot of the Jedi, but placed where he should walk to once our cutscene gets going.
Select camera2 and its info_null, and move both entities close to the navgoal entity.
Now what about testing? What can we do to make sure we have the angle and shot we want?
You have two options, you can copy/paste the Jedi’s NPC spawner for a reference; placing it where the Jedi would end up. Or move the original spawner to the navgoal’s location. Regardless of which option you pick, continue to adjust the camera until you get the desired camera; compiling and testing until you are satisfied. Ultimately I decided to use this shot:

CAMERA #3
For Camera 3, this will be used for a full shot of the Reborn as he stands up and prepares for battle, and is the only camera we will call twice in the script.
Grab your Camera3 ref_tag and its info_null entity and position the camera to your desired angle. I will be placing mine to face behind the Reborn, attempting to keep room in the shot to keep the Reborn’s whole body in frame when he stands up.
Like the other few cameras, adjust and choose your angles until you’re satisfied with your camera work. Ultimately I went with this shot:
CAMERA #4
For our last camera, similar to Camera 3 but facing the Jedi instead. Select your Camera4 ref_tag and its info_null and position the camera to face the Jedi. Choose an angle best suited to your liking and continue testing until you’re satisfied.
Ultimately my shot looked like this:
Alright! All of our cameras are placed! Now let’s make a cutscene!
PUTTING IT ALL TOGETHER
The stage is set, everything is set up. Now let’s make a cutscene! Move your Jedi back to his original position or delete the extra NPC spawner, depending on your testing method. Compile your map if you haven’t done so already. You can close Radiant now, you won’t need it anymore, unless you want to add more to your cutscene. But I won’t be referring to Radiant anymore for the rest of this tutorial.
Back in BehavED, open up your Tutorial_Start script and let’s do this!
MOVING THE JEDI
Under the first camera command, we’ll begin our process by creating an affect command for our Jedi. This affect command will tell our Jedi to move to the navgoal we placed earlier, and walk (not run) to it.
Under the camera1 move and pan commands, create an affect command, and double-click on it to bring up its editor window.
In the dialog box that says “DEFAULT”, change the “DEFAULT” value to Jedi1, and click OK. Your script should look like this:
Expand the affect command for the Jedi and create two SET<E”set_type”> commands. To help with placement, keep the affect command selected and expanded to make sure both commands are created inside the affect. Your script should look like this (notice the small indent for the two set commands, verifying they’re both in the affect command):

Double-click on the first SET command to bring up the editor, and navigate the dropdown menu and look for the command SET_WALKING. This command can be located in the “// Booleans” section of the menu, near the bottom of the dropdown menu.

Click on the Re-evaluate button and notice the new dropdown menu which should say “false”, expand this new dropdown menu and select the “true” option. Click OK and verify your script looks like this:
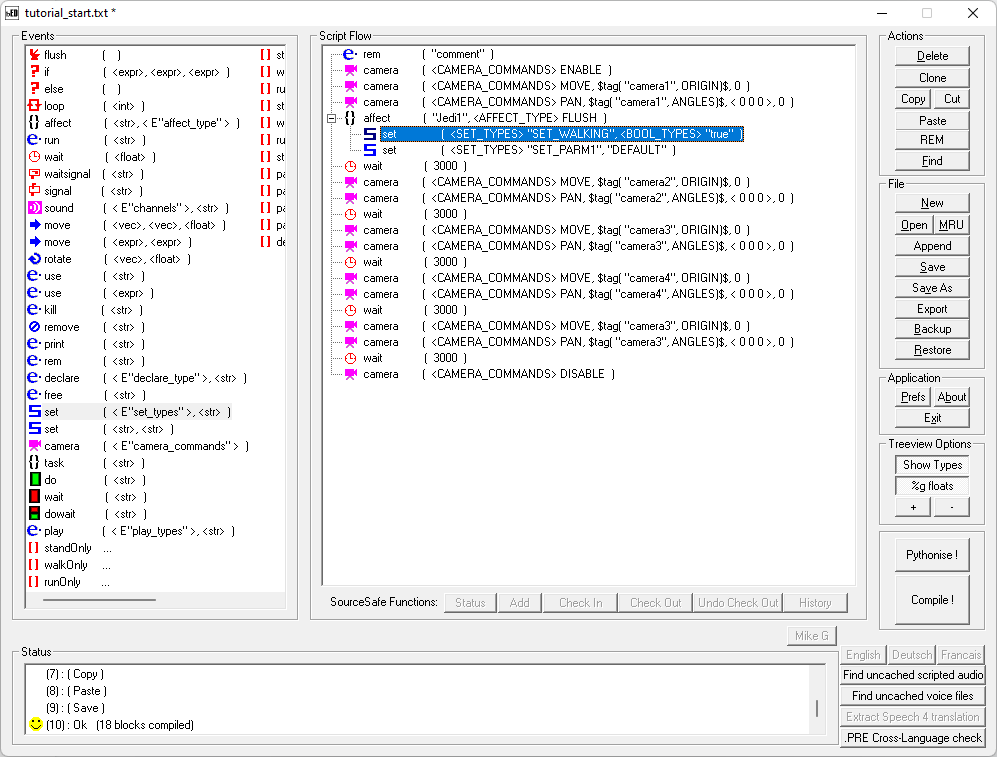
Double-click on the 2nd SET command and expand the dropdown menu. Look for the command SET_NAVGOAL, which can be found in the “// Standard Strings” section near the top of the dropdown.
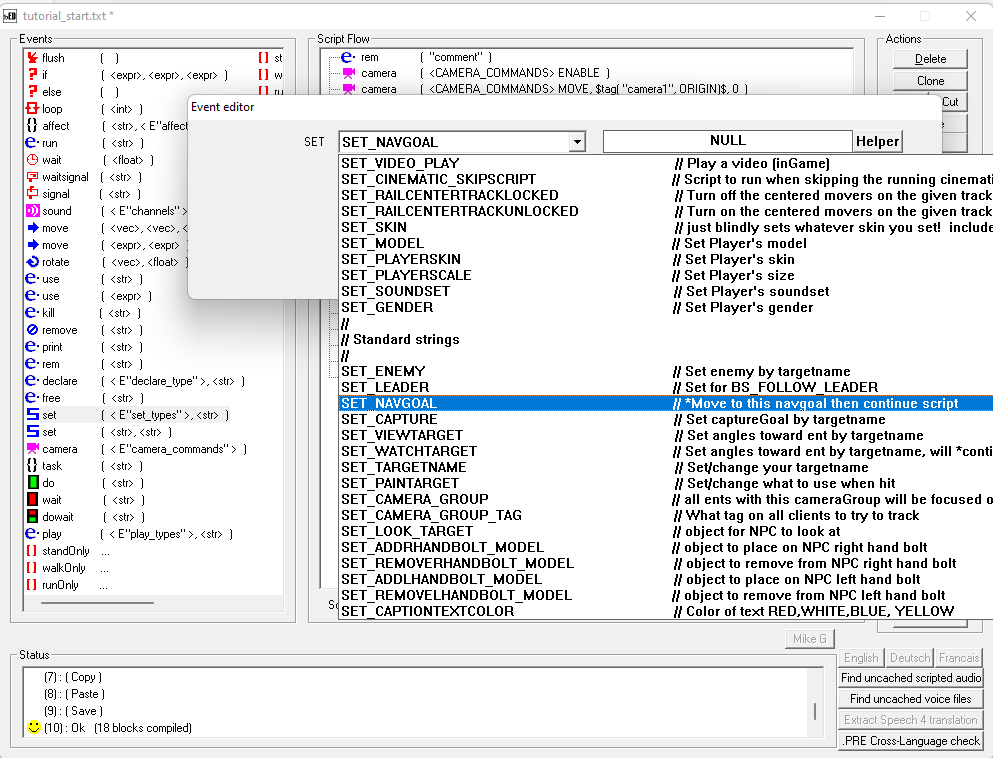
Once found, click on Re-evaluate, and in the box that says NULL, type the name of our navgoal from earlier, which is jedi_move. Click OK, and verify your script looks like this:
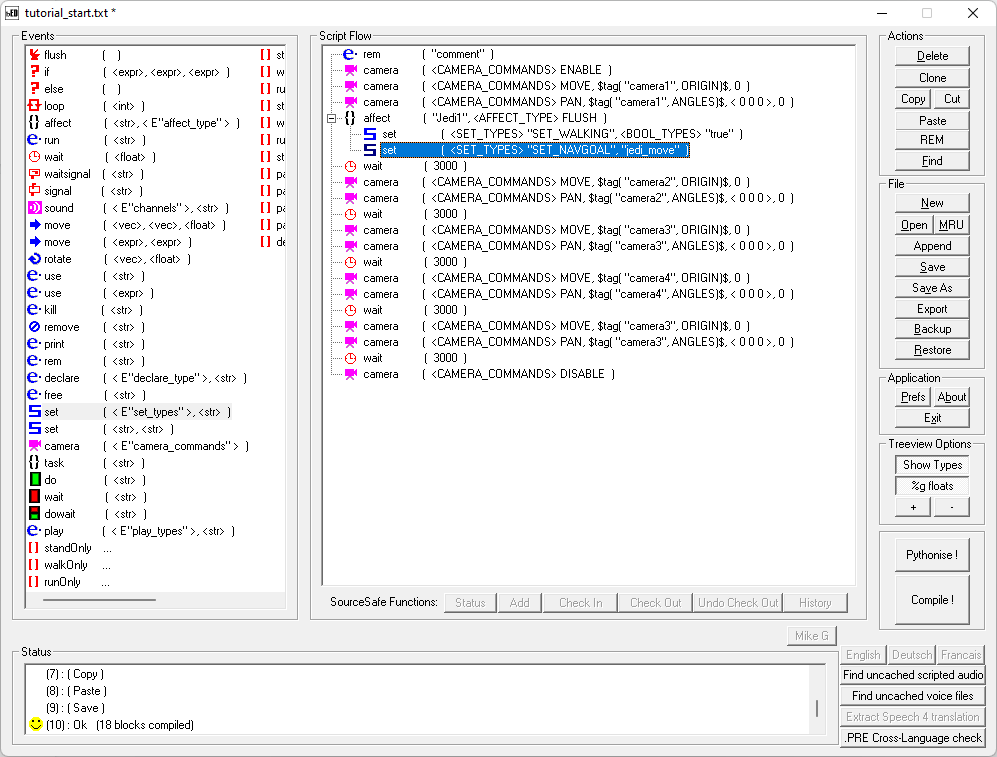
Now our Jedi will move to this location!
JEDI TALKING
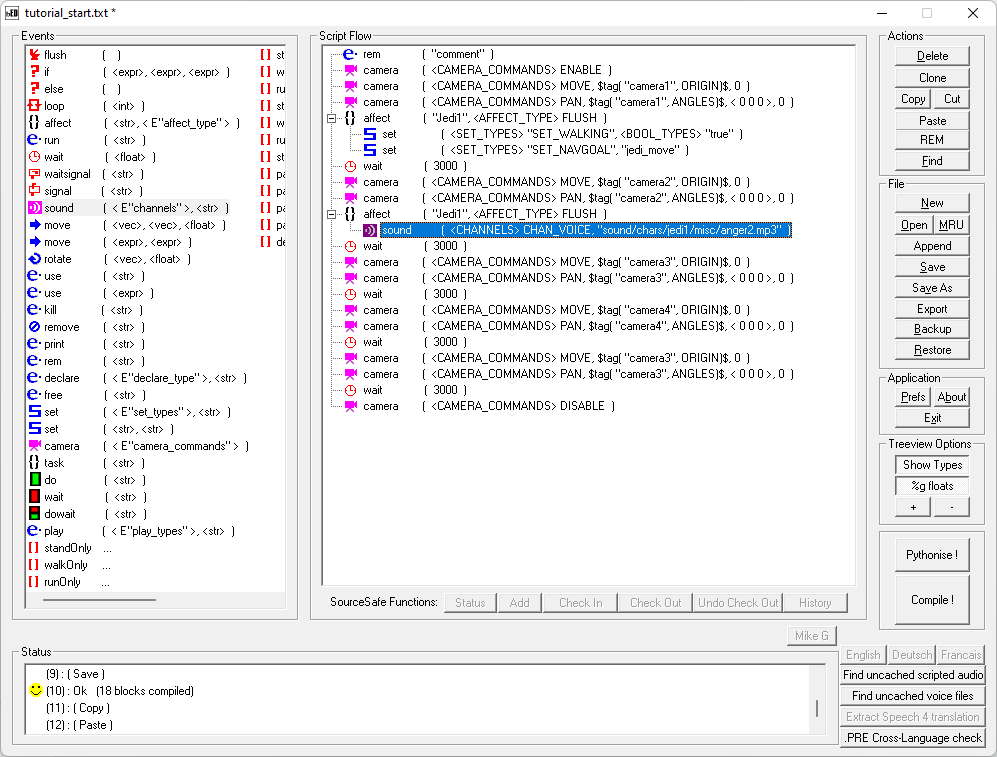
Once the Jedi moves we want him to say something, and we want him to talk after reaching his navgoal with Camera 2 focused on him.
Under the camera2 move and pan commands, create a new affect command and have it target Jedi1. Inside the affect command, create a Sound command. Once you’re done, verify the script looks like this:

Double-click on the sound command to bring up its editor. You’ll see a dropdown menu with the default value CHAN_AUTO, and another box which says “FILENAME”. We’ll go over the channels and what they mean in another tutorial, so for now expand the dropdown menu and select the value CHAN_VOICE. Click on the Re-evaluate button and paste the following text into the FILENAME box: “sound/chars/jedi1/misc/anger2.mp3”. The editor window should look like this:

Once you click OK, verify your script looks like this:
Now as it’s currently written, there will be no pause between the camera changing and the Jedi speaking his line of dialogue. So let’s add a little pause! With the affect command selected, double-click the wait command to create one in the Jedi’s affect. I’m going to leave the wait command at a 1 second pause, but feel free to change the pause to your own liking.

REBORN ACTIONS
Now that the Jedi has spoken, it’s time to make the Reborn react! Under the first set of Camera3 move and pan commands, create a new affect command, and have it target Reborn1, like so:

We’re going to have the Reborn perform a few actions:
-
Play an animation to stand up
-
Face the Jedi
-
Pull out his saber
-
Speak an aggressive line of dialogue
Let’s get ourselves set up!
In preparation, create three SET <E”set_type”> commands and 1 sound command inside the Reborn’s affect. Verify your script looks like this before continuing on:
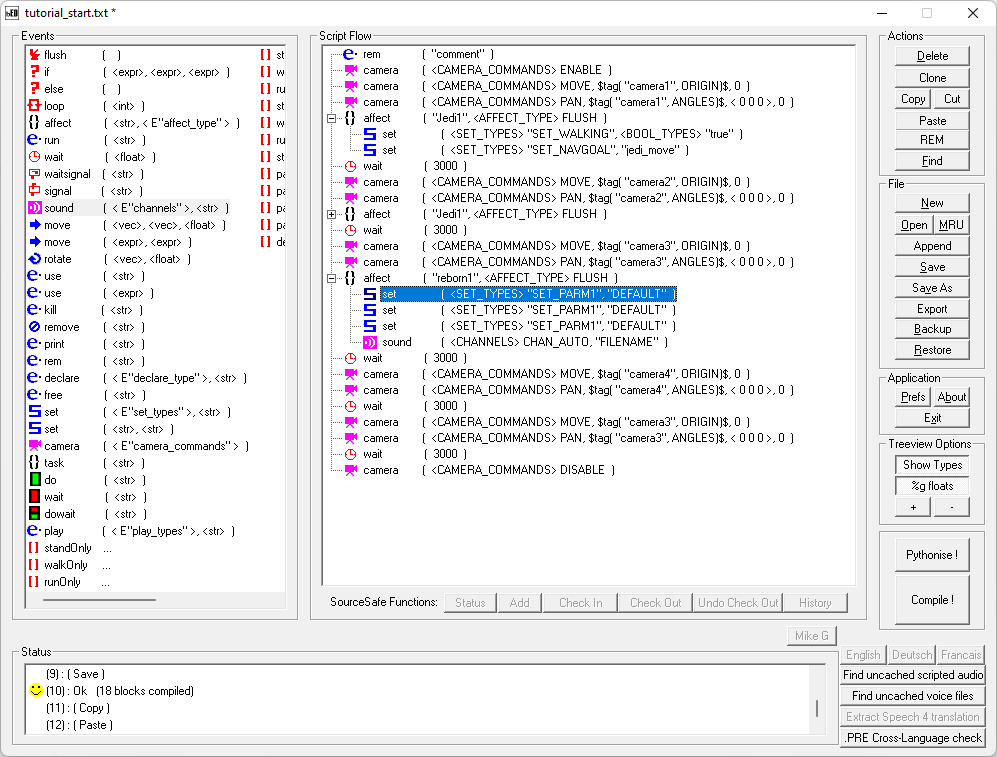
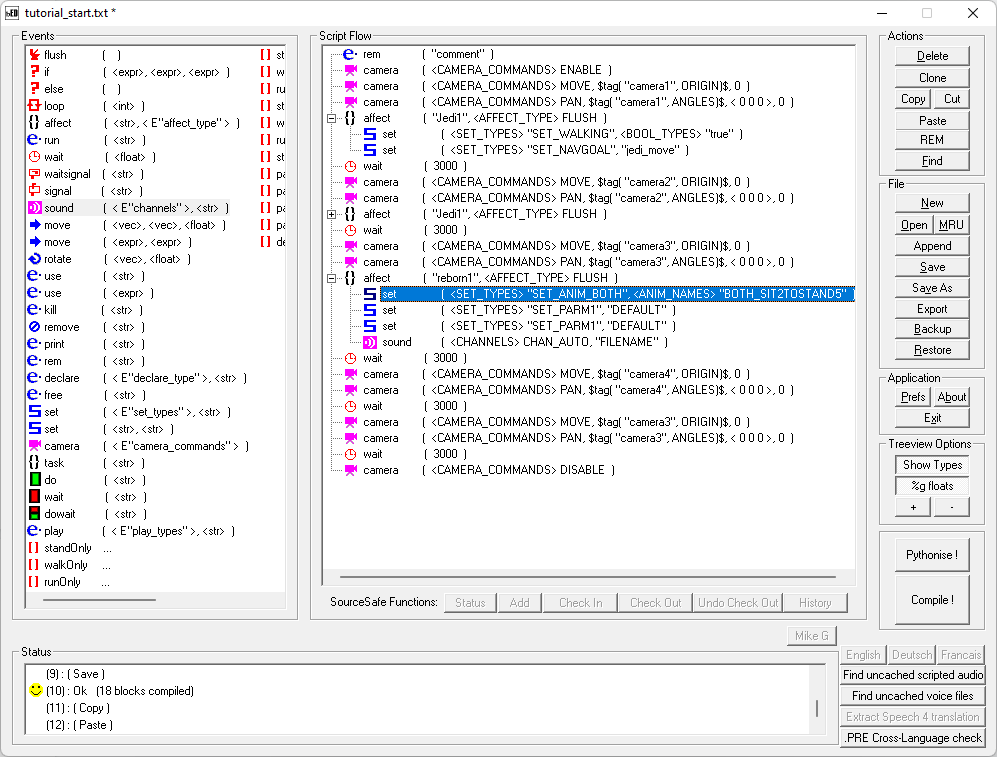
To start, let’s have our reborn stand up! Double-click on the first SET command and on the dropdown menu select the SET_ANIM_BOTH command, located in the “// Special Tables” section near the end of the dropdown menu.

Click on Re-evaluate and click on the new dropdown menu to look for the animation BOTH_SIT2TOSTAND5, located in the “// BOTH_SITTING/CROUCHING section near the middle of the menu.

Once this is selected, click OK, and verify your script looks like this:
Double-click on the 2nd SET command and expand the dropdown menu. Look for the command SET_WEAPON, located in the “// Special Tables” section of the menu close to the bottom.
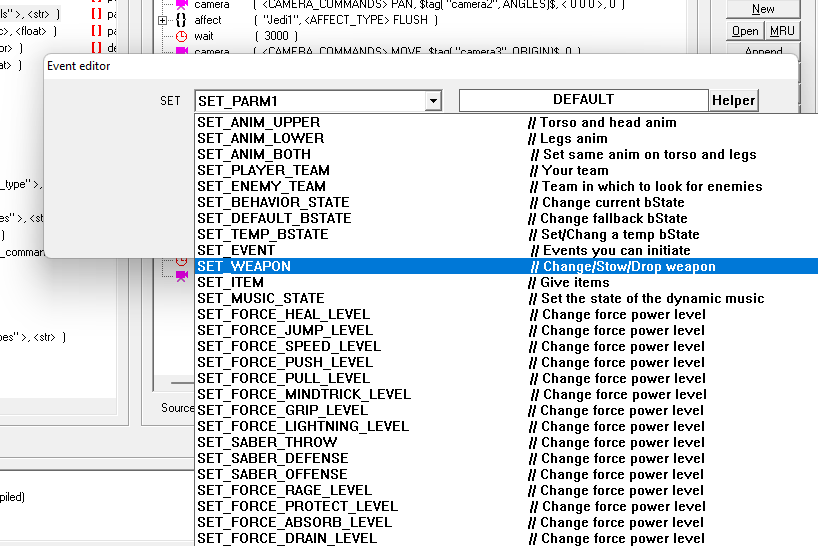
Once selected, click on Re-evaluate and on the new dropdown menu that appears, select WP_SABER

Click OK and verify your script looks like this:

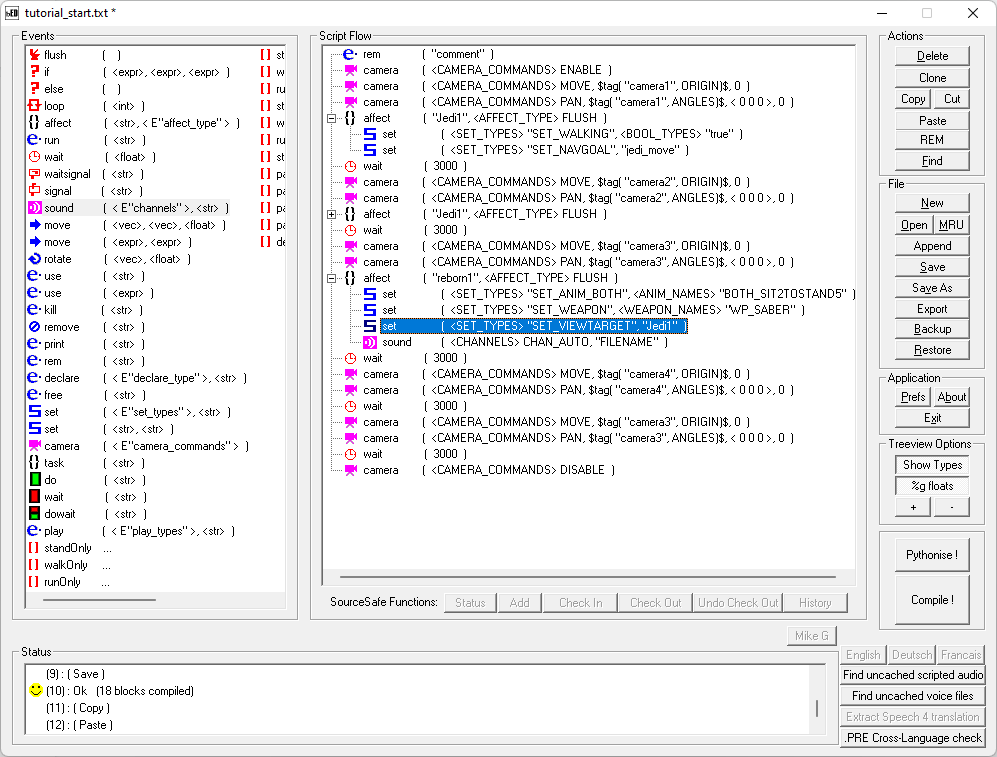
For our last SET command, double-click it and expand the dropdown menu. Look for the command SET_VIEWTARGET and click on the Re-evaluate button. In the box labelled “NULL”, type the Jedi NPC’s targetname, which earlier we called Jedi1.

Click OK and verify your script looks like this:
Finally for the sound command, double-click on it to bring up the editor. Expand the dropdown menu inside and select CHAN_VOICE. Click on Re-evaluate, and in the box that says “FILENAME”, paste this text inside:
“sound/chars/reborn2/misc/anger1.mp3”
The window when you’re done should look like this:

Click OK and verify your script looks like this:
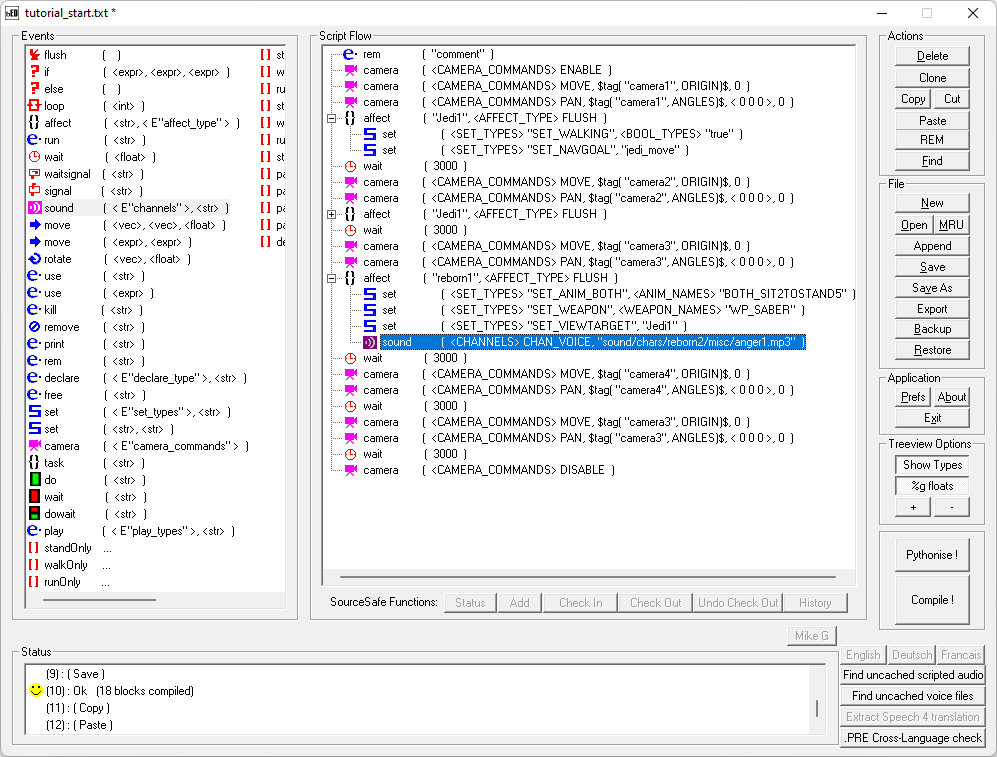
Now if we were to execute this, the Reborn would perform all 4 actions at the same time. We don’t want that, so let’s add some pauses! Create a few “Wait” commands and place them and edit them as shown in the below screenshot. Make your own personal changes if you would like. Also lengthen the wait prior to the Camera4 move/pan commands to 6000.

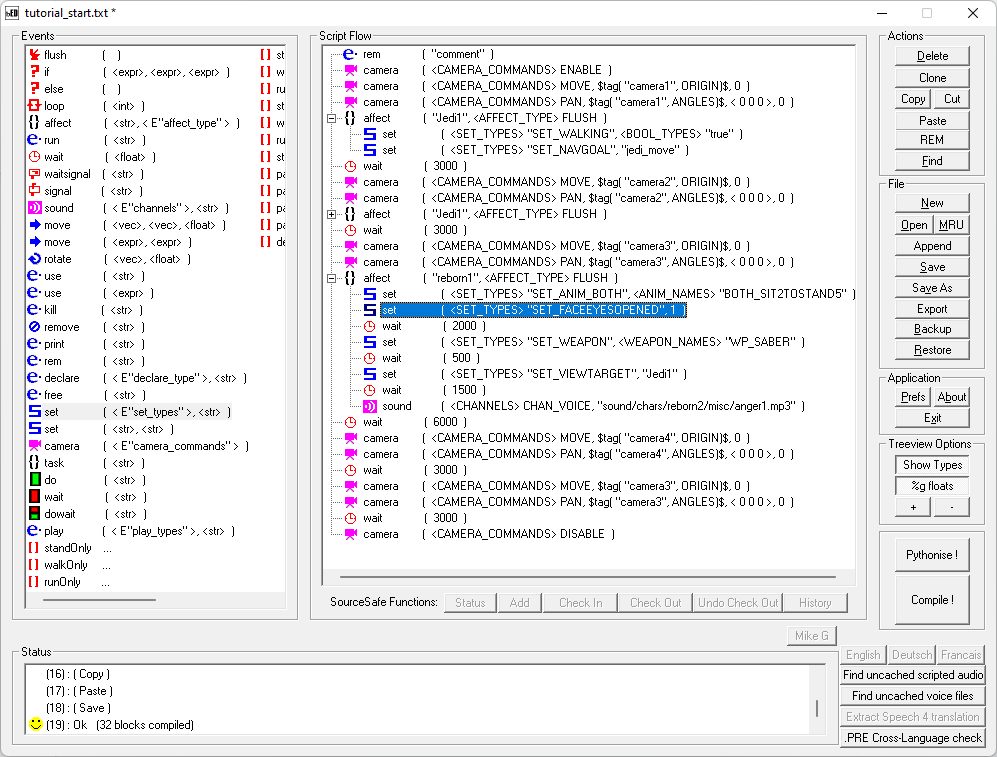
One last thing before we move on, we need to open the Reborn’s eyes back up! Create a new SET command under the Animation Command and create a SET_FACEEYESOPENED command, located in the “// Floats” section of the menu, close to the top of the menu.
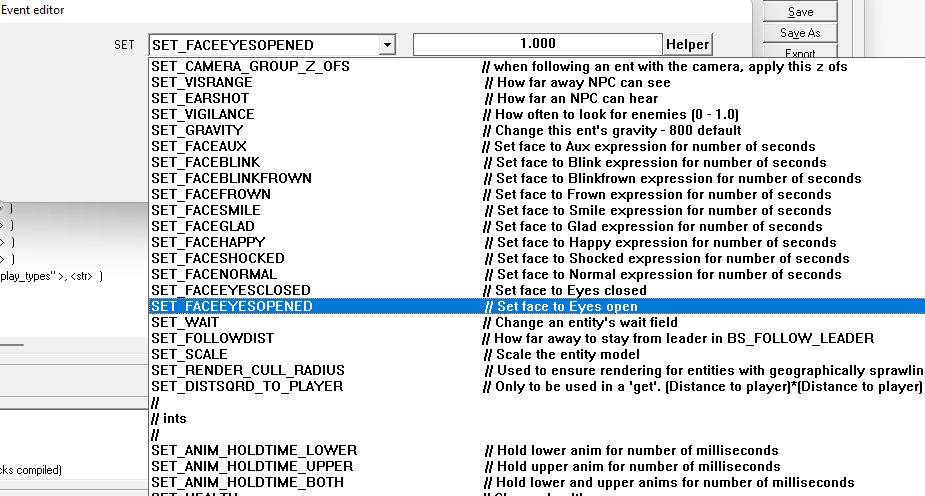
Once you select the command and click “Re-evaluate”, type “1” as the value for the command. Your window should look like this:

Click OK and verify that your script looks like this:
JEDI RESPONSE
The Jedi isn’t gonna like that very much, so let’s make him turn on his saber, and let’s also have him perform a fancy flourish to show that he means business!
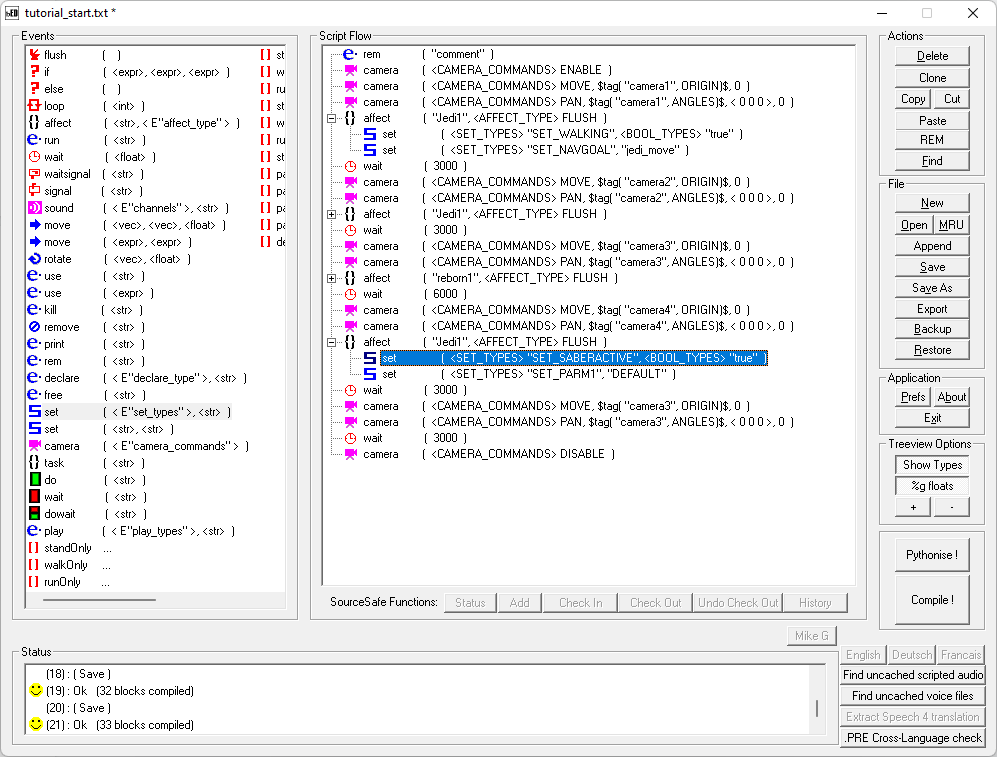
Create an affect command under the camera4 move/pan commands and have it target “Jedi1”. Inside the affect command, create two SET commands. Verify your script looks like this:
Double-click on the 1st affect command and look for the command SET_SABERACTIVE, located in the “// Booleans” section of the menu near the bottom.
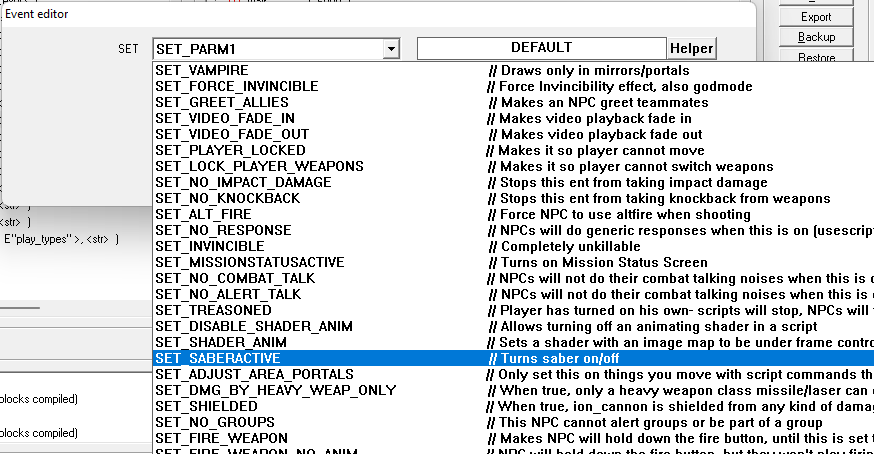
Once the command is selected, click on Re-evaluate so the boolean dropdown menu appears. Select “true” for the option and click OK. Verify your script looks like this before continuing:
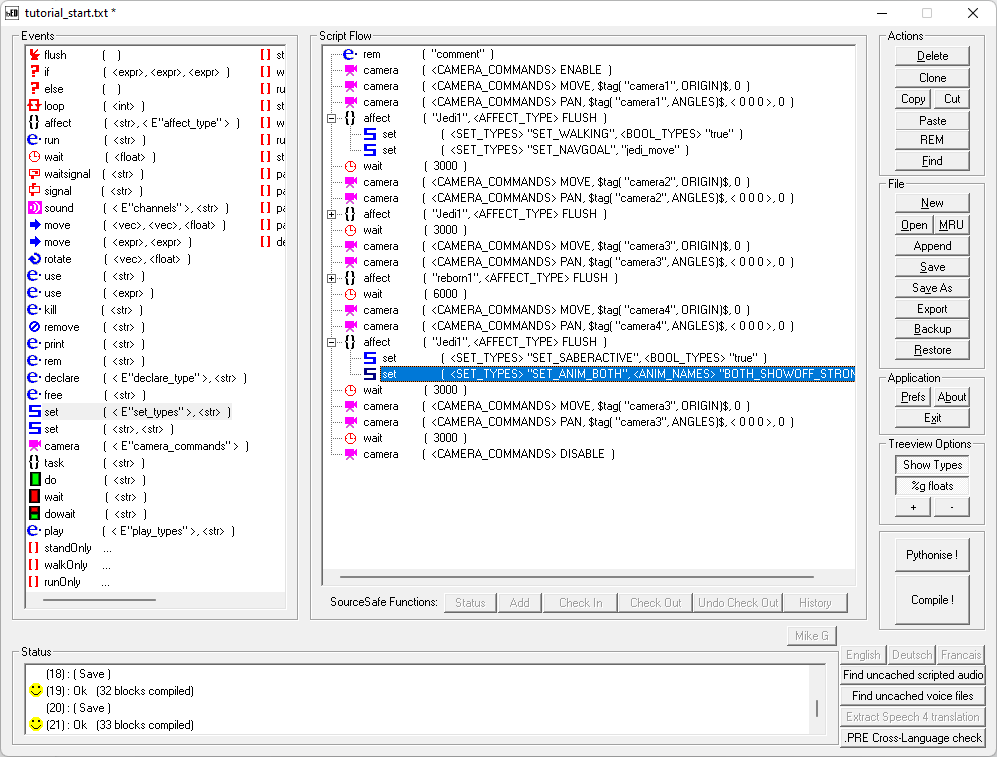
Double-click on the 2nd SET command and select the SET_ANIM_BOTH command located in the “// Special Tables” section of the dropdown menu near the bottom of the menu.

Click on “Re-evaluate” and in the new dropdown menu, look for the animation BOTH_SHOWOFF_STRONG located in the “// BOTH_ACROBATICS” section of the menu near the bottom of the menu.
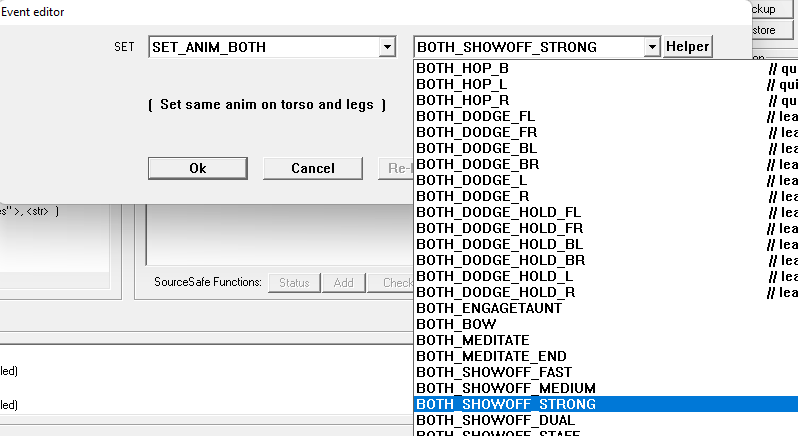
Once it’s located, click OK and verify your script looks like this:
The Jedi has now responded and looks confident! What will the Reborn do?!
REBORN RESPONSE
We’re going to have the Reborn pull out a surprise 2nd saber and perform an animation! That’ll certainly make the Jedi fear for his life, because 2 sabers are better than 1….right?
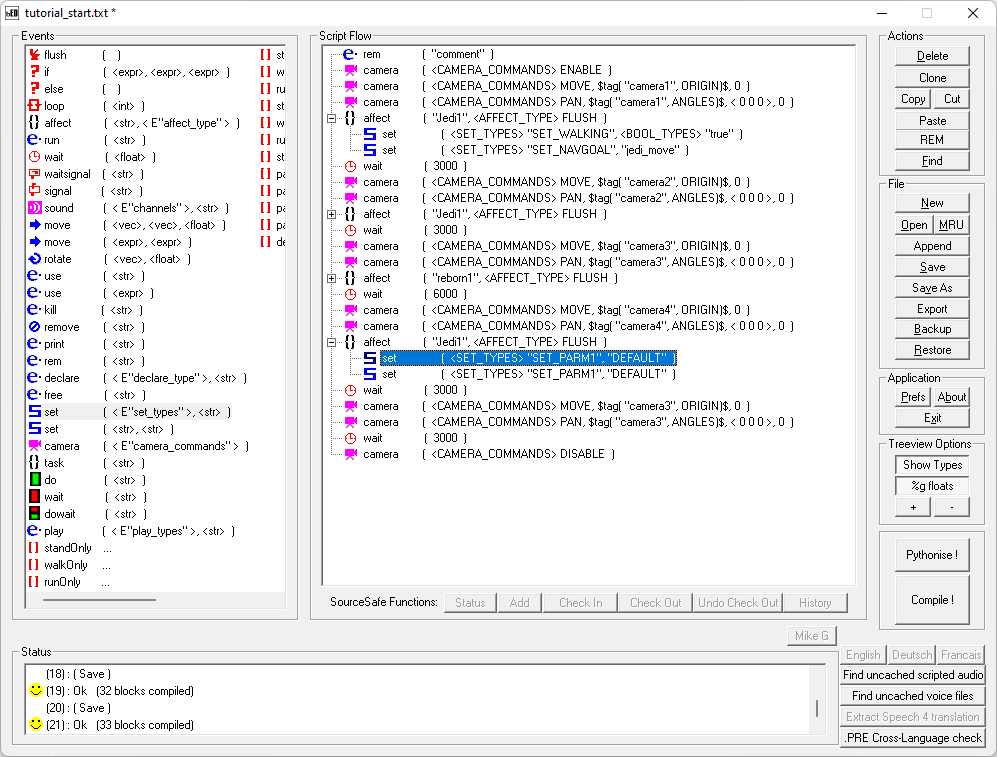
Under the final camera3 command, create an affect command and have it target “Reborn1”, inside the affect, create 4 SET Commands. Verify your script looks like this before continuing:

Double-click on the first SET command and locate the command SET_SABER2, located in the “// Standard Strings” section of the menu near the top.

After clicking on the SET_SABER2 command, click on the Re-evaluate button. The value box will change to say “none”. Change the value of that box to “reborn” and click OK. Verify your script looks like this.

This second saber is unique to this reborn! He wanted an orange saber! So let’s give him one! Double-click on the 2nd SET command and locate the command SET_SABER2_COLOR1 in the “// Special Tables” section of the menu, close to the bottom.
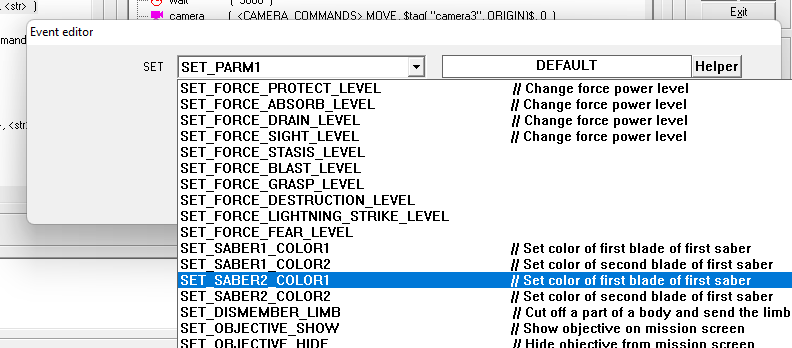
Once selected, click the Re-evaluate button and select the “Orange” color (or whatever color you want). Click OK and verify your script looks like this:
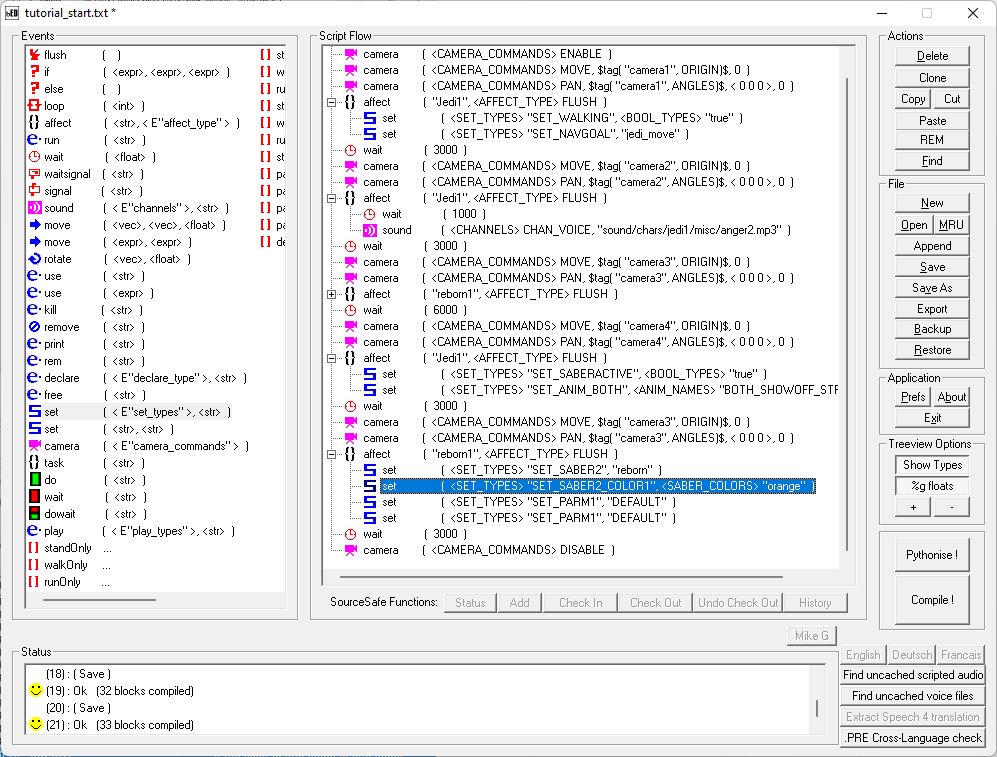
Now we had two other SET commands, but guess what? Delete them! Because we can reuse prior scripts!
Expand the previous “Jedi1” affect and copy the SET_SABERACTIVE and SET_ANIM_BOTH commands to the Reborn’s affect. Verify your script looks like this:
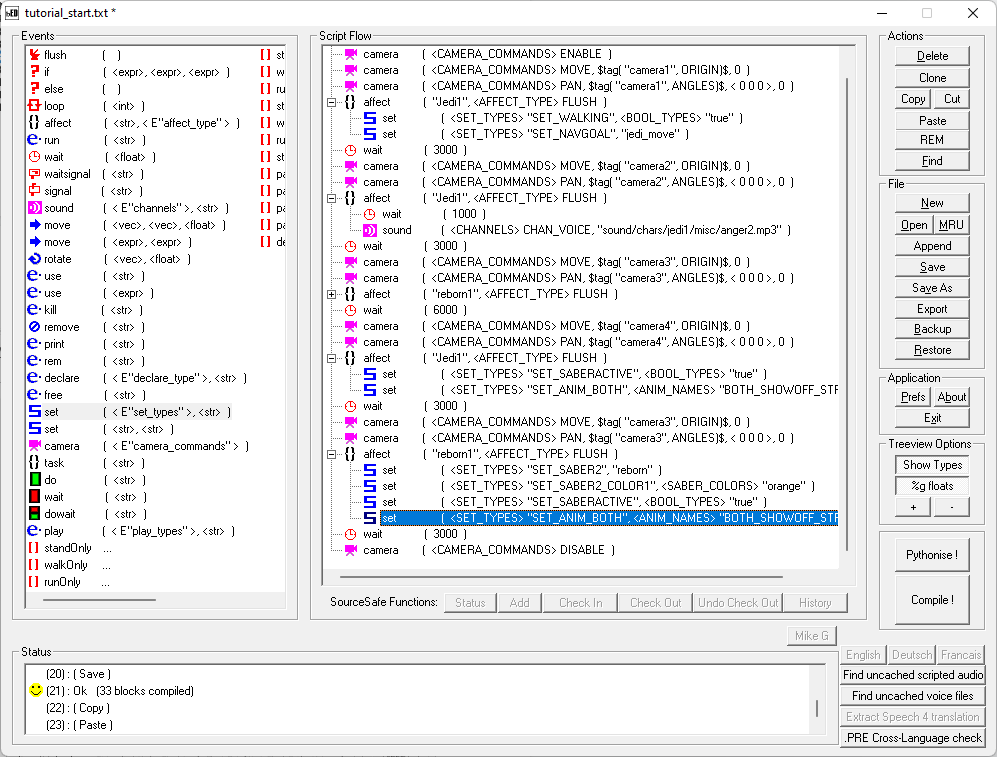
Double-click on the SET_ANIM_BOTH command and expand the dropdown menu with the animations. Select the animation BOTH_VICTORY_DUAL, located just below the previously used animation:
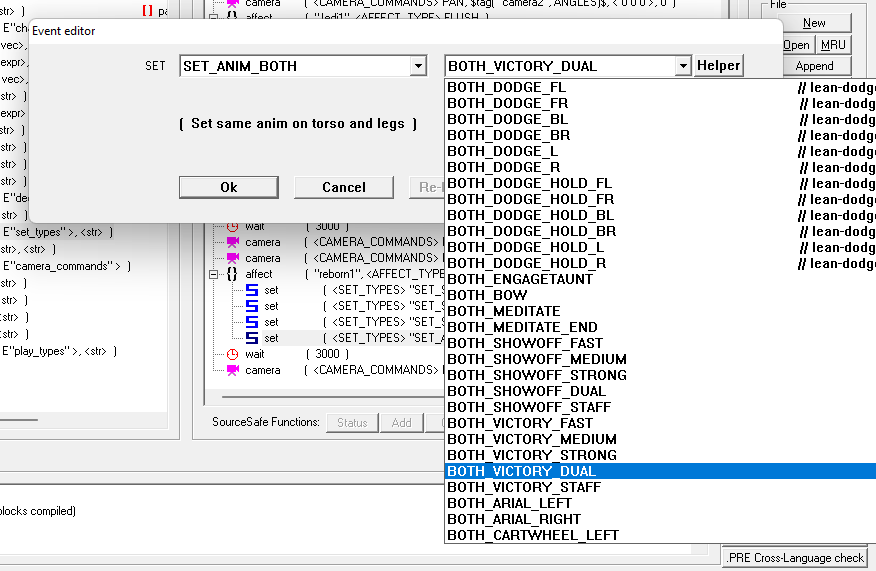
Click OK and verify your script looks like the following.

Create a wait command at the top of the affect for the reborn and leave it at the default 1000 milliseconds to allow for a natural pause. Edit the final wait command prior to the CAMERA DISABLE command to 5000 milliseconds instead of 3000 milliseconds.

And with that! Our cutscene is completed! Load up Jedi Academy and watch your very first cutscene!
I know that this was a very long tutorial and we went over a lot. If you’re still struggling and you’re very confused on where to go from here, that’s perfectly fine! I will include my full solution as a download for you to review and learn from. But I hope between now and when I release my next tutorial I have given you enough information to start building up your own stories!
In Part 3 I’ll go over additional and more efficient methods to set up your cameras, camera movement, and tasks.
Until then, keep scripting my friends! Please DM me if you have any questions!
LINK TO MY SOLUTION: https://drive.google.com/file/d/1ypwO2V0slT34tBjB0sajCf1L7nPk7Fgi/view?usp=sharing


Recommended Comments
Create an account or sign in to comment
You need to be a member in order to leave a comment
Create an account
Sign up for a new account in our community. It's easy!
Register a new accountSign in
Already have an account? Sign in here.
Sign In Now