


Introduction:
Hey there, I'm Maui and I love to learn new skills. That's why I learned how to do frankenstein modelling with Blender using the Jedi Academy Plugin Suite.
I started learning Python and created an addon called Skeleton Tool, this would be a must-have but it became outdated and full of errors. After 3 years I came back to the community and decided to pickup where I left everything. The video's I made with the tutorial are lost unfortunately but I might make a new one later on if people would like that.
My addon can now do everything you'll need except the modelling and weighting part ofcourse.
Requirements:
- Modview -> http://jkhub.org/files/file/90-modview/
- Pakscape -> https://jkhub.org/files/file/89-pakscape/
- Blender -> https://blender.org
- Jedi Academy Plugin Suite updated by @Cagelight https://github.com/cagelight/jedi-academy-blender-suite
- Skeleton Tool -> https://github.com/Mauii/skeleton_tool
What you'll learn:
- Frankenstein modelling
- How to use "Skeleton Tool"
- Proper naming convention
NOTE: This tutorial is written as a follow-along project. A video is made to show you the process as I've written it down. The video has been recorded without sound, so put on your best modelling music, and enjoy!
Download Everything
- Download everything mentioned above in the Requirements section.
- Place everything on desktop (relocate wherever you can easily find it when needed).
Prepare Directory
-
Add models/players/
- Go to your JKA installation and navigate to gamedata/base.
- Add new directory -> name it models and open it.
- Add new directory -> name it players and open it.
-
Add _humanoid
- Go to your base folder and open assets1.pk3 -> do not close this.
- Navigate through the following path -> models/players.
- Click and drag _humanoid into base/models/players.
-
Add models
- Go back to assets1.pk3.
- Click and drag Desann and Rodian into models/players.
Prepare Blender
-
Install required addons
- Open your file explorer (windows 10 shortcut: windows button + e).
- In the navigation bar -> %appdata%.
-
Navigate to Blender Foundation\Blender\2.91\scripts\addons.
- On my end it looks like C:\Users\Kenny\AppData\Roaming\Blender Foundation\Blender\2.91\scripts\addons.
- Click and drag (or copy/paste whatever method you prefer) jediacademy and skeleton_root into script\addons.
-
Enable required addons
- Open Blender.
- Go to Edit -> Preferences -> Addons.
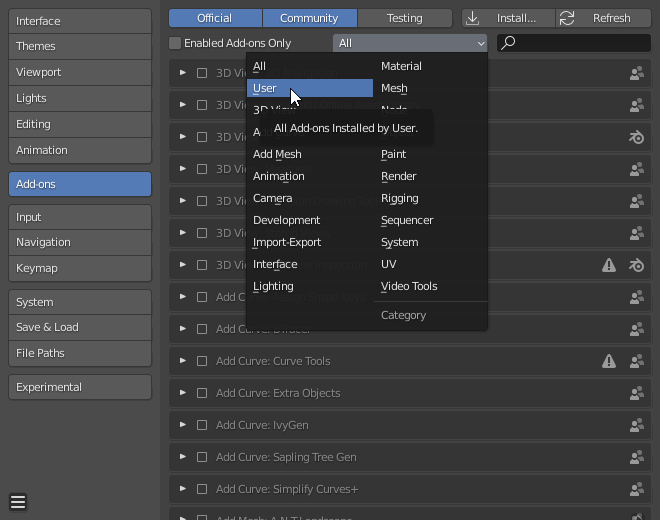
-
Click on All and select User.
-
- Make sure the addons are enabled by ticking the checkbox.
- On the left bottom corner, press on the triple-striped icon and select Save Preferences.
Further Steps
-
Import primary model
- In Blender, click on File->Import->.glm.
- Navigate to gamedata/base/models/players.
- Open Desann and click on model.glm, import it.
-
Delete stuff we want to replace
-
Hold Z and with your mouse, hover over Wireframe and release the button again.
- If you haven't got the same view as the first image, try to press ALT+Z this enables/disables the function X-Ray.
- Select the parts from the head we want by pressing B (box select) and drag everything we need (no need to hold shift. Box select will keep everything select even when you make new selections.
- What we do now, is delete every part we want to use from another model. -> Click on the object and press X and press D to confirm. (it might look strange on your screen but it'll be better soon)
- Hold Z and select Material Preview to show the textures again.
-
Hold Z and with your mouse, hover over Wireframe and release the button again.
-
Import salvage model
- Now do the previous steps from Import primary model and import Rodian.
Time to use my addon
-
Parent Body Parts, Caps and Tags
- To start fixing stuff, we select a random object in Blender (3d view) by using our left mousebutton.
-
Make sure you have the same screen as I have here:
-
- Click on Clean duplicates in hierarchy. This will delete every object with atleast .001 in its name. This means that there are objects with the same name, and we don't want that. (this might take a small moment)
-
After that's done, click on Parent Body Parts, Parent Caps and Parent Tags.
-
You might or might not get errors, depending on the models you're using. always make sure the Naming Convention is followed.
- If you have an object called helmet_0.
- Rename it to head_helmet_0. -> Do so by doubleclicking the object's name in the hierarchy list (above the Property panel) or in the Object Property panel as shown in the picture above (head_fins_2 is visible)
-
You might or might not get errors, depending on the models you're using. always make sure the Naming Convention is followed.
- You'll notice that (if all went right) the hierarchy list appears to be ordened.
-
Create model_default.skin file (The Create Skin function also sets all the Ghoul2 names so you will not have to bother about that)
- Press on the Folder icon and navigate to base/models/players again and add a new directory and give it a name you want, I gonna name mine Desodian. DESann / rODIAN, get it?? ... yes?... anyways.. let's move on.
- Click on the folder you've just made and press Accept, you got a chance you'll have to click Accept again.
- Now press Create Skin and voila. You're done... or so you'd think. We still have to check whether our model works or not, this will be done in the next chapter.

Control model in modview
- Go to your newly created folder in file explorer and right click model.glm
- Select Properties and click on Change (or adjust, whatever the english windows shows you)
- Navigate to modview.exe with whatever means you require.
- Click it, apply and confirm.
- Now double click on model.glm and modview should open.
-
You'll now see 2 warnings:
- Shader blablabla.. click Ok.
- Caps, Stormtrooper blablabla.. click No.
- Well done, your model is ready to use.
- If you want to learn more about other things you can do with it now, have a feast and enjoy the tutorials made by other wonderful people.
Thank you
I hope you've learned something out of this tutorial, if you do please let me know in the comments below. If there's something unclear to you or isn't working as you hoped it would, don't hesitate to contact me by either using the comments section or send me a PM.
I prefer the comment section so other people can use your question (+ solution) aswell.
Thank you for reading and following along with this tutorial. I hope it went flawless for you, and again.. if it wasn't the case don't hesitate to call for help!
Edited by Maui
I returned to the community and made some changes to my addon which indirect changes some of the steps


Recommended Comments
Create an account or sign in to comment
You need to be a member in order to leave a comment
Create an account
Sign up for a new account in our community. It's easy!
Register a new accountSign in
Already have an account? Sign in here.
Sign In Now