- Subject: How to create teleports that can be switched on and off without scripting
- Written by: Szico VII
- Tutorial written for: JK3
- Similar concept work like in: N/A
- Difficulty level: 8/10
- Expected time to complete for first attempt: 0.5-1.5 hours
- Prerequisites: Proficiency with entities, linking and basic building
"Toggleable" - My word for meaning "being able to be turned on/off (made active/inactive)
You can download the example/source files for this tutorial here
Okay, so you want to make a toggleable teleport do you? Okay, for this tutorial I'm not going to be creating any structures to be teleported between, I'm just going to show you the SETUP of a teleport and entities to make it toggleable. You will have to place the entities in your map in the relevant places on your own.
Firstly you'll want to create your trigger brush (which the player has to touch to be teleported away) Cover it with the system/trigger texture as you would normally when creating a teleport, but don't go any further. Instead of making it a trigger_teleport, you need to make it a trigger_multiple. This is because for some reason, the trigger_teleport entity doesn't function properly when you try to make it inactive, plus you cannot start it as inactive (e.g when you load the map it starts OFF.)
We simply have to make the trigger_multiple believe it is a trigger_teleport. (let this be called Trigger #1 from now on) Don't worry, its very easy.
Now, create a target_teleporter and link the trigger_multiple to it, so the trigger points toward the target. (Ctrl+K) You'll notice this is how you'd create a normal teleport destination if you had been using a trigger_teleport. However, we need to add another step before the trigger_multiple will act as a teleport. For ease of this process, I recommend you place the target_teleporter right above the teleport, or somewhere close to it, far away from where you want he final teleport destination to be.
Now, we're going to set the destination for the teleport. Create a target_position in the place where you wish your player to be teleported to, and then link it FROM the target_teleporter. The link structure should be as shown below:
Trigger #1 -------> target_teleporter -------> target_position
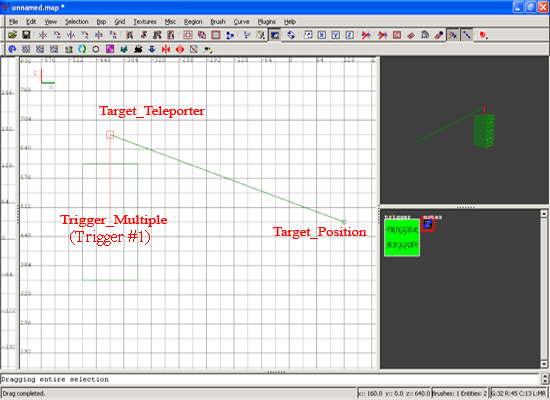
Remember, the target_position is where the player will be teleported TO, and the trigger_multiple where they will be teleported FROM. The target_teleport simply acts as a midway point which actually makes the trigger_multiple act as a trigger_teleport.
From this point, there are now 2 ways to go about actually turning this trigger on and off. One is using quite a lot of entities, OR you can use less entities but some scripting. I personally think the scripting bit is easy, even nobody who has ever used BehaveED before should be able to do it. However I will show how to use the entity method, as it requires no scripting. For this tutorial I will be using a button (which can be pressed by the player) to toggle the teleport on/off. (You can also do it using say a func_breakable, which ''destroys'' your teleport or something like that when broken, but this is probably the best example.
First, create the brush that will be your button, and texture it with an according texture. Then create a brush which encompasses the button, and make it a trigger_multiple. Add a noise key if you wish. DO NOT ADD A WAIT KEY. Check the ''Use Button'' box as well. Here you can go two ways, depending on whether you want the teleport to reactivate with the same switch, or a different one. For this tutorial I will assume you want just the one switch, as it is harder and a little more confusing.
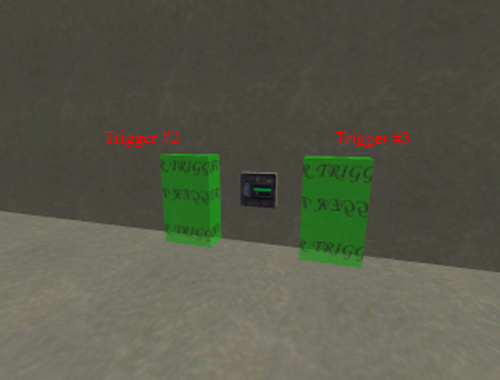
Select the trigger_multiple you just created (let it be called Trigger #2 from now on) and copy it, creating a duplicate trigger. However, check the box in the entity window that says ''Inactive'' for this trigger. (Let this one be called Trigger #3 from now on) Move both triggers aside from the button, move trigger #2 to the left, and trigger #3 to the right, as shown below:
Now we need to make the other entities required for activating/deactivating the teleport when the button is used. I personally find it easier to put all the entities in and then link them afterward, but the order you do it is up to you. Here is how you should set it up in terms of linking.
Trigger #2 ----------> target_delay -----------> target_activate -------> Trigger#3
Trigger #2 ----------> target deactivate-------> Trigger#1
Trigger #2 ----------> target deactivate-------> Trigger#2
Trigger #3 ----------> target_delay -----------> target_activate ----->Trigger#2
Trigger #3 ----------> target activate --------> Trigger#1
Trigger #3 ----------> target deactivate ------> Trigger#3
Give both target_delays' the following keys.
Key: wait
Value: 4
It should look similar to this setup now:
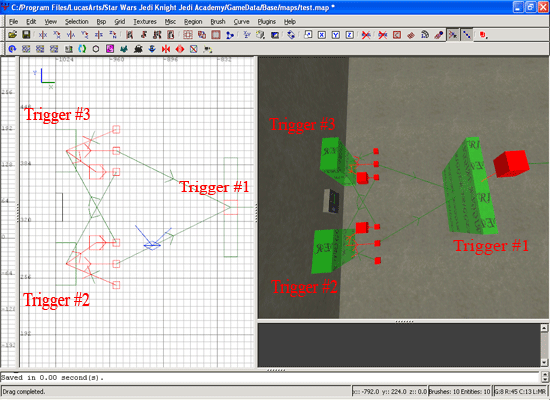
This is how your overall setup SHOULD look by now (Remember, Triggers #1, #2 and #3 are all actually trigger_multiples''):
Trigger #1 ----------> target_teleporter ---------> target_position
Trigger #2 ----------> target_delay --------------> target_activate -------> Trigger#3
Trigger #2 ----------> target deactivate ---------> Trigger#1
Trigger #2 ----------> target deactivate ---------> Trigger#2
Trigger #3 ----------> target_delay --------------> target_activate -------> Trigger#2
Trigger #3 ----------> target activate -----------> Trigger#1
Trigger #3 ----------> target deactivate ---------> Trigger#3
Triggers #1 and #2 both start off active (useable), but not Trigger #3 (due to you checking the ''inactive'' flag). As trigger #1 starts active, the teleporter will start active.
When you press the use key whilst in Trigger#2, the following will happen. It will fire all its targets, initiating the following events. Firstly, it will deactivate itself, and Trigger #1. (The teleport) Then, after 4 seconds (due to the wait key we put on the target_delay) it will activate Trigger #3.
The teleport will not function at this point - it has been turned OFF. To turn it back on again, go now to Trigger #3 and use it. The following will happen. It will fire all its targets, initiating these events.
Firstly, it will deactivate itself, and ACTIVATE Trigger #1 (The teleporter.) After 4 seconds it will re-activate Trigger #2, allowing the cycle to start again.
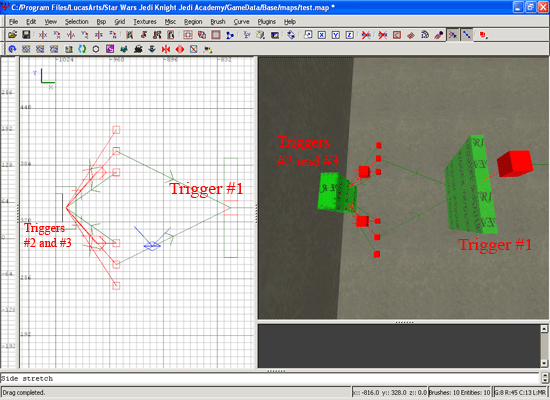
However, you will notice that we have 2 triggers used to operate the teleport, but only one button. If you want the 2 buttons in separate places, simply create another button, and place Trigger #2 over the one which will DE-ACTIVATE the teleport, and trigger #3 over the one which will RE-ACTIVATE it. If you want to operate the teleport from the same switch, drag BOTH triggers'' #2 and #3 into exactly the same place around the centre button. They should be exactly the same size and shape.
Due to the 4 second delay between you can press the next trigger in the sequence, there should be no problems in-game. The final result is as shown below.
Of course, you can also have the sequence the OTHER way around e.g the teleporter starts INACTIVE, and you have to activate it. To do this simply give check the ''Inactive'' box on both Triggers'' #1 and #2, and uncheck the ''Inactive box'' on Trigger #3
You can download the source files at the top of this tutorial
Adding a Teleporter effect
Ok, so you've setup your teleporter sequence, and button, but how can people tell whether the teleport is on or not without actually trying it?
Most teleports which can be turned on or off give some indication of which state they are in, on or off, so now I''m going to show you how to do this. First of all, choose an effect for your teleport. This could either be a brush/patch with a fancy glowing shader, a light, an fx_runner or something similar. All can be used in a similar way. For this tutorial, I shall be using a patch with my teleporter shader on it. I have also added a teleport model to the setup. Here is the teleporter model with the effect in a temporary location.
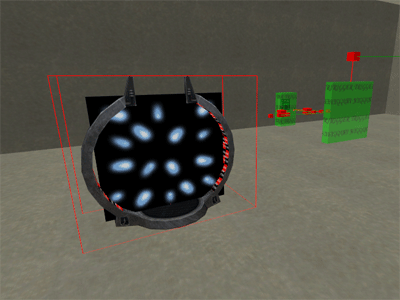
The teleporter model will never disappear, but the effect inside it will - by the time we are finished.
But first things first. Select your effect brush/patch and make it into a func_useable. Depending on whether your trigger_multiple (Trigger #1) is set to start off or on, check the ''Start Off'' flag for this the newly created func_useable accordingly.
Now, create another trigger_multiple exactly the same size and shape as Triggers #2 and #3. It shall be called ''Trigger #4'' Check its ''Use Button'' flag.
Give it the following key:
Key: wait
Value: 4
This wait value corresponds with the delay between Trigger #2 deactivating and Trigger #3 activating, so that the teleporter effect and the trigger_multiple which actually teleports the player won't go out of sync with each other. Now target this trigger (Trigger #4) at your func_useable
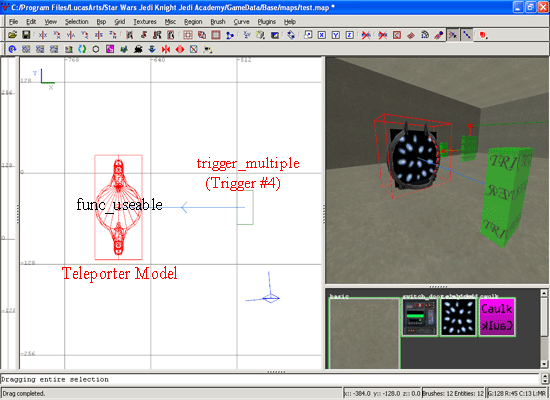
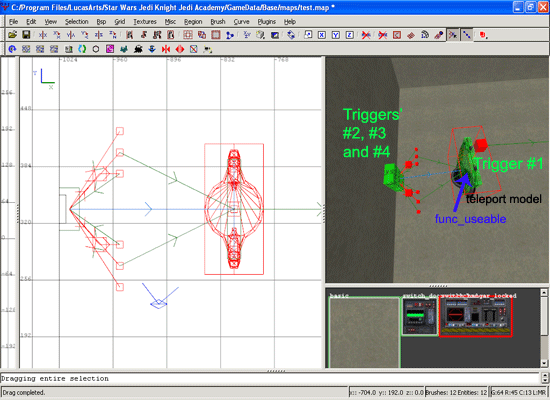
Now it's time to finish this thing off. Drag Trigger #4 into exactly the same place as Triggers'' #2 and #3 - You now have three trigger_multiples in the exact same place, but due to the delays and wait values we have implemented everything should work smoothly. Also move your teleporter model (or move Trigger #1 to the teleporter model) so that when you go into the teleporter field you will appear to be teleported.
Final setup in Radiant is as shown below.
And here's what it looks like ingame:
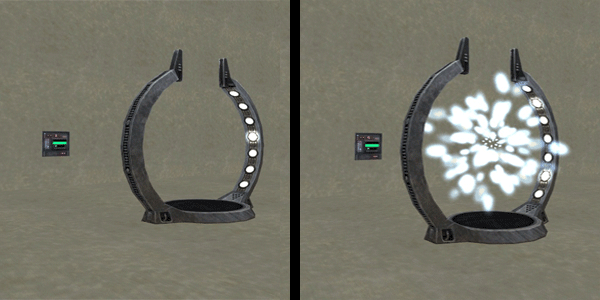
And there you have it - A toggleable teleporter, complete with cool effects. You can also implement the func_useable effect on the button itself, by making 2 buttons, turning each separately into a func_useable (giving one an ''off'' texture and one an ''on'' texture, and using the ''startoff'' flag on the ''on'' switch, then targeting both with Trigger #4 (As well as the teleporter effect). Experiment around and have a go!
The overall entity setup if you've followed me this far will be:
Trigger #1 ----------> target_teleporter ---------> target_position
Trigger #2 ----------> target_delay --------------> target_activate -------> Trigger#3
Trigger #2 ----------> target deactivate ---------> Trigger#1
Trigger #2 ----------> target deactivate ---------> Trigger#2
Trigger #3 ----------> target_delay --------------> target_activate -------> Trigger#2
Trigger #3 ----------> target activate -----------> Trigger#1
Trigger #3 ----------> target deactivate ---------> Trigger#3
Trigger #4 ----------> func_useable(s)
All done!










Recommended Comments
There are no comments to display.
Create an account or sign in to comment
You need to be a member in order to leave a comment
Create an account
Sign up for a new account in our community. It's easy!
Register a new accountSign in
Already have an account? Sign in here.
Sign In Now