


Introduction/Setup
There are times when entities fall short. There are some things you just can't accomplish with plain old entity modding. This is where Icarus scripts come into play. Icarus is just the type of script file that JKA uses in game. (.ibi) So, first off, what can we use it for?
Icarus comes in handy for a great many things, so here are a few examples. You can make entities unusable. You can manipulate them with rotations and moving them around. You can set special Parameters on players to give them "special clearance" for other functions on your map. You can manipulate NPC's, heal players and give them shield. Control scale, setup timers, etc...So, what do we need?
In order to write and compile scripts into .ibi files for use in JKA, you need to use a program called Behaved. You may also find it handy to have its counterpart, Devaheb. (It decompiles scripts so you can look at them. Do not copy other people's scripts without asking permission. It's perfectly okay to look at them to learn how to do it yourself though.)
You can attain these tools by downloading the SDK. You may also download GTKRadiant.
So first parts first. You HAVE to set it up properly. Do not skip these steps.First off, I use GTKRadiant 1.4. So, my Behaved resides in Star Wars Jedi Knight Jedi Academy\GameData\Radiant-1.4\Tools. If you use the SDK your's will be located projects/JEDI_Academy_SDK/Tools folder
Next open up Behaved. You'll see a few sections on the right side, from top to bottom.

Under the Application section, open up "Prefs". When the new window pops up, look for "Set All Options to JKA Default". Click it. Next, make sure the paths are consistent with where you extracted your BehavEd and DEvaheb folder. So, for IBIZE.EXE. C:\Wherever you extracted to\BehavEd and DEvaheb\IBIze.exe For the Command Line Description file make sure C:\Wherever you extracted to\BehavEd and DEvaheb\behaved.bhc is selected.
And last, but certainly not least, "Source Files Path". Inside the BehavEd and DEvaheb folder you made, there will be another folder called "SourceForBehavEd". Make sure it's set to the proper path of your folder. For instance, mine is:
C:\Program Files\LucasArts\Star Wars Jedi Knight Jedi Academy\GameData\Radiant-1.4\Tools\BehavEd and DEvaheb\SourceForBehavEd
Excellent! You should be fully setup. If not, you will get error codes when you try to use the drop down menus of the commands. If so, follow the steps above until you get it right.

Universal Set Scale/Unusable
Unusable/Setscale script
Making our first script:
Universal Scale/Unusable script. How to utilize scripts in entity coding.(Beginner)
If you've gotten this far I'm going to assume you understand proper entity syntax and are familiar with their keys and spawnflags. If not, set your eyes upon one of the other tutorials here on JKHub. Or download GTKRadiant and familiarize yourself with the Entity List(N). Now, since we are using scripts, we have a new entity to consider and several new entity keys.
First off, we have the entity "target_scriptrunner". This entity reads from the scripts folder in your pk3 to the script you specify. So, make sure your PK3 has a folder called "scripts". If you wish to keep your scripts organized you can split them into subfolders inside the scripts folder within the PK3. You just have to make sure your coding reflects that.
So, let's assume you just did "scripts" inside your PK3 and simply placed all your IBI files therein.. Your scriptrunner would just look like this:
{
"classname" "target_scriptrunner"
"targetname" "myscript"
"count" "-1"
"spawnflags" "1"
"usescript" "FirstScript"
}
Notice you don't need to put scripts/ before the script name? However, if your script was inside a different folder within the scripts folder you'd HAVE to specify that folder. Like so:
"usescript" "tutorial/FirstScript"
By this time you should already be familiar with spawnflags and keys like wait, count, delay, etc... If you aren't I'd highly recommend running GTKRadiant and looking through the entity list. (Press N)
Here are but a few of the keys we can use associated with scripting:
"usescript" - "script_targetname" - "parm1" through "parm16" - "spawnscript" - "deathscript"
"usescript" : You can add this entity on triggers or other func_ entities. This specifies that, when used, this entity will fire the script you specify.
"script_targetname" : This is meant specifically for the affect command in BehavED. This means you will be doing something to this entity at some point with a script.
"parm1" through "parm16" : Every entity you make can have 16 variables set on it. Think of them as little bookmarks for information that the script can read and then use. You can put any number or text string into this key so that you may call on it in your scripts.
"spawnscript" : When this entity spawns, it will run this script.
"deathscript" : When this entity is killed, it will run this script.
So! Armed with this information, let's make our first script.
Hopefully by now, you are advanced enough in entity modding to know that you can use misc_model_health_power_converter entities in order to spawn models throughout your map. However, there's a couple problems with this method. One, the entity will still be usable as a health converter. Two, you can't set the scale on the entity. So, in order to fix this we are going to make a script to tell the entity it cannot be used by players and to check "parm1" on the entity for setting scale up or down.
So, let's make a simple tree from map_objects/yavin.
{
"origin" "0 0 0"
"model" "models/map_objects/yavin/tree02_b.md3"
"classname" "misc_model_health_power_converter"
}
First off, we need to add one of the keys we talked about. "spawnscript" I've already decided that I will name my script UniSSUnus. So, I'll add the spawnscript key.
"spawnscript" "UniSSUnus"
Remember when I said you could store variables directly on an entity with the parm keys? Well, the script we are going to write will read parm1 and then set the entities scale to parm1. So, I want this tree to be 175% bigger than its original size. Let's add it to the entity as "parm1" "1.75"
{
"origin" "0 0 0"
"spawnscript" "UniSSUnus"
"parm1" "1.75"
"model" "models/map_objects/yavin/tree02_b.md3"
"classname" "misc_model_health_power_converter"
}
Now, let's open up BehavED.
On the left side of the UI, you'll see a section called "Events". This is pretty self explanatory. You click the command you want to use, and drag it into the center window called "Script Flow". Specifically, we are going to use the set event for setting specific Icarus callbacks.
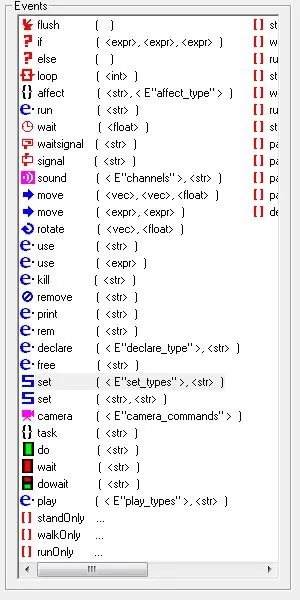
Drag two of these into your script flow. Now, by default it will be at SET_PARM1, DEFAULT. Double click this line to bring up a config box.You should see a drop down menu on the left and a str box on the right. Open the drop box. If you setup BehavED properly you'll see all sorts of icarus callbacks, conveniently sorted into sections. If not, you'll probably get an error and see nothing. Follow the installation steps on the first page to setup BEhaved correctly.
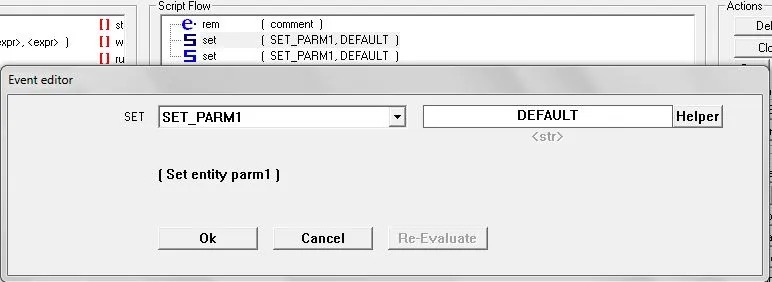
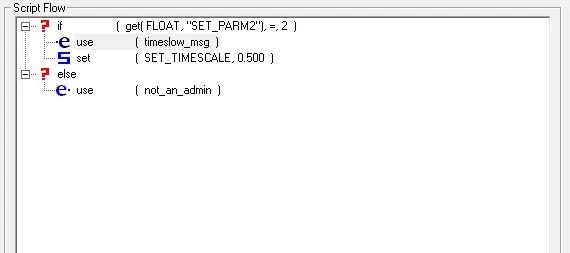
We are going to start with making the entity unusable. Scroll down to the Booleans section and look for SET_PLAYER_USABLE and click it. It should show that as your selection in the SET box. Now move to the str box and type false and hit Ok. The line should now read (SET_PLAYER_USABLE, false).

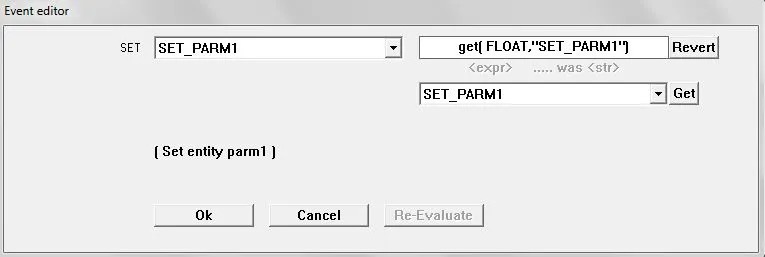
Now lets move onto setting the scale. Open up a second Set command in the script flow. Open the drop box again and scroll down to floats. Near the bottom you should see SET_SCALE. Click it. Now, instead of typing anything into the str box, click Helper. You'll see another drop box pop up with a Get button next to it. Remember how we set the scale on our entity in "parm1"? You guessed it! Make sure SET_PARM1 is selected in the drop box and click Get.
You should now see 'get(FLOAT, "SET_PARM1") in the str box.
Click Ok.
If all went as planned you should see
(SET_PLAYER_UNUSABLE, false )
(SET_SCALE, get(FLOAT, "SET_PARM1") )

The rem line is used to comment your script. It has no affect on the flow of the script. Click Save As, and type UniSSUnus. Save. After you save click Compile !.

If you did everything right it will compile with no errors in whatever directory you saved it in. If we open it up with notepad or behaved we should see
rem ( "Unusable/setscale" );
set ( /*@SET_TYPES*/ "SET_PLAYER_USABLE", "false" );
set ( /*@SET_TYPES*/ "SET_SCALE", $get( FLOAT, "SET_PARM1")$ );
Go ahead and place it inside your "scripts" folder within your maps PK3. Compile your map, load up, test. You should now see your model at 175% of its normal scale, and it will be unusable as a health generator.
Shield Dispenser
Making our second script:
A shield Dispenser (Intermediate)
This script will be a bit trickier than the last one. misc_model_health_power_converter works just fine for recovering HP in our map modding without the need of any scripting. However, you've probably tried to use a misc_model_shield_power_converter and noticed it doesn't work/crashes your game. This is one of limitations with ent modding we are about to overcome. Let's get started.
First off, decide what "model" you will be using for your shield dispenser and make a misc_model_health_power_converter and specify the the model you chose. Specify your origin and angle. Remember that handy unusable script we made last time? You are going to add that to the "spawnscript" key to make sure this thing can't be used to regain health. It's merely here to display a model.
{
"origin" "0 0 0"
"angles" "0 0 0"
"parm1" "2.5"
"model" "models/items/psd.md3"
"spawnscript" "UniSSUnus"
"classname" "misc_model_health_power_converter"
}
I went ahead and included the model I use for my shield dispensers, and the scale I set it to in the code above. Now we need 2 more ents. First: a trigger_multiple, second: A target_scriptrunner that's going to be targeted by your trigger_multiple.
{
"angles" "0 180 0"
"wait" "1"
"target" "shieldscript"
"spawnflags" "6" //Press use to activate and must be facing 180
"origin" "0 0 0"
"model" "*8"
"classname" "trigger_multiple"
}
{
"usescript" "shieldtutorial"
"count" "-1" //Can be executed infinitely
"targetname" "shieldscript"
"spawnflags" "1" //This spawnflag means that this scriptrunner will run on the entity that used it. Or the entity that triggered the entity that used it. Players are entities.
"classname" "target_scriptrunner"
}
I've taken the liberty of deciding that we will be naming the script "shieldtutorial". Now we are ready to make the script. Let's dive into Behaved. Our main commands for this script are going to be if and else. Basically *if* checks for some kind of variable. IF the condition matches It executes the block of commands under it. If the condition doesn't match, it moves to the else line. (Unless you don't specify an else condition. In which case, nothing happens. )
First drag an if expression into the script flow. We are going to be working with a lot of these. In order to fully simulate a shield dispenser we are going to use multiple "if" statements to check if your shield is below a certain level. If it is, it will set your shield up to the level it checked. Basically if you have less than 25 it will set it to 25. Less than 50, it sets to 50 and so on until you are at 100. This also means we will be putting "if" s inside "else" commands to smooth it out.
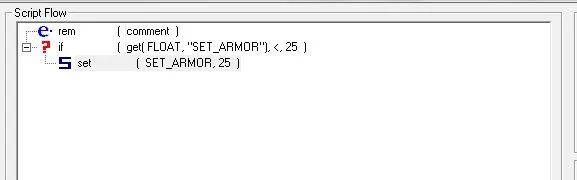
So, open up that IF command you made. In the first expr open up the drop down menu next to Get. Scroll down to "ints" and look for SET_ARMOR. Click it, then click the Get button. We should now see get( FLOAT, "SET_ARMOR") in the first expr box. Now in the middle box you are going to see < > ! =. Those are operators meaning less than, greater than, not, and equal to. We will be check to see if our shield is lower than 25. So, select less than . In the last expr box type 25. Click okay.
You should now see if (get(FLOAT, "SET_ARMOR"), < ,25)
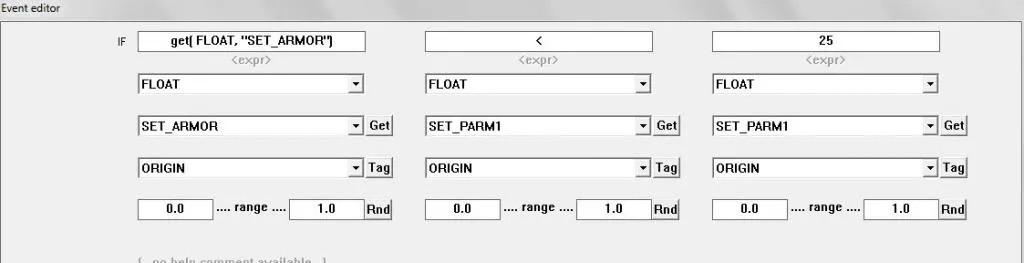
This statement says IF the float shield is less than 25.
So what will happen if the shield is less than 25? We will raise it to 25.
Drag a set event into the script flow INSIDE the IF. Open the set up by double click it. Open the drop box and scroll down to "ints" and again select SET_ARMOR. In the value box type 25.
Basically what we just did was check to see the state of the players armor. If its less than 25, we will bump it up to 25. That's all fine and dandy. But what if its less than 50 and more than 25? Well, that's where our "else" commands start to come in.
Make sure your IF is collapsed before you drag your else into the script flow. If you else is inside your IF command under set and sound, you did it wrong. Move it out of the IF, collapse the IF, place it UNDER the IF.
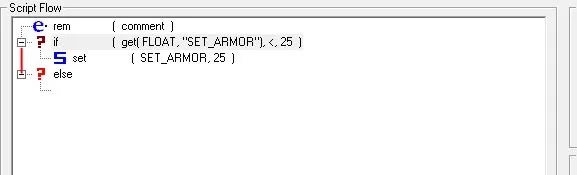
Now, you are going to select that last if block you made and clone it by pressing the space bar. You'll see a new IF popup collapsed. Drag that whole block into that ELSE you made. Double click it. You'll notice it's exactly the same as the last IF. Change the 25 to 50.
Open up the SET event in this if, and likewise change it to 50. The pattern should be immediately evident to you by now. We are increment the integer valuer of the shield in each IF block.

Basically, we are going to repeat this structure until we reached the desired end result of 100 shield. Each IF should have an ELSE attached to it. In the ELSE should be the next IF statement checking a greater value for the integer shield.
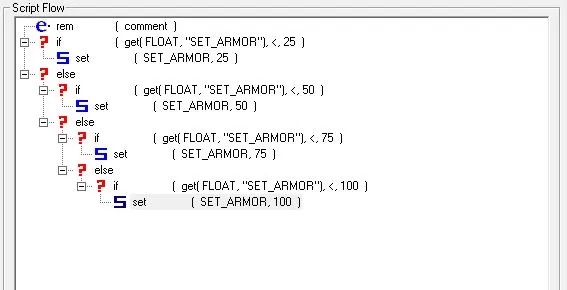
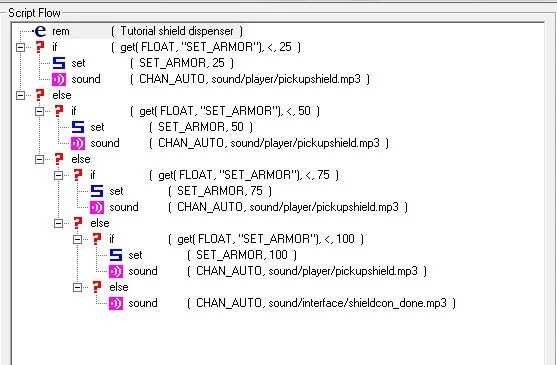
If you followed the steps correctly, you will have something like the picture above. Save it and compile it. Your ent code to use this script should look something like this:
{
"angles" "0 180 0"
"wait" "1"
"target" "shieldscript"
"spawnflags" "6"
"origin" "0 0 0"
"model" "*8"
"classname" "trigger_multiple"
}
{
"usescript" "shieldtutorial"
"count" "-1"
"targetname" "shieldscript"
"spawnflags" "1"
"classname" "target_scriptrunner"
}
The trigger_multiple waits 1 second in between triggering to make it feel smoother. Adjust that as you please. Place the script inside your "scripts" folder in your custom map's PK3, compile your map's .ent file. Save it all up, try it out. Good luck and enjoy.
*Extra*
I like to spice mine up by having it play sounds at each IF/else check.
Admin Key
Making our third script:
An admin key (Beginner)
This script is ridiculously simple.
Again, you'll need 2 entities. The first being a target_scriptrunner.
{
// admin key
"classname" "target_scriptrunner"
"count" "-1"
"spawnflags" "1"
"targetname" "adminkey"
"usescript" "credentials"
}
Our script will be called "credentials". Count -1 ensures that this script can be used any number of times. "spawnflags" "1" says that it will activate on the trigger that executed the script. Or the entity that triggered the trigger that triggered the script. (In this case the player is the entity).
The second entity can be anything the player will use to execute the script. An item_ysalimari, a trigger_multiple, whatever. In this case, we will use an ysalimari.
{
// Admin Key
"classname" "item_ysalimari"
"target" "adminkey"
"wait" "4"
"origin" "X Y Z"
"count" "-1"
"noglobalsound" "1"
}
When the player picks up the ysalimari it will trigger the target scriptrunner, thus executing our admin key script. Now that the entities are all setup, let's open up BehavED.
Now, the first thing you need is a set "set_types" Double click it in the Script Flow box.
Now, this is very simple. Just choose one of the set_parms. Any of them will do. Just make sure you remember which parm you used. It will now be your admin key. We will use set_parm2 for this. Type 1 in the "str box". It should now read SET_PARM2, 1.

When the player picks up the ysalimari, his parm1 variable will be set to 1. Now you can make scripts that specifically check for that value before allowing the player to use it. Thus creating a lock system, or an admin key system.
If you want, you can always add another line to the script to activate a target_print in your ent coding to tell the player they picked up the key. Just use an use "str" command. Type the name of the target_print in the str box. In the end you should have this:

Here's a quick example of one of my scripts that uses the admin key system.
Variable reset timer
Making our fourth script:
Parameter Reset Timer (Intermediate)
In the previous tutorial I showed you a very simple way of using a parm as a key to enable players to have special permissions. As you start to allow the players to interact with the map more, and do things that are going to require you to set parms on the players, you are going to need to be able to reset them periodically or when the player reconnects. For instance, you are using parm2 for a setscale script, the player grows large with it and then reconnects a bit later. They will spawn large again because that parm hadn't been reset.
So before we get into more advanced scripting where I'll show you how to do all these things like make admin restricted scripts, setscale, timescales, Juggernaut mode, etc... we need to develop a system for our map to control the chaos. I learned this method by observing how Nab622's map tpcv3 works. He graciously gave me permission to share this information with you all.
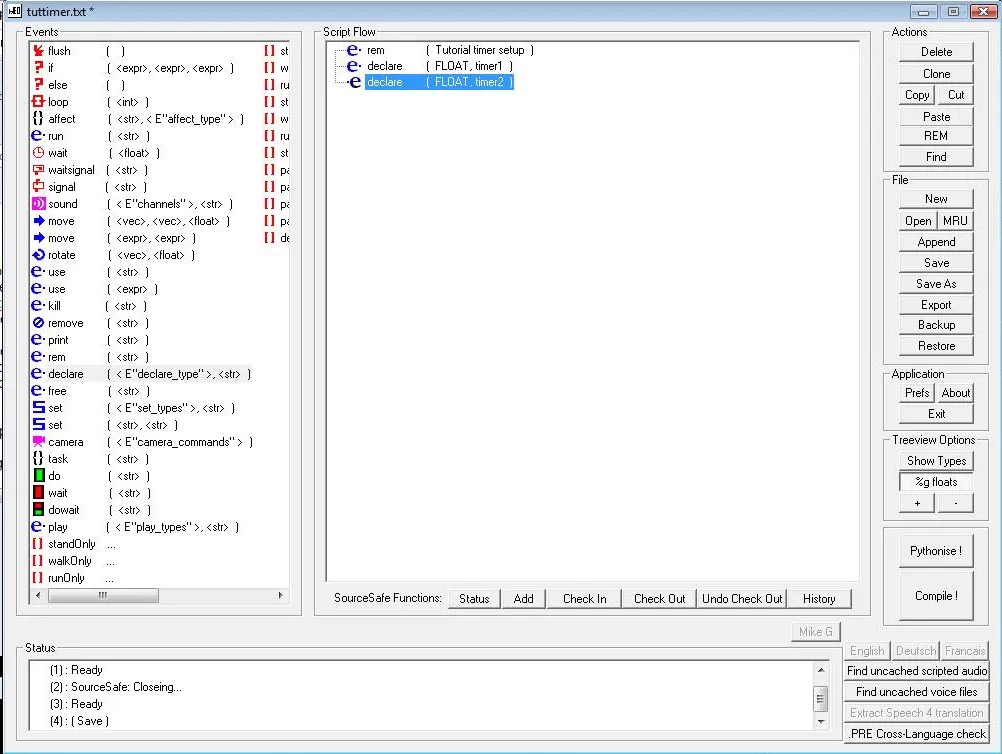
So let's open up Behaved.
First step. Drag 2 declares into the script flow. Make sure they are both declared as floats and name them timer and timer2.
(NOTE: "timer1" in the following screenshots should be named "timer")
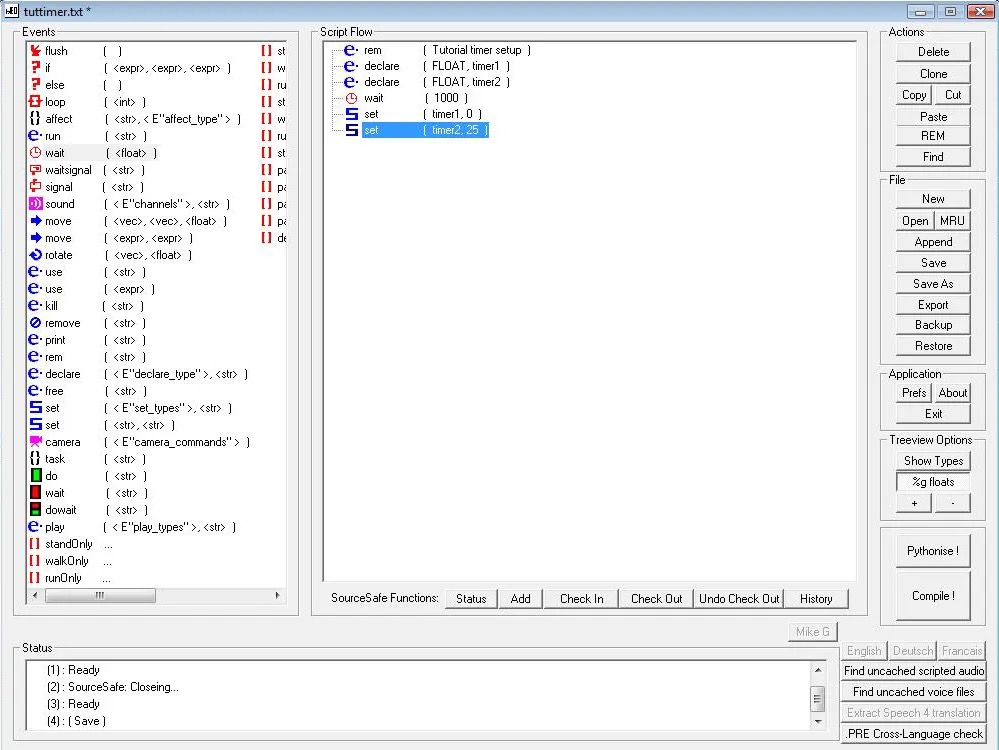
Second step. Drag one wait into the script flow and leave it at 1000. Next, drag two set events into the script flow. have the first one set timer to 0 and the second one set timer2 to 25.
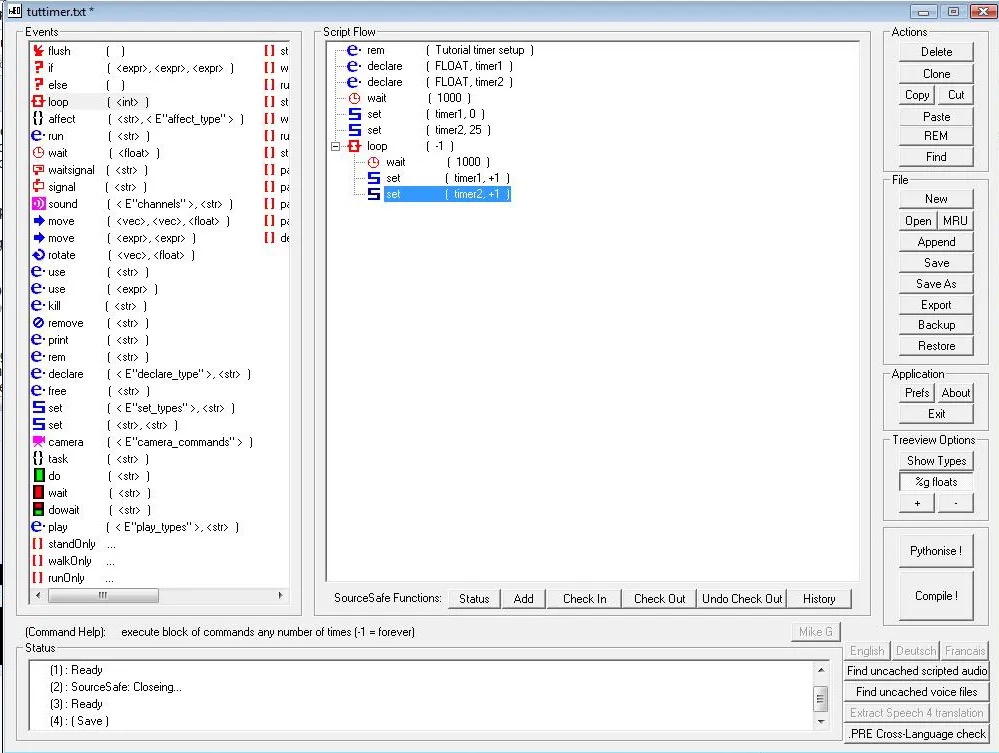
Third step. Drag a loop into the script flow and leave it at -1. Place a wait 1000 and two set eventss into the loop -1. You may copy them from above or make new ones. Now this is important. Make the first one set timer +1 and the second one set timer2 +1. This has the effect of increasing our two global variable timers by 1 every second indefinitely.
That's it for this script. Save it and compile it. Place it in your PK3. If you are using GTKRadiant make an info_null. Press (N). Add this key. spawnscript value: tuttimer (or whatever you named it). Save it.
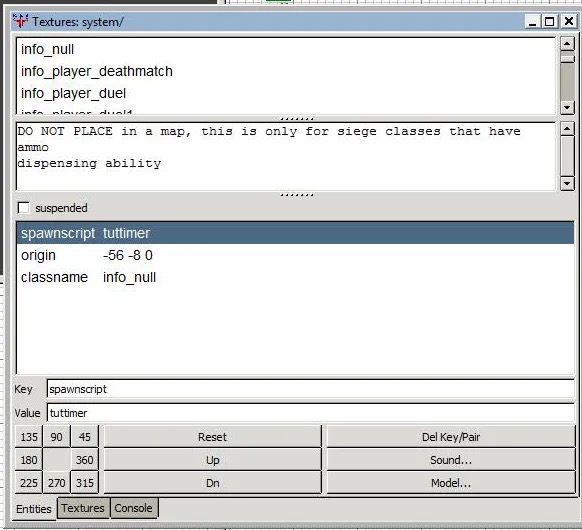
If you are .ent modding make the following entity.
{
"spawnscript" "tuttimer"
"origin" "0 0 0"
"classname" "info_notnull"
"targetname" "startupnull"
}
When the map loads up all the entities the info_notnull will use it's spawnscript, thus setting up our global variables and starting the timers. I forgot the targetname in the screenshot. But add it as well. Target he info_notnull with something like a info_player_intermission.
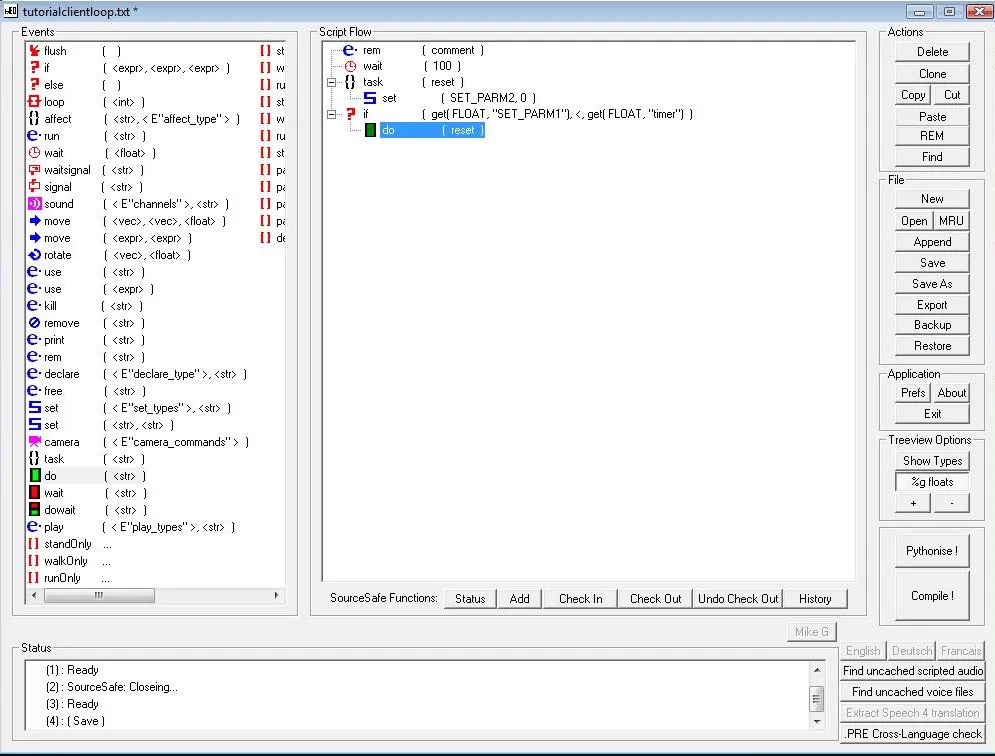
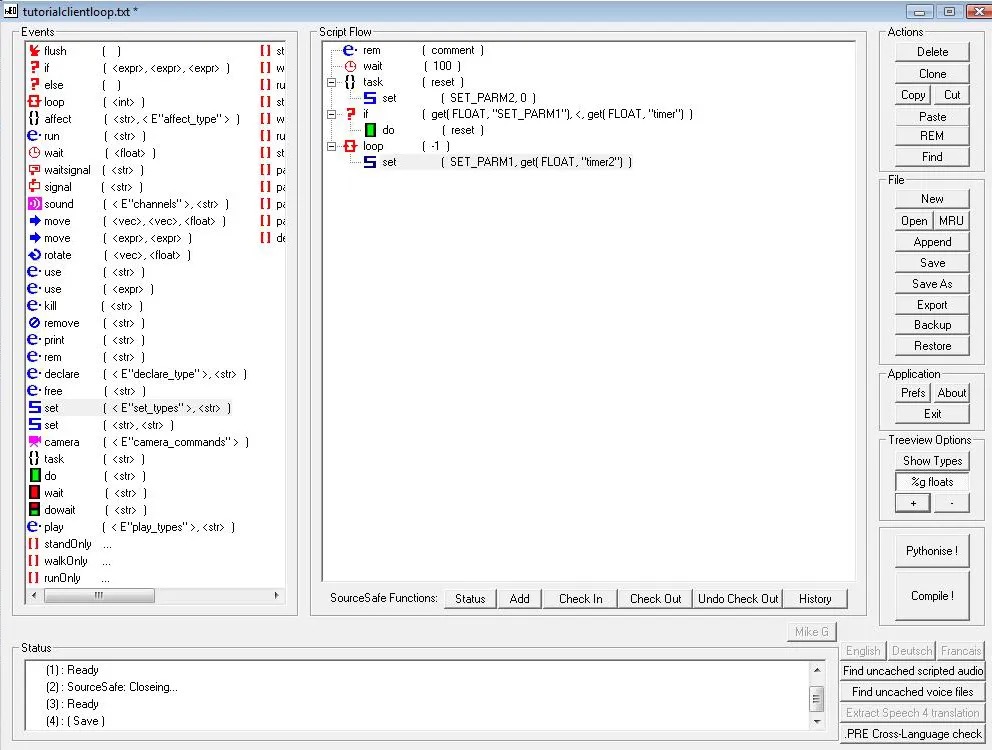
That's it for the first part. Now we need to head back to BehaveD and setup the script that will loop on each player as they spawn. First step. Drag a wait into the script flow and set it to 100. Drag a TASK into the script flow and name it "reset". If you followed my other tutorial you used Parm2 as your "admin key". Drag a set E"set_types" into the script flow and. Have this line set PARM2 to 0.
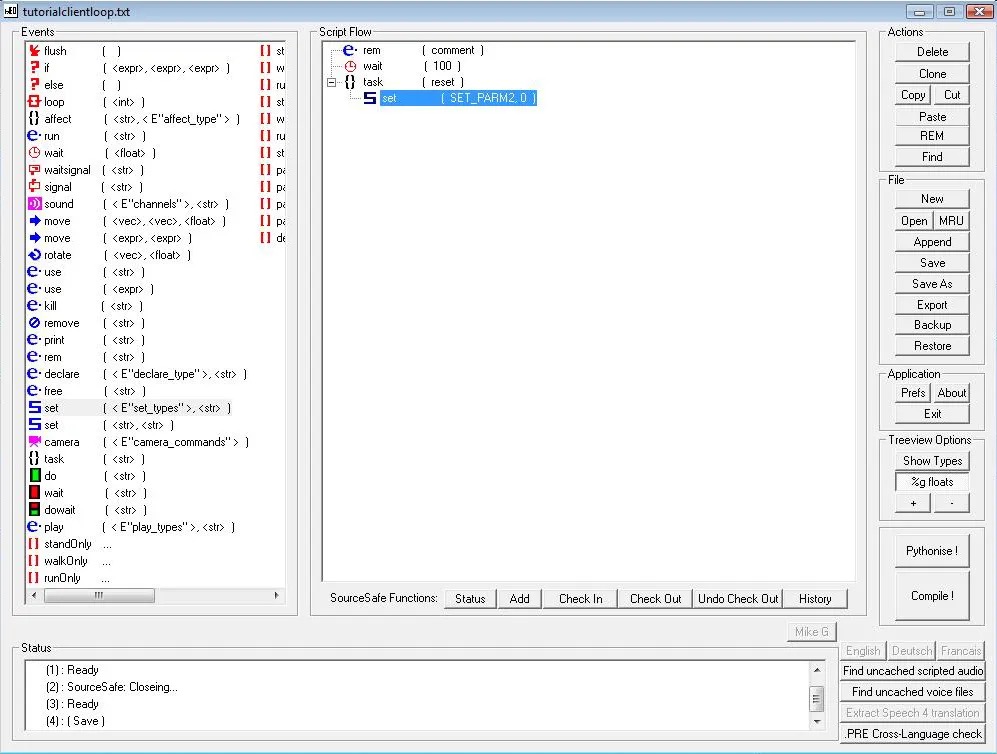
Pretty much any parameter you use on the players that you'd like to be reset goes in this task. Since I only used PARM2 in these tutorials so far, that's all I put in. As I show other scripts I'll remind you that we are using a Parameter that will need to be added to this script later on. For now, let's just finish the script up by adding in the timer check.
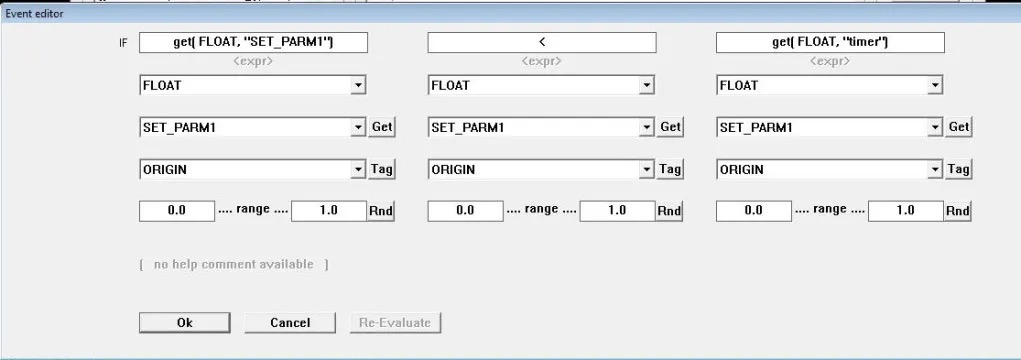
Start by dragging an IF event into the command flow. I plan on using PARM1 on the player to hold the timer information. So, make sure FLOAT is selected in the first drop box, and PARM1 is selected in the second and click GET. Do the same thing in the far right fields. However when the text is generated delete SET_PARM1 and type timer instead. In the middle field place the less than sign. (<) After you finish all that click Okay. Drag a DO into the if command subfield and set it to do the task called "reset".
We are very nearly finished. The last step is to setup the loop that will set the timer information from the global variable "timer2" into the player's PARM1 field.
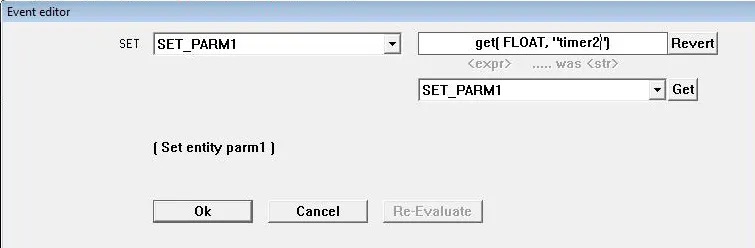
So drag a loop into the script flow and leave it at -1. Make sure it's under the if(), not inside it. Drag a set E"Set_types" into the loop. Double click it to open it. Leave the first drop box as "SET_PARM1". Click helper on the right box to bring up the variable selector. It will start on SET_PARM1. Just click Get. If it says get( STRING, change it to get( FLOAT. Replace SET_PARM1 with "timer2".
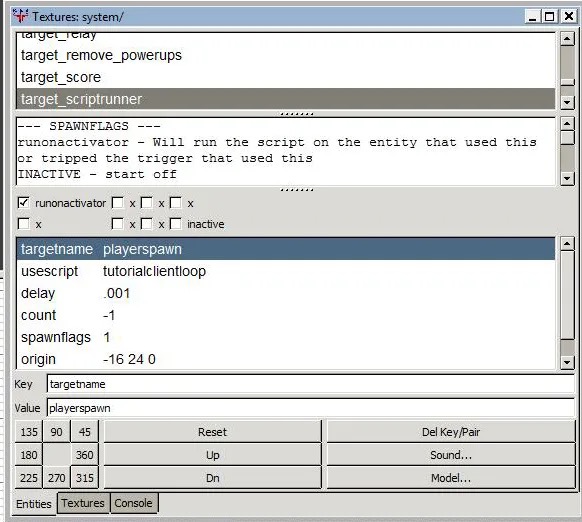
Save it, compile it, place it in your PK3. If you are using GTKRadiant make a target_scriptrunner. Make sure runonactivator is selected and type the following keys in
key: usescript
value: tutorialclientloop
key: delay
value: .001
key: count
value: -1
key: targetname
value: playerspawn
If you are .ent modding the entity will look like this:
{
"delay" "0.001"
"count" "-1"
"usescript" "tutorialclientloop"
"spawnflags" "1"
"targetname" "playerspawn"
"classname" "target_scriptrunner"
}
Now, have all your player spawns target the scriptrunner.
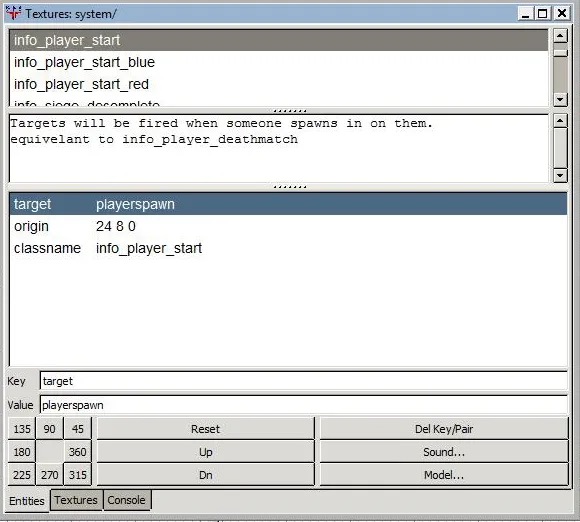
If you are .ent modding the entity will look like this:
{
"angle" "270"
"origin" "680 1424 -56"
"classname" "info_player_start"
"target" "playerspawn"
}
Load up your map and spawn up. Everything should be working fine. If you'd like to make certain it is working as it should, load up your map with /devmap mapname. Once you are loaded into the map type /developer 1 in the console. You should see the lines of your scripts working. If you made a mistake it will be shown to you in the console. Just follow the steps back until you find your mistake and fix it.


Recommended Comments
There are no comments to display.
Create an account or sign in to comment
You need to be a member in order to leave a comment
Create an account
Sign up for a new account in our community. It's easy!
Register a new accountSign in
Already have an account? Sign in here.
Sign In Now