


A skinning guide containing a simple recolor as an example. And pretty much everything explained as I come across it in the tutorial.
(Silly banner time! It's kind of ugly...)
This tutorial will cover the process of taking a model with an existing texture, applying a new/altered texture to the model, and saving it in a way so that it doesn't overwrite any existing models/skins. (I am using Windows 7 on this tutorial)
Needed Programs:
- Photoshop (Any image editing program will do, even paint, but I will be using photoshop CS3 for this tutorial).
Update: Since I wrote this tutorial I've upgraded to photoshop CS5, everything is still doable though.
- Winrar (A lot of other people use packscape, but I've always used winrar and will stick to it in this tutorial).
- Notepad/Wordpad(Any text editor).
- Modview (Optional).
First of all, you need to have an idea of what you want to make. For the simplicity of this tutorial I will only work with a simple recolor skin. A recolor skin is the simplest way of doing a custom skin. This involves taking the existing textures for the model into an image editor, and then change some of the colors without adding or removing any detail.
This tutorial can be used by people who want to make new detail as well. Where as I just do recolors, you just have to add the new detail you want to the textures, or completely redo them.
Step 1, Extracting the desired model:
Now, at this point you know what kind of skin you want, and you have found a model that has the appropriate geometry (shape, body type, cloth type) that you want.
For this tutorial, lets say you want to edit the Tusken Raider.
To find the model and it's textures we need to go to our Gamedata/Base folder of your Jedi Academy installation. This is usually found under C:/Program Files (x86)/Lucasarts/Jedi Knight Jedi Academy/Gamedata/Base. Inside our base folder you will need to find the assets1.pk3 file.
Open this using Winrar (pk3 is an archive format that winrar can open). It will show you something like this:

You will need to navigate through the folders: models -> players -> tusken. Here you will have to select the entire folder named tusken, copy it, and paste it somewhere you want to save the work files of your skin.
Now you have the model you want to edit extracted with all it's associated texture files.
Step 2, Setting up the skin:
People do this in different orders, I don't always do it the same order myself, but you can fix all the naming and paths of the skin before you start editing it. We'll do that now for this tutorial.
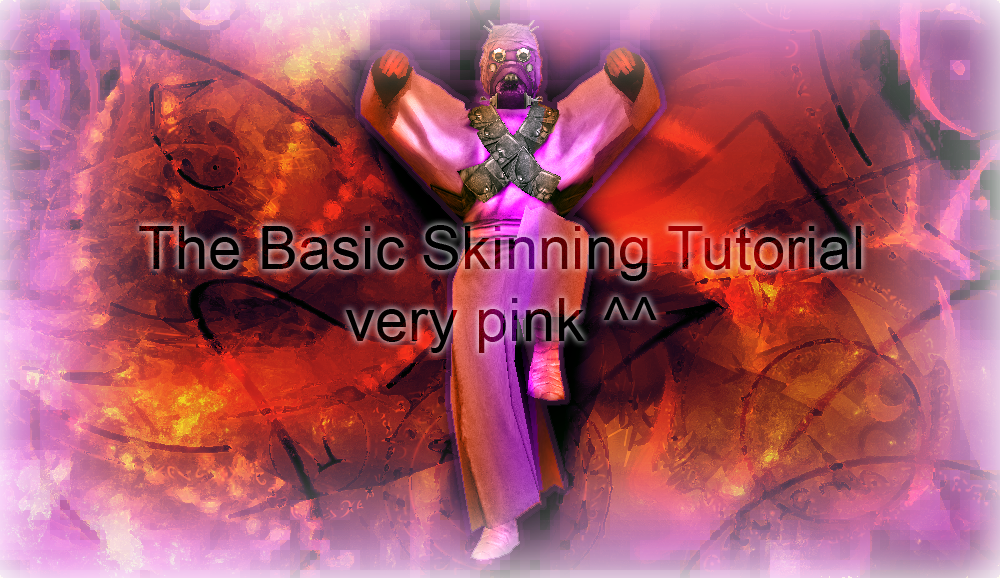
Lets name our skin "tusken_edit", we then create 2 new folders, 1 named "models", and 1 named "players". We then move the tusken_edit folder into the players folder, and then the players folder into the models folder:
As a result we will now have the path: "models/players/tusken_edit". We will use this setup to directly create the .pk3 file that will go in your base folder later.
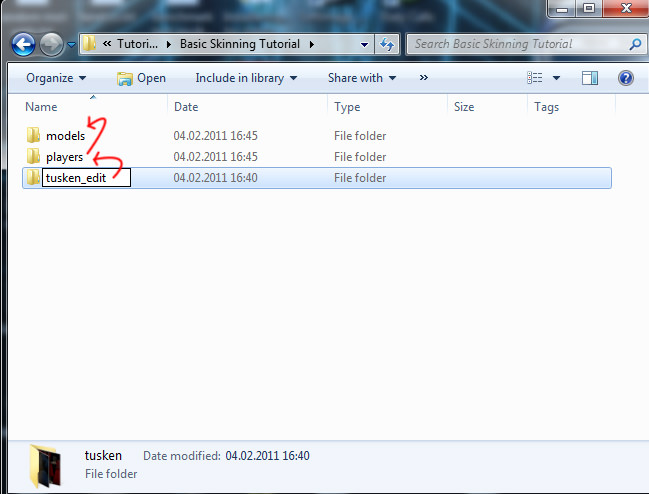
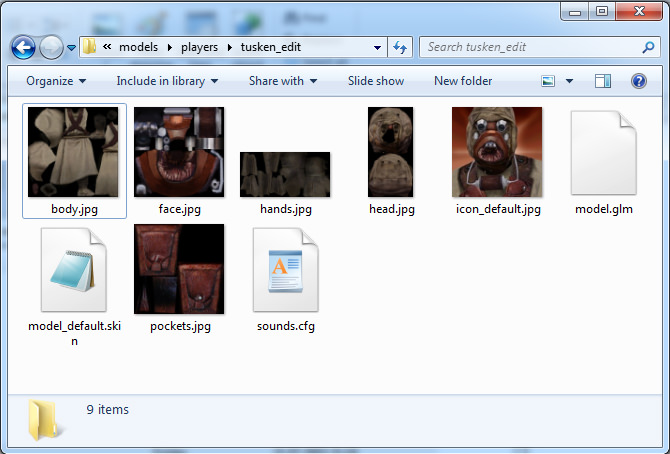
We then move inside the folders and into the tusken_edit folder. This is what we'll see:
The files that I have marked with a red X are the files we want to remove from the folder, we do not need them. But I will explain why:
animevents.cfg is a file used by the game to add a sound to an animation. This is one of the ways the game handles sound events, since the sound is supposed to play when the tusken is howling, they added a script to hook it directly to the animation.
And before you start thinking: Hey maybe I can get sounds that play when I press attack or something ingame. I have to say that sadly this does not work, it is not supported by multiplayer and what you'll end up with is either nothing, or a sound that plays whenever ANY character does the animation (I will not say this 100 percent certain because I'm not done exploring it, just haven't had the time to do continue with it, but so far it's a dead end).
I have removed all the textures named blue or red, because these are used by the team colors for the skin, and I don't need them to make my own team colors. I will show you how to add team support to your skins as well.
The parts we have kept are: body.jpg, face.jpg, hands.jpg, head.jpg, model.glm, model_default.skin, pockets.jpg and sounds.cfg.
All the jpg files are the textures we're going to be editing. This is where all the skinning magic happens. The model.glm is the actual model of the skin, without this one here, the textures will have nowhere to place themselves. The sound.cfg chooses which sounds the model uses, and what gender it is.
Now, once we have removed all the stuff we don't need, you should have a folder that looks like this:
What we want to do now, is open the model_default.skin file, using wordpad/notepad.
Inside the model_default.skin we press ctrl+H, this opens the Replace dialogue. In the top one we type /tusken/, and in the bottom one we type /tusken_edit/. This renames all the parts where tusken is mentioned in the skin, with the new skin name, tusken_edit.
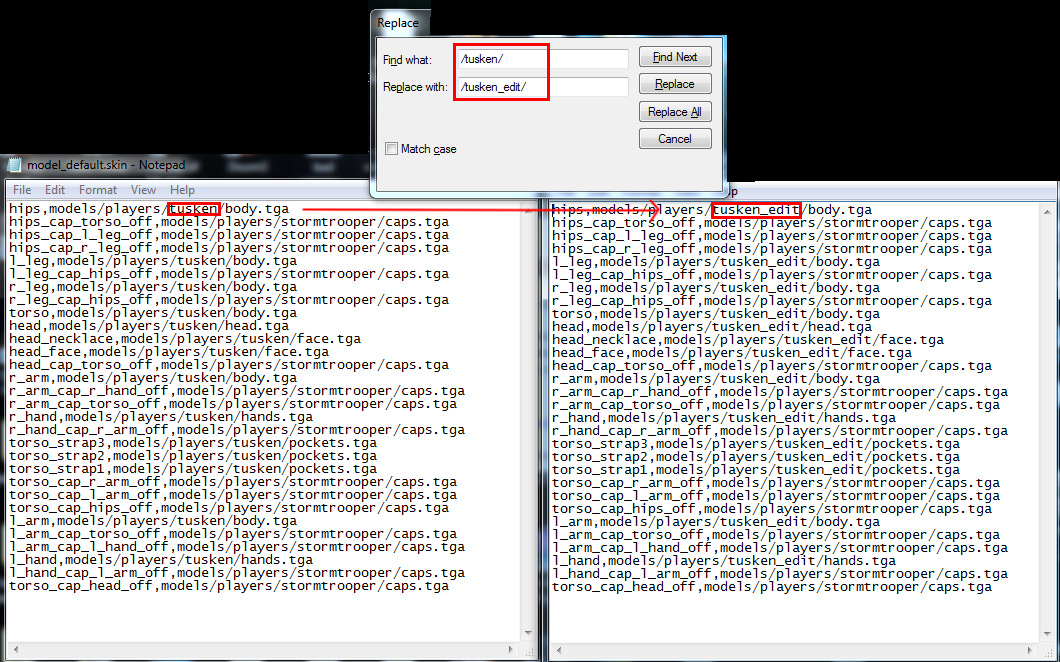
The reason we add "/***/" is a habit I have learned that is quite handy. Some skins have textures named the same as the model, as an example the body of the tusken could have been named tusken_body. And in the model_default you can see that the textures are listed as well. So to prevent these texture names to be overwritten as well, we make sure to only affect the part we want by adding the "/" before and after the names.
After you have replaced all the names correctly it is good to look over to make sure all the names really have changed. Keep in mind that the part talking about stormtroopers should remain the way they are. Because this is referring to the caps of the model, the textures used when an arm is cut off etc, if you want your own cut off limbs to have a special flesh texture inside the cut surface, you can rename these and make your own, but I won't be showing that in this tutorial.
It's also nice to notice that on the reborn for example, the mouth and eyes textures are taken from the imperial skin, so even if you rename the /reborn/ parts, there's still a /imperial/ part remaining that you'll have to change as well if you want to use your own eyes and mouth texture.
Now let's take a look at the first line to get an understanding of what this is:
hips,models/players/tusken/body.tga
This line is telling the game that the model part, named "hips", should use the texture located in the models/players/tusken/ folder. And the specific texture is the "body.tga". Now don't be alarmed by it saying .tga there, it's still using the .jpg file you have in the folder. This is just the standard used by Jedi Academy for some reason.
If you want, you can turn parts of the model off inside this file. You do so by instead giving it a path to a texture, you type "*off" like so:
hips,*off
This will turn off the hips piece of the model, so that they won't even be seen when you use seeing force power ingame. (The model needs at least 1 visible piece, so making a completely invisible skin by only turning the pieces off will not work)
Once we have changed all the names to tusken_edit, we save the file and close it. If we were to make the models folder containing all these files into a .zip with winrar now, and then rename it to .pk3. This skin would now function ingame under the name tusken_edit, and would not overwrite the existing tusken. It would just be identical cause we haven't done anything to it yet.
Step 3, Texturing:
Now everything is ready for us to start making our skin unique. We select the body.jpg, right click it, and select "open with photoshop". Or you can open photoshop first and then locate the body.jpg from there.
You'll end up with something like this:
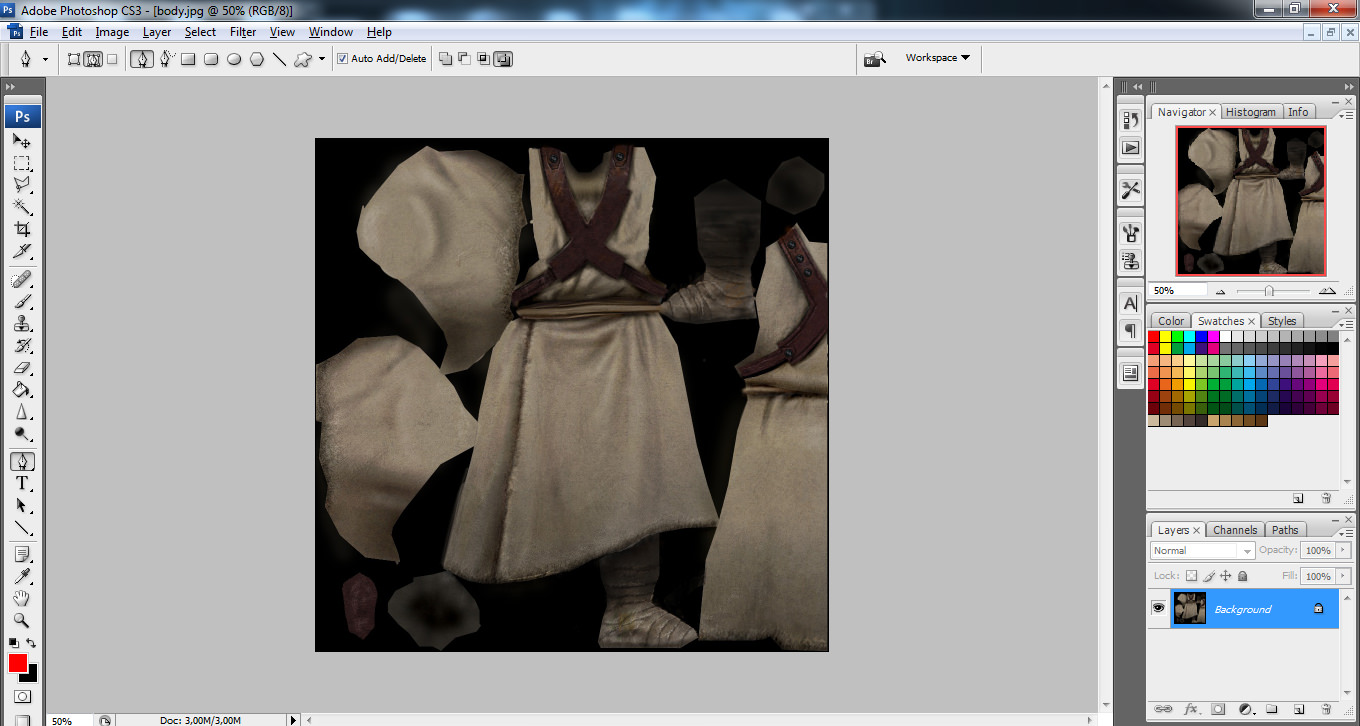
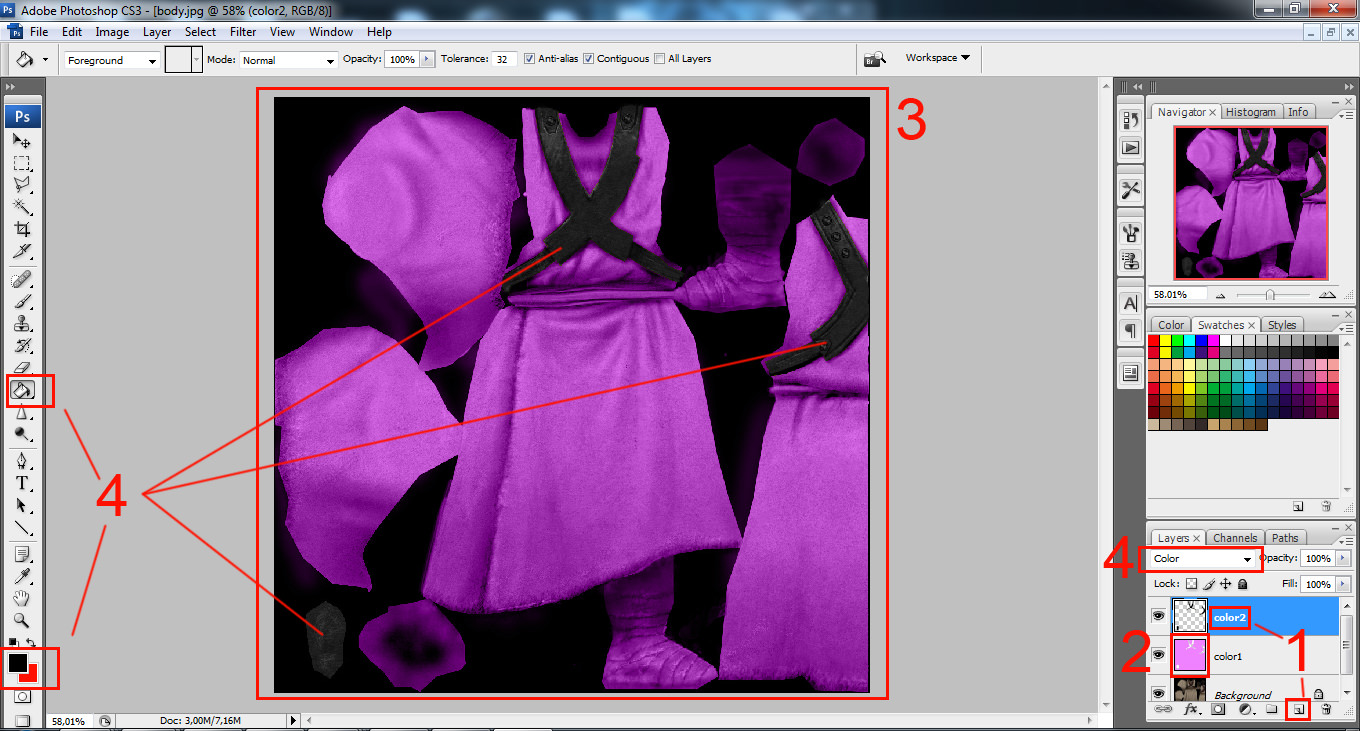
Now, I will not go through details on how to operate photoshop, you can find tutorials for this elsewhere, but I will show you what tools to use to make a quick recolor.
Part 1:
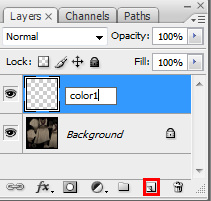
Create a new layer, double click the name part of it and rename it so you can keep track of what it is.
Part 2:
1. Select a color by double clicking the color squares and picking a color with the mouse and sliders.
2. Select the paint bucket (shortcut G) and then left click the texture.
3. Go to the layer option and scroll down to the Color setting.

Part 3:
Now we've gotten a new color! But it's all over and covering everything. I didn't want to color the belts etc, so lets do something about that.
1. Select the lasso tool (L), but press down the button so you can select the lasso tool that's showing sharp corners, this is the point to point lasso tool, experiment with it to see what it does. Make sure feather is set to 0 %
2. Select the parts you don't want to have the pink color to it.
3. While having the color1 layer selected press delete. This will remove the color from those parts.

Tip: When using the lasso tool you have to close the selection by returning to the starting point you made. After you've done this you can start selecting more again by holding the Shift key as you place a new point, this will make it so your old selection doesn't go away.
At the end you should have something that looks like this:

Part 4:
Now lets try adding another color, to see how this is done. Now I can either do the exact same process again, or if I want to color the stuff I didn't color before, I can use my color1 layer to color the other parts quickly.
1. Create a new layer again, and rename it to color2
2. "Ctrl + Left Click" on the color1 IMAGE to select everything that is on that layer, it will show you a silhouette in the viewport.
3. Press "Shift + Ctrl + I" to INVERT the selection, this will now select everything the color1 layer doesn't affect. Which is the parts we want (Or you can go on Select in the top menu then press Inverse).
4. While having the color2 layer selected, pick a color again, left click on the viewport with the paint bucket selected, and set the layer to color again. I picked black.
Now repeat part 1-4 on the other .jpgs in the folder.
Step 5, Modview (Extra):
Now once you have done that, let's go take a look at it in modview.
1. To setup modview. You take the modview.exe and place it somewhere, personally I placed it in my base folder. (probably not the best place, another path would be creating C:/base and putting it here)
2. Then you need to create the folder setup: models/players inside the base folder. so you can go inside the players folder as far as: "gamedata/base/models/players". Inside this folder you need to place the _humanoid folder, found in the assets1.pk3, follow the steps from step 1 to find it. This folder contains the animations for the player model in Jedi Academy, modview needs it to function properly (You can place modview anywhere, as long as the models/players/_humanoid folder is placed next to it).
3. Once this is done you take the tusken_edit folder, not the "models/players/tusken_edit" folder, just the tusken_edit folder. And place it inside the "gamedata/base/models/players" folder, besides the _humanoid folder.(or "C:/base/models/players" if you chose to use that path) Once you have done this, start modview.exe from your base folder.
4. Press File -> Open, Navigate to the "gamedata/base/models/players/tusken_edit" folder (you can copy the path directly into the text bar to go there fast). select the model.glm inside the folder and press open. When the dialogue shows up just press either yes or no, I have never seen this warning do anything at all, I usually press no though.
5. Now you can view your model in 3d space without making the pk3 file, and without having to go ingame (shaders do not work in modview, so if you want to test a shader you have to go ingame).
Modview tips:
1. Navigation: Left click drag to rotate, Right click drag to zoom in and out, Alt + Left Click drag to change focus point.
2. Press the button marked "Tex" to reload textures, if you place updated textures in the "gamedata/base/models/players/tusken_edit" folder you can refresh these without having to restart modview/reload the model.
3. In the navigation bar on the left you can open the "Sequences" to scroll through animations, this is useful for taking screenshots of the model in a particular pose, experiment with the "play, frame by frame, pause" buttons to figure out how to cycle through an animation. (Double click an anim in the sequence list to run it)
Step 6, Packing the pk3 file:
Now we have all the textures altered, we have the model_default.skin file fixed, the folders are correct, and we're all set to go.
1. go to your models folder. The one containing the players/tusken_edit folders. (Not the one used by modview if you did the extra step, the one you started editing with).
2. Right click the models folder and select "Add to Archive"
3. this dialogue will open:
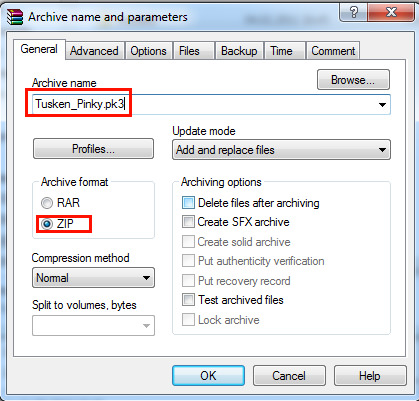
Here it's important that you select the archive format to be ZIP, RAR will not work, and set the Archive name to Tusken_Pinky.pk3, it will say .zip at first, but just set it to .pk3 directly.
4. Take the newely created Tusken_Pinky.pk3 and place it in your base folder, Start the game and select it by typing "/model tusken_edit" in the ingame console.
Congratulations! Your skin is now in the game!
Step 7, Team support and Icons (Extra):
1. To add team support to our skin, all we have to do is copy the model_default.skin, paste it twice, and rename these to model_red.skin, and model_blue.skin. If you want these to look different from the default skin, you'll have to create new textures. So for example you edit the body in photoshop, make it blue or something, save it with the name body_blue.jpg. Open the model_blue.skin file, find the place where it refers to body.tga, rename it to body_blue.tga, save and the blue team will now use the body_blue texture instead.
2. If you want a special hidden skin, like the reborn/boss. You need to create a model_"name".skin, and they will be selectable ingame by doing "/model tusken_edit/name", example: model_boss.skin ---> "/model tusken_edit/boss".
3. To make icons that work in jka, you need to have a picture with pixel size the power of 2. This means 128x128 pixels, 256x256 pixels etc. Do not overdo it on the sizes here. The default size is 128x128, but I have seen people use 256 as well.
4. The special thing about icons is that they need to be saved in a special way to work for jka, you need to go to file -> save for web. And then just save it with the default jpg/jpeg settings. Name it icon_default.jpg, for the blue and red team name it icon_red.jpg and icon_blue.jpg. if you have a special skin like the reborn/boss, you name it icon_boss.jpg, for it to be associated with the /boss.

That concludes this very basic skinning tutorial. It's kind of old now so sorry if I missed some corrections now that I looked over it and posted it here.
And in general guys, recolored skins is not something that's usually worth submitting to jk3files or similar. You have to have done quite the impressive recolor for it to be something that'd be considered really awesome xD


Recommended Comments
There are no comments to display.
Create an account or sign in to comment
You need to be a member in order to leave a comment
Create an account
Sign up for a new account in our community. It's easy!
Register a new accountSign in
Already have an account? Sign in here.
Sign In Now